- Sign In Changes: You now need to sign in using the email address associated with your account, combined with your current password. Using your display name and password is no longer supported.
- If you are currently trying to register, are not receiving the validation email, and are using an Outlook, Hotmail or Yahoo domain email address, please change your email address to something other than those (or temporary email providers). These domains are known to have problems delivering emails from the community.

XPLORx4
-
Posts
2,583 -
Joined
-
Last visited
-
Days Won
47
Content Type
Profiles
Forums
Calendar
Everything posted by XPLORx4
-
any difference from stock 235 and 265?
XPLORx4 replied to Strato_54's topic in 96-2004 R50 Pathfinders
Hmmm that sure looks like an XE to me but if you have the original window sticker that says SE, I guess you have a rare unicorn. SE models typically had alloy wheels and black fender flares and chrome bumpers. Any way, check the door placard and the vin plate on the firewall. You should be able to easily fit 265/75R15 or 31x10.5R15 on those wheels. If the gearing is 4.36, you’ll notice an immediate reduction in acceleration performance. The speedometer could also read too slow afterwards. Ideally you should probably replace the wheels with 16x8 or 17x8 wheels and upsize to a tire size in the 31” diameter range until you lift it. -
any difference from stock 235 and 265?
XPLORx4 replied to Strato_54's topic in 96-2004 R50 Pathfinders
The 97 SE models should have been equipped with 265/70R15 tires on 6-spoke aluminum alloy wheels. If you have chrome wheels and 235s you may not have an SE. You may have an XE. Check a couple of things: what is the tire size on the door jamb? look on the vin placard on the firewall near the windshield wiper motor and check for an axle code HG46 or HG43. HG46 is 4.636:1 final drive ratio and HG43 is 4.363:1 ratio. 97 Pathfinders equipped from the factory with 235 series tires (usually XE and LE) have 4.363 gears They also have a steering rack with a little more throw than models equipped with 265 series tires (usually SE). -
AC Delco variable rate springs and suspension upgrades
XPLORx4 replied to WA97Pathy's topic in 96-2004 R50 Pathfinders
You must be using a spacer lift. With a 2" coil spring lift, there is no binding or locking of the CV joints when extended all the way, because the max extension isn't changed from stock (unlike spacers, which allow 2" further extension). Manual hubs have to be engaged when you're off-roading, and you will probably break a CV joint if you extend the front suspension all the way driving on moguled terrain. -
I drove my 97 with a bad knock sensor for 15 years, so I think you’ll be ok.
-
Simple but efficient OBDII IPhone adaptable code reader?
XPLORx4 replied to MTGunner's topic in 96-2004 R50 Pathfinders
I have this adapter and OBD Fusion on my iOS devices. iKKEGOL iCar 2 Mini OBD2 OBD II WiFi Car Diagnostic Scan Tool for IOS iPhone iPad PC with Switch Auto Sleep(Black+Blue) https://www.amazon.com/dp/B00PFFG1EO/ref=cm_sw_r_cp_apip_tAdGm9tYfi2pl -
I did this already. To do so, run a 16awg wire pair from inside the cabin where your switch is mounted through the firewall. I route my wires through the diamond shaped plate where the clutch cylinder would have been attached. Run the wires (inside a wire loom for protection) along the cowl beside the brake lines and down to the fuse box behind the battery. First, pop out the fuel pump fuse. Turn the ignition to ON and using a voltmeter, check which one of the fuse terminals is hot. The non-hot side goes to the fuel pump. You will be cutting the wire on that side of the fuse later. Turn off the ignition and replace the fuse. Unbolt the fuse box. Remove the alternator wire from the stud on the fuse box. You may also need to remove the positive battery cable to give you more room to work on the fuse box. Use small flat screwdrivers to pop open the clips holding the upper and lower halves of the fuse box together. Locate the fuel pump fuse. Cut the FP fuse wire you identified earlier and connect the ends of your switch wires to the the cut wire. You should use male/female solderless connectors on the OEM cut wire in case you want to undo the mod later. Route your wires along the existing wire bundle, then snap the top and bottom halves together. Put it al back together and you’re done!
-
OD Light flashing on startup -- No speedo
XPLORx4 replied to missionstreet's topic in 96-2004 R50 Pathfinders
There’s likely a malfunction with the Vehicle Speed Sensor. -
Enjoying a 2wd for offroad use all depends on the difficulty of the trails you drive on. I would recommend avoiding all mud, and don’t drive on any roads that require steep, slow climbing since you don’t have low range gearing. Carry with you some means of self-recovery in case you get stuck. That means a d-ring shackles, tow strap or two, a hi-lift jack perhaps, and maybe some MaxTrax. Air compressor and tire deflators also.
-
IMO, installation of manual hubs is not one of the first things of importance when spending money on upgrades for a stock vehicle. Save the hundred or so dollars and put it to use elsewhere, such as better tires, recovery gear, air compressor, automatic tire deflators, or better camping gear. You may save some money on gas by installing manual hubs, but unless you drive A LOT, it'll take several years to break even on the gas savings. I would recommend installing hubs when you decide to lift it, and factor in the cost of the hubs with the suspension components when you save up enough money. It'll reduce wear on the CV boots.
-
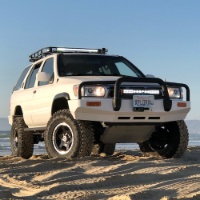
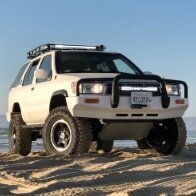
PathyDude17, excellent job on making this great video to explain the different methods to lift the INDEPENDENT FRONT SUSPENSION of the R50 without installing a drop-bracket lift or “subframe drop (SFD) lift”. Thank you!! I wish that someone had posted this info 10 years ago to spare the hassles and numerous debates over CV axle angles, why they do or do not break, what spacers do, and what the purpose of each OME spring is. I would like to add that I had a custom spring manufacturer install 2” lift springs in my Pathfinder in 1999, long before AC even sold stuff for R50’s. I have never used spacers (which weren’t even available back then anyway). My Pathy has almost 209k miles on it now. I would guess it has somewhere between 8,000 to 10,000 actual off-road miles on it, most of that on very severe rocky terrain in which tires frequently become airborne. In 20 years of off-roading, I have never grenaded a CV joint. The broken CV joint phenomenon started occurring after the introduction of spacer lifts. Granted, there are side-effects of using 2” lift coil springs, primarily “topping out” the strut, which occurs because the “at rest” position of the strut is closer to its maximum extension, allowing medium-size road irregularities, driveway humps, speed bumps, etc to cause the strut to max out more easily. The associated loud “thunk” can be disconcerting to the uninformed R50 occupant. Note again that in 20 years and over 200k miles, I have never experienced a suspension related failure due to topping out. I hope the video helps all viewers make better informed decisions on how to lift the R50 FRONT suspension.
-
Great specifications, but what orientation is used to position the angled strut spacers to the top and bottom strut bolt plates?
-
What are you attempting to achieve by replacing the headlights with inexpensive LED bulbs? Do you just want to reduce the electrical load on the headlight circuit? Do you want better lighting of the roadway ahead? Just going for a "cool" look? IMO, if you don't care about lighting the roadway ahead of you, just about any set of cheap LED bulbs will do. Just pick what color temperature you want. If you want reliable, long-lasting bulbs that will provide good light distribution on the road (instead of just random glare), you should bite the bullet and spend a little more money on bulbs such as the ones mentioned above by GTR lighting. I have a set of the GTR lighting LED bulbs in my Sequoia, and they are very good. (My R50 has HID projectors, so no LED for me.)
-
Hey, also re: your comment about needing/wanting a manual transmission. My opinion is DON'T DO IT! Especially not with 2.02:1 low-range gearing. You will burn up or glaze your clutch on your first trip out. In watching your throttle control, I noticed that you seem to be on and off throttle too aggressively and frequently, which gives the impression that you want to over-drive it. I think this is a function of not having enough torque to get over the obstacle. It's as if you're driving in 4H, not 4L. Get the crawler gears if you love your rig and want to keep wheeling it on that type of terrain.
-
Hawairish, both sets of crawler gears require grinding the T-case. I opted for the 3.7 AC gears because they were less expensive at the time, and I had already developed a good relationship with the owners at AC over the years. (3.7:1 crawler gears installed circa 2006.) I did not perform the modifications myself, having delivered the t-case to a drivetrain shop, who did the work on the bench. I did this because I lack the tools and expertise to handle that kind of work. Furthermore, I wanted the work to be covered by a labor warranty in case something went horribly wrong. FWIW, I was able to drop the t-case in my driveway using basic hand tools. Access to the top bolts holding the t-case to the transmission was difficult, and I found it relatively easier to get to them from inside the cabin than from underneath. Therefore, I removed both front seats, the center console and a significant portion of the lower dashboard to remove the floor plates over the shifting mechanism. The front passenger compartment looked like multicolored spaghetti. I had a friend's help removing and reinstalling the t-case using a floor jack. Access to a 2-post lift and a transmission jack would make the job much easier, and may avoid the hassle of disassembling the interior of the truck. I cannot even comprehend how frustrating and painfully aggravating rock-crawling would be in my R50 without the crawler gears. I probably would have driven it deliberately into a rock or tree by now out of sheer frustration. A couple notes about the crawler gears: they do make a slight whining sound at low speeds, even in 2H. The low-range gear in the t-case always rotates,, even if it is not engaged with the front driveline output. In low-range, there is significant gear whine, but I'm used to it. If traversing a trail benefits from faster speeds (such as between major obstacles), it's really not much fun to drive in 4L ("D" w/ OD ON), because max speed is only about 35mph before you feel like the engine is over-revving. So, you need to fully stop, shift to "N", shift from 4L to 4H, then get going again. Anyway, I am sure you'll make a sound decision with regard to installing crawler gears. If you opt not to install them, try the techniques I recommended earlier and see if that helps improve your trail finesse. PS. Nice rear bumper! PPS. Bucket list item: it would be cool for me to make a road trip down to AZ some day and have a meet-up. I'm sure there are lots of things we could learn from each other. I'd love to do some wheeling in Sedona.
-
Hey, so Hawairish, I just stumbled on this thread and watched your videos. Here's my take on the issue. I don't think what you noticed has anything to do with the drive-by-wire system. It has everything to do with the torque converter and the insufficient low-range gearing of the stock transfer case. I don't know if you have the TX10 part time case or the TX14 full-time case, but neither t-rcase really has low-enough gearing for the kind of terrain and obstacles you are driving on. Before I installed my crawler gears into the TX10, I used two techniques to counter the poor performance in 4L on that type of terrain. First, I used the e-brake engaged part-way. This allows for controlled crawling up and over an obstacle without the quick and potentially damaging drop afterwards as the suspension compresses. You essentially drive using only the gas pedal, fighting both the obstacle's and the e-brake's resistance to tire rotation. Another technique I use (and still do, even with the crawler gears) is left-foot braking. I try to apply firm, but light consistent pressure on the brake while finessing the gas pedal. Don't let the obstacle determine how smoothly you make it over, let your feet do the "walking". That being said, if your off-roading will continue to involve obstacles such as the ones in your video, and you have the part-time transfer case, I would strongly recommend swapping out the 2.02:1 low-range gears for at least the 3.7:1 gears sold by 4x4parts.com. These totally transformed my enjoyment of rock-crawling over challenging terrain such as the stuff you're driving on. (Plus, they enabled me to actually crawl at high altitudes, where the 3.3L engine has only about 125HP.)
-
Try checking page EL-84 and following in the service manual, linked below https://www.dropbox.com/s/pafywl7qwwmpj0t/EL.pdf?dl=0 If you can not determine which wire disabled the tach, you could remove the cluster, pop off the clear plastic cover and remove the needle from the tach.
-
If the light says “Service Engine Soon”, this is called the Malfunction Indicator Light and is triggered by a fault in systems that affect driveability and emissions. The error code can be read by an OBDII scanner. Usually disconnecting the battery resets the error stored in the powertrain control module unless there is a pretty severe malfunction. This would typically be observed by poor driveability.
-
The R50 front grille, fenders, hood, and headlights were given a “facelift” in late 1999 and this was introduced as model year 1999.5. It’s likely that a fender that is advertised to fit up to 2004 models will not fit your 1998.
-
The tire pressure indicated on the door jamb only applies to stock tires and wheels, stock suspension, and stock weight. If you change any of these, throw that tire pressure recommendation out the window. I haven't run the doorjamb pressure (26psi) on my Pathy in over 20 years. The best way to determine ideal tire pressure for your rig is to do a chalk test.
-
Rear control trailing arm replacement instructions
XPLORx4 replied to DonutHands's topic in 96-2004 R50 Pathfinders
You can replace the arms with the wheels on the ground, but it's pretty tight under there and it'll be hard work. No matter how you choose to do it, replace ONE link at a time. You will likely need a ratchet strap to help move the axle to line up the bolt holes. -
Reverse lights went out now the car won’t start.
XPLORx4 replied to Ole_Rosie_R50's topic in 96-2004 R50 Pathfinders
Sounds like the ignition system thinks the transmission is not in Park. Check fuses first. -
Yes. You first need to remove the dash bezel (2 screws on the bottom, and tension clips above the vents). Then pull off the fan speed and temp control knobs. The faceplate pops off to reveal the bulbs.
-
Yes, I have done it. All of the instrument cluster and AC control lights in mine have been converted to white LED (which ends up looking slightly bluish due to the color temperature.) They dim just like the OEM bulbs. I think I got mine at superbrightleds.com. Sorry, it was so long ago that I forgot which bulbs I used, but you will want to choose bulbs that have the greatest number of LEDs mounted omnidirectionally.
-
What are the conditions under which the vibration occurs? Vibration could be caused by worn U-joints. It could also be caused by the slip yoke not being sufficiently engaged with the splines of the output shaft. This would be more likely with a large suspension lift. It's not too hard to remove the rear driveshaft. Before you do, wiggle the front of the driveshaft near the slip yoke. If there's a lot of play, that could indicate the slip yoke needs to be slid over the output shaft more fully. You'd need to lengthen the driveshaft or somehow make a pinion yoke driveshaft spacer to fix it. Check for worn U-joints by rotating the driveshaft and watching for slop in the U-joints. To remove the driveshaft, remove 4 17mm nuts/bolts holding the driveshaft to the pinion yoke on the rear differential. Once the driveshaft is free from the pinion yoke, you should be able to easily slide it out of the transfer case.
-
It’s 3 pieces. Slip yoke, main shaft, and pinion yoke.

