- Sign In Changes: You now need to sign in using the email address associated with your account, combined with your current password. Using your display name and password is no longer supported.
- If you are currently trying to register, are not receiving the validation email, and are using an Outlook, Hotmail or Yahoo domain email address, please change your email address to something other than those (or temporary email providers). These domains are known to have problems delivering emails from the community.

XPLORx4
-
Posts
2,583 -
Joined
-
Last visited
-
Days Won
47
Content Type
Profiles
Forums
Calendar
Everything posted by XPLORx4
-
Pathfinder Deluxe Suspension Package 2" Lift
XPLORx4 replied to CanadianPathyNut's topic in 96-2004 R50 Pathfinders
Well, you really gotta figure out what kind of off-roading you do. If your truck is driven on a daily basis, and you don't do a whole lot of agressive off-roading, you're better off with a less agressive tire such as the BFG AT or the Bridgestone Dueler AT/Revo. AT tires are less expensive, quieter, last longer, have better highway manners and get better gas mileage than MT tires. Plus, your ride is pretty blingin' [that's a compliment] for MT tires. Unless you only want MT tires to add more bling (which IMO is being a little too poseurish), go with an AT tire like the ones I mentioned above. On the other hand, if you plan to regularly get your truck dirty, aren't afraid of paint scratches or (gasp!) a dented step-rail or two, and are on your way to building a serious 4x4, the BFG MT or the Goodyear MTR are excellent choices for daily driver/weekend warrior rigs. -
Pathfinder Deluxe Suspension Package 2" Lift
XPLORx4 replied to CanadianPathyNut's topic in 96-2004 R50 Pathfinders
Super Swampers are probably the best mud tires. What kind of mud to you intend to drive through that requires top-of-the-line mud tires? -
Sliders and NEW Bumper of to the powder coaters
XPLORx4 replied to snosnk's topic in 96-2004 R50 Pathfinders
snosnk- Ahh, I thought you did the work yourself! How much did CBI charge you to fab the bumper? I may try to find a shop locally that can do something similar (if the price is right!) -
If tire balancing doesn't solve the problem, then I'd start checking other steering and suspension components such as the ball joints and tie-rod ends. It's a bit odd that the vibration is short and only occurs at certain speeds.
-
Sliders and NEW Bumper of to the powder coaters
XPLORx4 replied to snosnk's topic in 96-2004 R50 Pathfinders
Wow, nice work, man! I like how you integrated a receiver hitch into the bumper design. It looks like you gained an extra 5 degrees of departure angle! Does the spare tire carrier still latch onto the original factory location or did you have to fab up a new latch for it? Also, do you have any gusseting or reinforcements for the "wings" that wrap around the rear corners? If you hit one of those on a rock and it deflects, it will surely munch the bodywork. I've been wanting to replace my rear bumper with something very much like what you've designed, except for me it would have to include a provision for a spare tire carrier, since my truck lacks the OEM carrier. -
Since you have a 2WD it's not CV joints. It may simply be an out of balance tire.
-
Just get the Nissan bearings. Your local dealer should have them for ~$25 each or you can order them online. Part number 54325-0w000 See this diagram to see where they go:
-
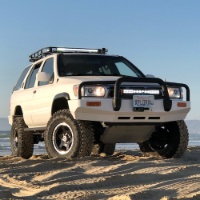
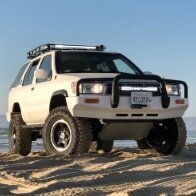
Nice looking ride, pathmaker. I take it those BFG MT's are 285/70R17. I'm impressed you managed to squeeze those babies in there. The clearance between the front tire and the fender (where the mud flap attaches) looks really close. How much sheet metal (fender) did you have to trim back? How did you get those tires home from the tire shop if they were rubbing so badly? Be sure to test tire clearance with the truck twisted up. You may find that the rear tire contacts the front part of the rear fenders. Where do you off-road mostly?
-
Using a trunk release solenoid to have a keyless rear-glass-open feature would be nice. If you install 2 solenoids (one for the hatch/glass lock mechanism, and the other for the hatch-release) you could have the best of both worlds!
-
If you want a more protected way to run the lights for your roof, you can run them through the existing wiring harness boot. This might be too much trouble for you since you've already got something working, but it's just a tip for others. http://www.xplorx4.com/Pathfinder/upgrades...ghts/wires2.jpg (For some reason, this site capitalizes "Pathfinder". You'll have to change "Pathfinder" to all lowercase in the URL to see the image. [edit: thanks Pezzy]
-
Nice truck, man! Do you have any rubbing problems with those tires? Do you find a noticeable improvement in articulation with the swaybar disconnected? I've never disconnected mine and it doesn't seem to make much difference either way. I've removed the front swaybar on my truck, and that makes a HUGE difference off-road.
-
Do you want a scan tool or a code reader? Scan tools are pricey, but code readers can be had pretty cheap. Search ebay for "obd code reader" for the best deals.
-
Hopefully you've released the parking brake. If your brake drums are not severely worn/grooved, you should be able to slide the brake drum right off the lugnut studs. If not, there are a couple of holes in the brake drum into which you can insert a bolt (metric size, sorry I don't know the size or pitch of the threads) and as you tighten the bolt, it will push the drum away from the wheel hub.
-
Help ! Coolant Leak/ Water Pump failure ???
XPLORx4 replied to IndianRider's topic in 96-2004 R50 Pathfinders
The timing belt is due for a change at 105K miles, and the water pump is usually replaced at the same time. You're close to that mileage already, so it could be that the water pump is finally giving out on you.