- Sign In Changes: You now need to sign in using the email address associated with your account, combined with your current password. Using your display name and password is no longer supported.
- If you are currently trying to register, are not receiving the validation email, and are using an Outlook, Hotmail or Yahoo domain email address, please change your email address to something other than those (or temporary email providers). These domains are known to have problems delivering emails from the community.
Leaderboard



Popular Content
Showing content with the highest reputation on 07/16/2019 in all areas
-
Broke comments about camber bolts off into their own thread.2 points
-
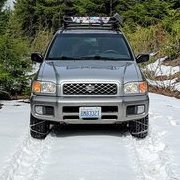
Good question and something I never addressed. If you scroll back you'll see the pics I took of the long junkyard Yakima bars I got. The basket is mounted to the factory rails, which on my model are a bit higher than some others. The cross bars then fit underneath and mount straight to the roof rails, the length is long so they extend out enough to mount the kayak. Works well and I can remove the bars if I want, but I've just been leaving them.2 points
-
Id recommend changing the water pump while your there. Especially if its never been changed. Sent from my LG-H700 using Tapatalk1 point
-
When I left mine exposed I got an intake full of water rather easily. I'd suggest ditching it, plugging up the hole in the bottom of the airbox, and putting a new hole (covered with mesh) on the top of the airbox. Should be nice and safe from water intrusion that way without having to buy an expensive snorkel.1 point
-
Powerstop Z36 HD pads. I tow a large trailer and go off road recreationally. They are fantastic pads that have a lot of bite and have worn well. Not much brake dust at all and dont off-gas much when they get a workout like lots of pads will.1 point
-
A visual inspection would not be a bad idea. Look for cracking on the back of the belt and evidence of oil or coolant leaks from the cam/crank seals and water pump. The spec in the manual is around 105k IIRC. I haven't found an age limit from Nissan, but seven years sounds reasonable. Yours is old enough to buy beer. Good luck!1 point
-
Goodies Finally all arrived!!!1 point
-
Engine should be at the highest point. The bleeder nipple is at the back of the motor near the firewall sticking up behind the intake plenum. It has a rubber cap on it. Heater fan should be blowing on hot/high1 point
-
Yeah, we’ve developed a really nice collection of People with 6-8 core R50s and a handful of peripheral ones along with close association with@hawairish & his folks down the in the SW.1 point
-
That's really cool seeing all the R50's in one spot. And it's awesome to see everyone pitching in to help out a fellow brother. As far as I know, it's just me and onespiritbrain in our neck of the woods. Mrelcocko is just a few hours away. Would be cool to get an east coast group photo like this! Sent from my SM-J327P using Tapatalk1 point
-
Another Pathy Party (5 this time)! Yesterday started as a Pines to Spines Offroad SubFrame Drop test fitment party on the Gambler 500 rig; however, after taking this picture, the guys all said my front end was such an eyesore that something had to be done.(@TowndawgR50 , [mention=40509]pathy_02[/mention],[mention=32880]ferrariowner123[/mention])1 point
-
1 point
-
Many R50s have what’s called a diversity antenna in the front windshield. This is in addition to the whip antenna and is meant to improve signal capture. You can see it running up the midline of the windshield. As an FYI, you can see these in many other vehicles though they often put them in the cargo area side windows (they are those things which look like defrosters on the cargo area windows of 4Runners & other vehicles).1 point
-
They took my parking spot [emoji2369] Sent from my SM-G960U using Tapatalk1 point
-
Probably the easiest, hassle free choice. While it may be repairable a new axle assembly will pop in fairly easily and quickly solving your problem all together. Afterwards by all means take apart the damaged axle and diagnose the problem, fix and keep it as a spare since both driver and passenger sides use the same part. Ive never seen an axle cleanly come apart at the joint like that. They tend to fail at the joint itself and have significant damage as a result so it would be beneficial for everyone to see what happened here.1 point
-
I ordered a new axle should be in within a week or 2. Sorry to inconvenience everyone, im just not use to the big SUV life. I have a background more with BMW’s and am much more familliar with those (coupes and such).1 point
-
If anyone is interested I can do the balancer mod for the v belt swap on the 3.3. I am a machinist and I have the 5mm broach to open the keyway after the bore is increased.1 point
-
It's super easy on R50's, for the rears just hit then out with a hammer, get some washers, and an impact and pull the new ones in. Fronts are a little more complicated, but same basic concept. -Kyle1 point
-
Not sure if you got around to doing this or not, noquarter89, but replacing the front isn't too bad. As NissanBoston mentioned, you do have to remove the wheel hub assemblies because there's not enough clearance to remove the studs once loosened. I did it in about 2.5 hours (tires off to tires on), replacing all 12 front studs. I have moderate/high mechanical skills and only hand tools, a floor jack, and some stands. The only specialty tools I used were ring pliers (I think just for the manual hubs I have, don't recall), a Harbor Freight ball-joint separator (p/n 99849), and torque wrench. (The ball joints do not need to be separated, but I used the tool to pop the wheel studs out.) Removing the wheel hub bearings usually requires special tools, so take the following at face value: I've only needed (for a Nissan anyway) nothing more than a couple metric machine screws, a Phillips and flat screwdriver, an awl, large sockets, and a rubber mallet or mini-sledge to remove and install them. You'll obviously want to be familiar with the process, especially during re-installation (you'll need to ensure the bearings are seated, and that the safety washer is appropriately secured...you will tighten it to spec and then back it off just a little). Removing the wheel studs just requires the ball joint separator and wrenches/sockets (resist the need to use a hammer). Installation's done with a thick washer, and some open-ended acorn-style lug nuts (cheap, disposable), and a torque wrench. If you don't have a vice (like me), you can just replace one stud at a time and use the other studs (with a lug nut and wrench) to give you some leverage.1 point