- Sign In Changes: You now need to sign in using the email address associated with your account, combined with your current password. Using your display name and password is no longer supported.
- If you are currently trying to register, are not receiving the validation email, and are using an Outlook, Hotmail or Yahoo domain email address, please change your email address to something other than those (or temporary email providers). These domains are known to have problems delivering emails from the community.
Leaderboard



Popular Content
Showing content with the highest reputation on 03/25/2019 in Posts
-
Making it's way thru the SW Sent from my SM-G960U using Tapatalk4 points
-
Day 4 of our roadtrip, visited Arches National Park Sent from my SM-G960U using Tapatalk3 points
-
Sent from my iPhone using Tapatalk3 points
-
It was the timer. Replaced with a junk yard box and all is good. Thanks all.3 points
-
oops, forgot the pic. Sent from my iPhone using Tapatalk2 points
-
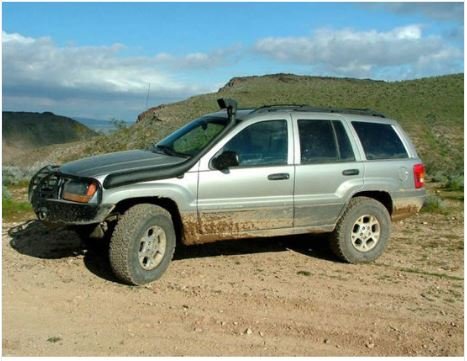
Anybody seen one of these in the wild? https://telawei.en.made-in-china.com/product/HsUEGnYumkVJ/China-Snorkel-for-Nissan-Navara-D22-Terrano-2-Pathfinder-R50.html - $40 a piece 10 piece minimum order https://telawei.en.made-in-china.com/product/DNREMJpbJkcU/China-Telawei-Snorkel-for-Nissan-Navara-D22-Frontier.html or these might be a bit better. Not sure about fittment and quality etc. but they are cheap enough if a few of us wanted to go in and get a minimum order, we could save some money if they work out. Thoughts?
 1 point
 -
heres my extended bump stop, anchored to the lower perch using a 4.5” bolt and a nut on the underside. 4” would’ve been better but oh well. Bumpstops are now about 2” longer1 point
-
in order for my jackstands to stay flat on their feet, I put the front up on ramps with the hubs engaged and left parked in 4WD. If only she was this tall all the time1 point
-
Gotcha. Keep us posted with the results.1 point
-
Thanks! I really appreciate that. I tend to be pretty impatient once I get going on a project though, so I already tracked down what I need for the steering and have that on the way, and I’ve got a stack of metal in the garage waiting to be cut and welded so I’m good to tackle this on my own from here.1 point
-
By all means go for it. It would be good to know that it is an option!1 point
-
My 93 is my Jezebel, so that is her name. Jezzi for short.
.JPG.29bc49fb6baed1423f6e4ef07a60865f.JPG) 1 point
1 point -
The options are..plastic backed for sewing..iron on...and Velcro... Same price regardless.. I'm good with Velcro..1 point
-
That's the idea. If the valve is bent, the spring can't pull it up as far, leaving the rocker arm a little slack when the valve's closed... though now that I think about it, I'm not sure how much bend the hydraulic lifters might be able to fudge for. The compression test is a better idea. I think you can rule out the belt. If the lack of fire in #1 was because of incorrect cam timing, #3 and #5 wouldn't be hitting, either.1 point
-
April 2017 trip to La Grange OHV Meeting up with the rest of the guys.1 point
-
that’s honestly good to hear. i’ve been thinking the noise had to mean something was wrong everything’s still tight. i do i need a good cleaning. its safe to spray paint that area after a good wire brushing of rust away, right? i start work again this week, so at least money comes in soon! first things i’m doing is going to good car wash then ordering manual hubs and going to lowe’s to get metal for that missing link.1 point
-
Ducting before airbox is gone. Had been running fine in spite of that.1 point
-
Maybe it’s running like @!*% for a different reason.1 point
-
Can’t imagine it’s too different1 point
-
Oh. That explains it. The DTC is P0113 though.1 point
-
1 point
-
That looks awesome!1 point
-
Nice scenery!1 point
-
Trip Report - Quilcene Went on a quick little spring exploration mission. Didn't have high hopes of any elevation since we had a pretty heavy snowfall recently so I planned some lowland stuff. Ended up being much drier than I anticipated so I made a run for an old firewatch location out near Quilcene. Towards the top I had to cable-up to get through some deeper snow in the shadows, but honestly it wasn't anything too nasty. Minimal to no snow (other than ~6-12" in shadows) all the way to the top at about 3200' of elevation. Overall I found a couple decent campsites, cruised some easy backroads, and checked some gates/dead-ends off my list so I know not to waste my time in the future! I use GaiaGPS to plan and track all my trips. I'm definitely getting my rhythm down. Work gloves with latex gloves inside help keep my hands happy while chaining. A pad to kneel on helps a lot as well.1 point
-
My 96 SE. From rags to riches. Sent from my SM-S737TL using Tapatalk1 point
-
Many years ago, I broke a rear swaybar endlink while I was in Moab. Couldn't see anything wrong because while the truck was sitting still, the ball end would go back into its socket. After getting pulled over and having the nice officer explain to me that when going around corners, it is not legal to have 2 tires up in the air, I decided I had to find the problem. when I grabbed the link and pulled, it popped apart and I found the problem that time. New link and I didn't have the sway anymore. I have also had to replace the rear link bushings for wear causing odd handling issues. Have to do it again actually. My right rear shock dumped all its oil about the time I wound up parking my Pathy for a while and I have noticed it has become a bit squirrely due to that. I will also admit that my truck is in rough shape since she has been neglected for the last 4 years and I am just getting back into working on it. 3" body lift and 4" suspension lift in the rear with soft springs have made things really noticeable.1 point
-
The spacers fit great over the strut and sit well on the bottom perch. I welded them to the perch to hold them in place. The new springs at 250lb spring rate are waaay stiffer than the stock springs. I ended up setting the spacer all the way at the lowest setting (as determined by my own arbitrary trimming, lol). The free height of the spring and spacer combination is 14.5” as installed and it ended up giving me way more lift than expected. Ground to fender measurement was 36.5” pre-install, and 39” after. So I got 2.5” additional lift. That really wasn’t what I was looking for, but...I’m happy with it. I’m planning to add a winch soon so hopefully that will pull it back down a little bit. I already have one set of camber bolts, (each strut has one regular and one adjustable bolt) and I was able to get the camber close but it’s still off. I need both bolts to be adjustable now to get it where I need it, so I ordered a second set of camber bolts that should be here tomorrow. The ride quality is fantastic. It feels so much more stable and planted now, soaks up speed bumps and potholes no problem, and doesn’t have any nose dive when braking. I’m seriously impressed with the ride! The only big downside is that I seriously need a SFD now! The stance and ride of the truck is where I want it, but the CV angle is atrocious. I have manual hubs so there’s no worries with regular driving, but I need to do the drop before doing anything serious off road. Unless Towndawg and Hawairish have things available soon I’ll probably fab something up myself. I don’t need to do anything more with the struts, just need the sub frame and engine blocks and steering shaft extension. Sent from my iPhone using Tapatalk1 point
-
It turned into a long day, but I got the springs installed yesterday! First of all, I’ve found it hard to find good info on the specs of the stock front springs, so I took some measurements to share. Stock front coil spring, 2003 SE: Free height 15.25” Top inside diameter 4.5” Bottom inside diameter 6” Measurements when mounted in strut: Unloaded height (no weight/supported on jacks) 10.25” Loaded height (full weight on suspension)8” Sent from my iPhone using Tapatalk1 point
-
here is a new one. the guy used electrical tape to tape the single din car stereo to the pocket,. then since he did not have the bracket to mount it in. He used expanding foam to hold it in. I almost drove the car into a ditch and left it after finding that GEM. Took me almost 4 hours to cleanup that mess1 point
-
1 point
-
1 point
-
I must be colorblind cause what I thought was red spray paint turned out to be burnt orange, but that’s not anything $6 can’t fix.1 point
-
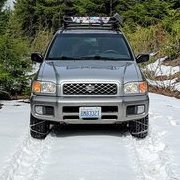
Really well thought out and executed build! Also really love that it's not a mall crawler, that it actually gets used regularly for it intended purpose. Really like the more utilitarian looks of the 1st gen R50's, makes me regret selling my 96, should've kept it to use as the beach cruiser/woods bomber. And I'm jealous of all the "playgrounds" you have around you, we've got nothing like that here, closest orv park is 6-7hrs away...1 point
-
Beautiful truck1 point
-
One important thing about #1 that I forgot to mention is that the rear of the chassis is also supported by jack stands. That is, you need 4 jack stands and a good floor jack to do this. In the first pic, the red jack stand set is used for supporting and pivoting the axle, but there's also a silver jack stand set (the driver's side one is just visible over the floor jack) that the truck is resting on them. Amended (clarified) instructions: 1. Lift the rear of the truck and use jack stands to support the rear chassis. There are oval-ish jack/support pads under the rear passenger doors on the unibody rail. Height of the truck depends on your jack stands...lift as high as possible, reasonable, and safe. I've used blocks to gain a few more inches to my basic 2-ton stands (it becomes especially helpful if installing lift springs and/or spacers). A proper floor jack (2.5-ton+) is capable of lifting the entire rear of the truck just by placing the jack directly under the rear diff. 2. With chassis supported, lift the rear axle and support both sides with jack stands on their highest setting. Position the jack stands under the lower spring perches, leaving enough room for your jack between the jackstand and axle end. 3. Remove the tires 4. Disconnect the shocks at the bottom, or remove them altogether. 5. Place your floor jack near the end of the axle. Lift the axle up enough to clear the jack stand, then remove the jack stand from the area. 6. Slowly lower the jack, allowing the axle to pivot on the opposite jack stand. Watch for line stretch if applicable. 7. As the end of the axle gets lower, the spring will decompress, and eventually loosen in the seat 8. When the axle is as low as reasonable, you should be able to lift the spring up to clear the lower perch, then tilt the bottom out and slide the spring down off the bump stop. (In my pic, the axle is resting on the drum, but that hasn't always been necessary if you can get the chassis supported high enough.) 9. Re-use the rubber spring pieces and install the new spring and/or spacers by reversing step #8. 10. Lift the end of the axle with the jack until axle, put the jack stand from step #5 back in place, and lower the axle onto the jack stand. 11. Repeat steps 5-10 on the other side of the axle. 12. Once both springs are in, reconnect/install the shocks, put the tires back on, and lift the truck off all 4 jack stands.1 point




.thumb.jpg.3351162271e2c1bf86fe7c0c7e657df0.jpg)