- Sign In Changes: You now need to sign in using the email address associated with your account, combined with your current password. Using your display name and password is no longer supported.
- If you are currently trying to register, are not receiving the validation email, and are using an Outlook, Hotmail or Yahoo domain email address, please change your email address to something other than those (or temporary email providers). These domains are known to have problems delivering emails from the community.

johann_peralta
-
Posts
312 -
Joined
-
Last visited
-
Days Won
19
Content Type
Profiles
Forums
Calendar
Everything posted by johann_peralta
-
A 1-1.5" wouldn't work for my design. It has to be no less than 3ish inches. I don't have any pics
-
although i am running a sfd, it wasn't related or installed because of the sfd. it was a lift i built, mocking an f150 crossmember drop lift. my diff is dropped 9-10" total. the only thing i ran into was the trans support crossmember. i notched it out a little bit and then the driveshaft cleared fine. depends on the type of suspension you are running
-
I made a diff drop a few years ago for my r50. its not blocks. Its two brackets that bolt into the 8 diff bolts ( 4 on each side). Its a 3-4" drop. I did it because after the lift i made for my pathfinder the cv axles were a little steep. the diff drop brought them back to near parallel to the ground.
-
Gonna try to use the stock location on the axle, i'll post some pics as soon as I get them setup. Looking like they'll go up onto the rail.
-
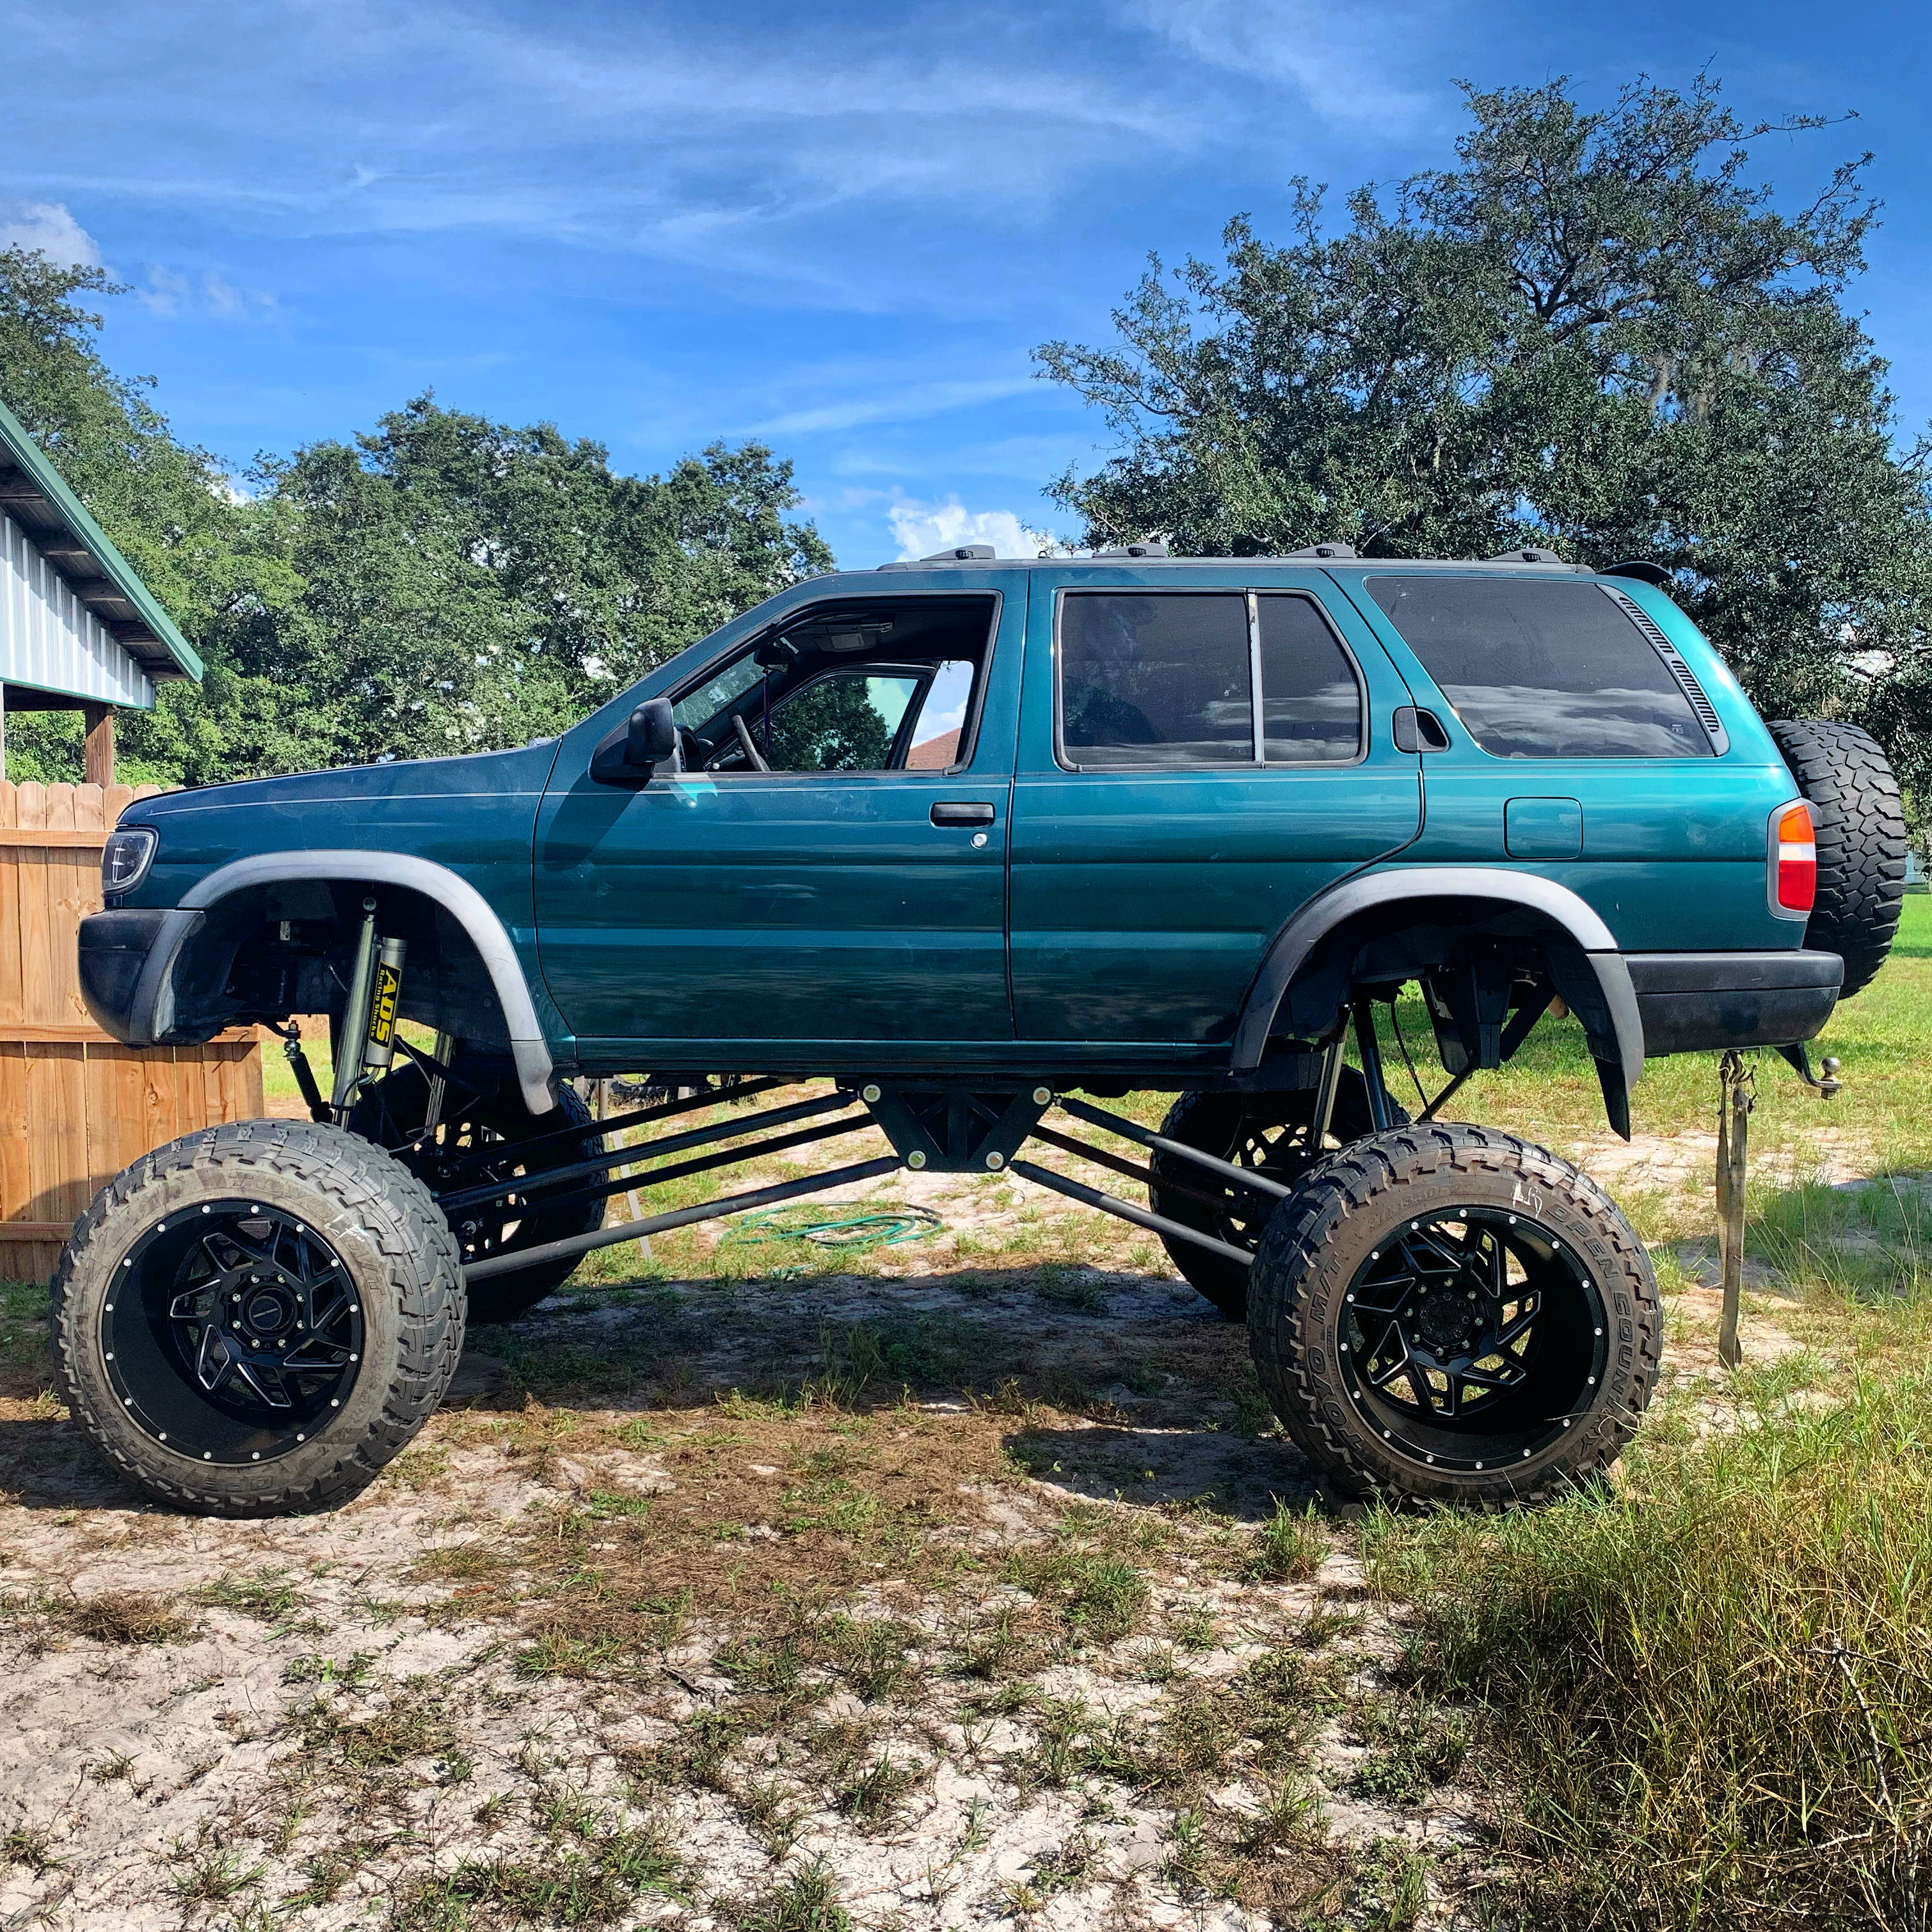
Well here she sits "done". I need to go back to trim & adjust some little things, paint the links and some brackets, double check everything is tight, etc... I broke the radiator while cutting the brackets for the steering box off the rail, so once I get a new rad in, it'll be hitting the backyard for a test drive!
-
2002 Pathfinder...the long road to recovery (build)
johann_peralta replied to system_f's topic in 96-2004 R50 Pathfinders
I made a diff drop that was 3-4". it isn't giving me any lift, but with my suspension it was necessary to keep the CV axles flat. It may fit also as a POSSIBLE replacement for the 6 subframe blocks in the SFD application. Not sure the consequences of having the CV axles and control arms at a different angle however. Maybe they'd hit the control arm? maybe not. Someone should try them and report back. -
I'm looking for a used set now. Maybe 35-40". Whatever comes across first.
-
Almost done with the SAS
-
got the rollers on today. Used the 5 to 6 lug adapters to get the r50 pattern to work. Figured if i'm going to use spacers they will be done right. Loktite and torque wrench. Upper links all set up, and then got rid of the jacks! Finally on its own weight! Tomorrow i'll finish the bottom links and the trackbar bracket hopefully. Drilling the knuckle and pitman arm to run heim steering also. Those are 235/65/15 incase you are wondering.
-
welded up a tube inside the coils so that the top end cant wiggle around or fall out for that matter. The spring's rubber pad thing (I forget what the part is called) slides over the tube snug as a bug in a rug. Also made some brackets for the bumper since the old ones were total junk (can see how the old welds burnt through the metal right above the eye's hook). Luckily I had a piece of 1/4" sheet metal laying around. Got the airbag/intake back in and re installed the bumper. It's a TJM bumper that came with it when I bought it. No others markings on it other than the sticker on the top right, so not too sure what it was for originally. Im gonna flap the front middle piece of the bumper and paint it over. Once I get the winch mounting plate ill install the 12k winch I have in the trunk.
-
2002 Pathfinder...the long road to recovery (build)
johann_peralta replied to system_f's topic in 96-2004 R50 Pathfinders
As for the alarm going off randomly, perhaps one of the door sensors is causing this. It happened to two of mine when the rubber boot wore thin. I put a 3m rubber pad on the door where the button pressed on ( one per door) and this solved my alarm issue. Also, I made a diff drop a few years ago for my pathfinder. Its a 3 or 4" drop. Completely bolt in and didnt have to alter the original stuff. Interested in pictures? -
Thanks for the tip! I'll have to do some research on that.
-
Today I finally ordered the Heim kit and got the coil "buckets" test fitted up. I plan on gusseting them and tying them into each other.
-
I finished up the 4 link brackets today. They are bolted in and then the reinforcements are welded in with a few passes. Ive never done anything like this before so i'm more than willing to take in come ideas from y'all. Thanks!
-
Follow it up a little more and you can find two bolts. Id recommend finding a back section with no rust at a JY, and replacing it.
-
So here is the trackbar bracket and crossmember. Its two sheets welded onto a frame reinforcement. I will show later on how ill finish the crossmember. debating on welding a top and bottom onto it, or just put bars in between. not sure yet... It sits higher than the oil pan and radiator/condenser, so i'm not too worried about it catching on anything. I then decided that anything that was welded to the frame was also gonna have a bolt or two running through it as a back up. Just incase. So the engine mounts, and all the frame reinforcements got a bolt or two through the frame. Here's how I ran a bolt through the new crossmember as another reinforcement. The bolt on the left is off center because i wanted it to go through the frame reinforcement also. If I would've planned this better, I would have extended the reinforcement to the left further and then centered the bolt. It'll do though. I did the same on the other side and in the back. These angle bar were 3/8" thick and took 2 cut off wheels just to make each piece... super annoying to cut with an angle grinder! PS, everything is being cut with an angle grinder, so lines won't be perfect.. I cleaned up both sides of the frame on the outside, and drilled the reinforcements to fit the existing holes (I ended up removing the abs bracket and cleaning further up into that corner but didn't get a picture). Ill weld them in tomorrow most likely and mount the coil buckets to these.
-
Its from an 00-01 grand cherokee v8, Im gonna regear to match the rear. 4.56 is the closest to 4.63 that i can find.
-
That axle under the car? Its for the white pathfinder in the pictures above.
-
So today I did a little more work on the r50. I started off by making the steering link to go from the steering wheel to the Jeep steering box. I sleeved it with some SUPER thick tube, and drilled holes in the tube so I could weld in the holes. Once all welded I Painted it black and installed it. Next I welded up the steering box reinforcement plates I had a custom power steering line made at the "local" hydraulic shop. Runs from the r50 power steering pump to the Jeep steering box. The return line I just used hose clamps for, as that is what the original used on the jeep. I have to make a little retainer bracket to hold the "loop end" of the hose, so its not swinging around or rubbing onto anything. Ill bolt it onto one of the oil pan bolts. I rolled the axle underneath the car for the first time! as it sits, i'm content with how well things are lined up. I make a cardboard template for the trackbar bracket, but forgot to take a picture. More than likely ill get that all welded up and installed tomorrow. https://imgur.com/a/BuJnL26 Things left to do: cut out the trackbar bracket and weld it on, make/buy longer trackbar, weld on 4 link brackets, weld up 4 links, make coil buckets & frame reinforcements in that area, install custom brake lines & purge system. probably missing some stuff here and there, but its been a long week lol ALSO sorry that these pictures have been coming up sideways and upside down.... I haven't any idea how to fix that. Ill try a different website next time to get picture into a URL form. Pictures are too large to use the "drag files here to attach , or choose file" option. Sorry!
-
Hello, My name is Johann and here is what I've been up to lately (SAS). I've been collecting parts for the swap for close to two years now. Mostly waiting on good deals on parts and tools. Recently I was gifted a motor picker, and that was one of the last tools I needed to start the swap. So about 4 days ago, it began. A few months ago I bought a 97 pathfinder for 300$US. It had shot wheel bearings up front, and as expected, very worn down suspension components up front. The ad had no pictures so I had no idea what i was going to go look at... As soon as I saw that is had a steel bumper, I knew I was buying it. Its a manual, and runs fine, other than suspension issues up front, which made it the perfect candidate for the SAS I've wanted to do for years. So soon after i acquired a hilux snorkel for free and mounted it to the r50 A few days ago I moved the big pathy (my green one) out of the shed, laid down some wood, and backed up the white one to be stripped down. It took about 5 hours, but I got the car way up on jacks (the jacks are welded to the rims and tires are flat) and removed the entire subframe. That subframe is WAY heavier than I thought! So the subframe is what holds the motor up, so to remove the subframe, I put a thick strap around the motor, and a jack under it (to hold it in place). Next I got the motor mounts I made and temporarily installed them to make sure they fit. I then decided that the frame was going to get reinforced anywhere that something was getting added. so I added a piece of steel behind it. These motor mounts were then welded in. I then did the same exact thing on the other side Once they were welded in, the motor was now being held up with no subframe! This was the hardest part so far because there was barely any space under the car with the jack in the way. Now with the jack out from under the car and with more space, I started cutting and removing all the old steering stuff. everything from the firewall up was removed. there are two little brackets holding the original steering bend box (90*, not sure the specific name for it). I cut those out with a reciprocating saw. once all the old was out of the way, I ground the "frame" down to raw metal (where the new jeep steering box would go) when I went to mom up the steering box, it wouldn't fit because the wheel well was blocking the back end from sitting on the rail, so I eyeballed it and cut a slot into the well to allow the box to sit. Once up, I mocked up some steel reinforcement plates to the frame, drilled them & the frame, and temporarily bolted up the box to make sure everything fit. Tomorrow the box will come back out so I can trim the reinforcement plates up to size better. Once they are trimmed up, the box will be mounted, plates tacked in, box removed and the rest of the plate will be welded in. I started tinkering with the shaft connecting the wheel to the steering box and am debating on how I am going to splice them together. Probably will cut to length, weld, sleeve, then weld the sleeve to both ends. Any better ideas? the left one is the jeep one, the right is the stock one. I need to connect the top piece from the left one (goes onto the steering box) with the bottom of the right one (goes into end of steering on r50)
-
The second gen r50 had one, theres a local around here that I see every few weeks with it. It's a little different though, the tubing for the 2nd gen isn't black or round, It's more of a rounded rectangle tubing, and I've only seen it in grey. Also, if I recall correctly, the 2nd gen carrier doesn't have a rounded end on the driver side, rather it's cut flat (don't quote me but for some reason I think I remember that) I think the 2nd gen doesn't have the same latch lever as the 1st (also don't quote me, but when I opened one up a year or so back I think I remember it being a little different)
-
Body lift or Suspension lift
johann_peralta replied to Ole_Rosie_R50's topic in 96-2004 R50 Pathfinders
Cant really do a body lift, because r50 is a unibody. frame and body are just one big piece. As far a lifts you have some options: sfcreations has 1-2.5" spacers I believe. Ebay hoepkers has 2" spacers. 4x4parts has lift coils and spacers. Theres a few other brands also but those listed are some popular options. There used to be a company making 4" sub frame drops, but no one makes a full kit currently. If you are interested in a SFD, there are some other threads about them in more details. -
Aftermarket Fender Flares
johann_peralta replied to Ole_Rosie_R50's topic in 96-2004 R50 Pathfinders
I was under the impression that the Qx4 flares were bigger and bulkier than the pathfinder flares. Aren't they?- 4 replies
-
- 1
-

-
- r50
- aftermarket
- (and 1 more)
-
Gonna have to take measurements to a shop of someone willing to make it for you. No one makes them regularly to sell.
-
Complications with getting lift
johann_peralta replied to joshrichard's topic in 96-2004 R50 Pathfinders
If they have a problem aligning it after a 2" lift (assuming its a 2"+-), they either aren't using camber bolts with enough angle adjustment, or are incompetent. That type of simple lift shouldn't create any driveline vibration. Usually it doesn't.