- Sign In Changes: You now need to sign in using the email address associated with your account, combined with your current password. Using your display name and password is no longer supported.
- If you are currently trying to register, are not receiving the validation email, and are using an Outlook, Hotmail or Yahoo domain email address, please change your email address to something other than those (or temporary email providers). These domains are known to have problems delivering emails from the community.

johann_peralta
-
Posts
312 -
Joined
-
Last visited
-
Days Won
19
Content Type
Profiles
Forums
Calendar
Everything posted by johann_peralta
-
Yes, you can do a 4" sfd + 2" spacers. The cv angle will stay the same as just the 2" lift.
-
I had 2 at one point. I turned the original 90*, moved the fuse box a tiny bit back, removed the battery clamp, slid the original as far as i could to the passenger side, then fit the second one beside it. Had to extend the ground cable.
-

R51 Transmission Curse ...Arrrrrrggggggghhhhhhh!
johann_peralta replied to Flanker7's topic in 2005-2012 R51 Pathfinders
https://imgur.com/a/cG4vlZm I know it is a little too late for this, but if you do go with a new trans, this may help. The 4.0 are known for contamination of ATF & coolant within the radiator as you may know. It is common for people to simply bypass the radiator and run the trans directly in and out of the trans cooler. I'd suggest adding another cooler in series, because by bypassing the Rad, you are loosing 'cooling power'. Attached is what I did to my 4.0 frontier. Replaced the Rad, thermostat, trans filter, added another trans cooler (I can get you the part number if you'd like), and flushed 40q of ATF through the trans in efforts to eliminate any coolant (if any managed to get in). I also flushed the radiator's bottom line where the trans used to connect with coolant. -
Anyone still selling a subframe drop kit?
johann_peralta replied to NovaPath's topic in 96-2004 R50 Pathfinders
Yes, makes a good support for the missing link. -
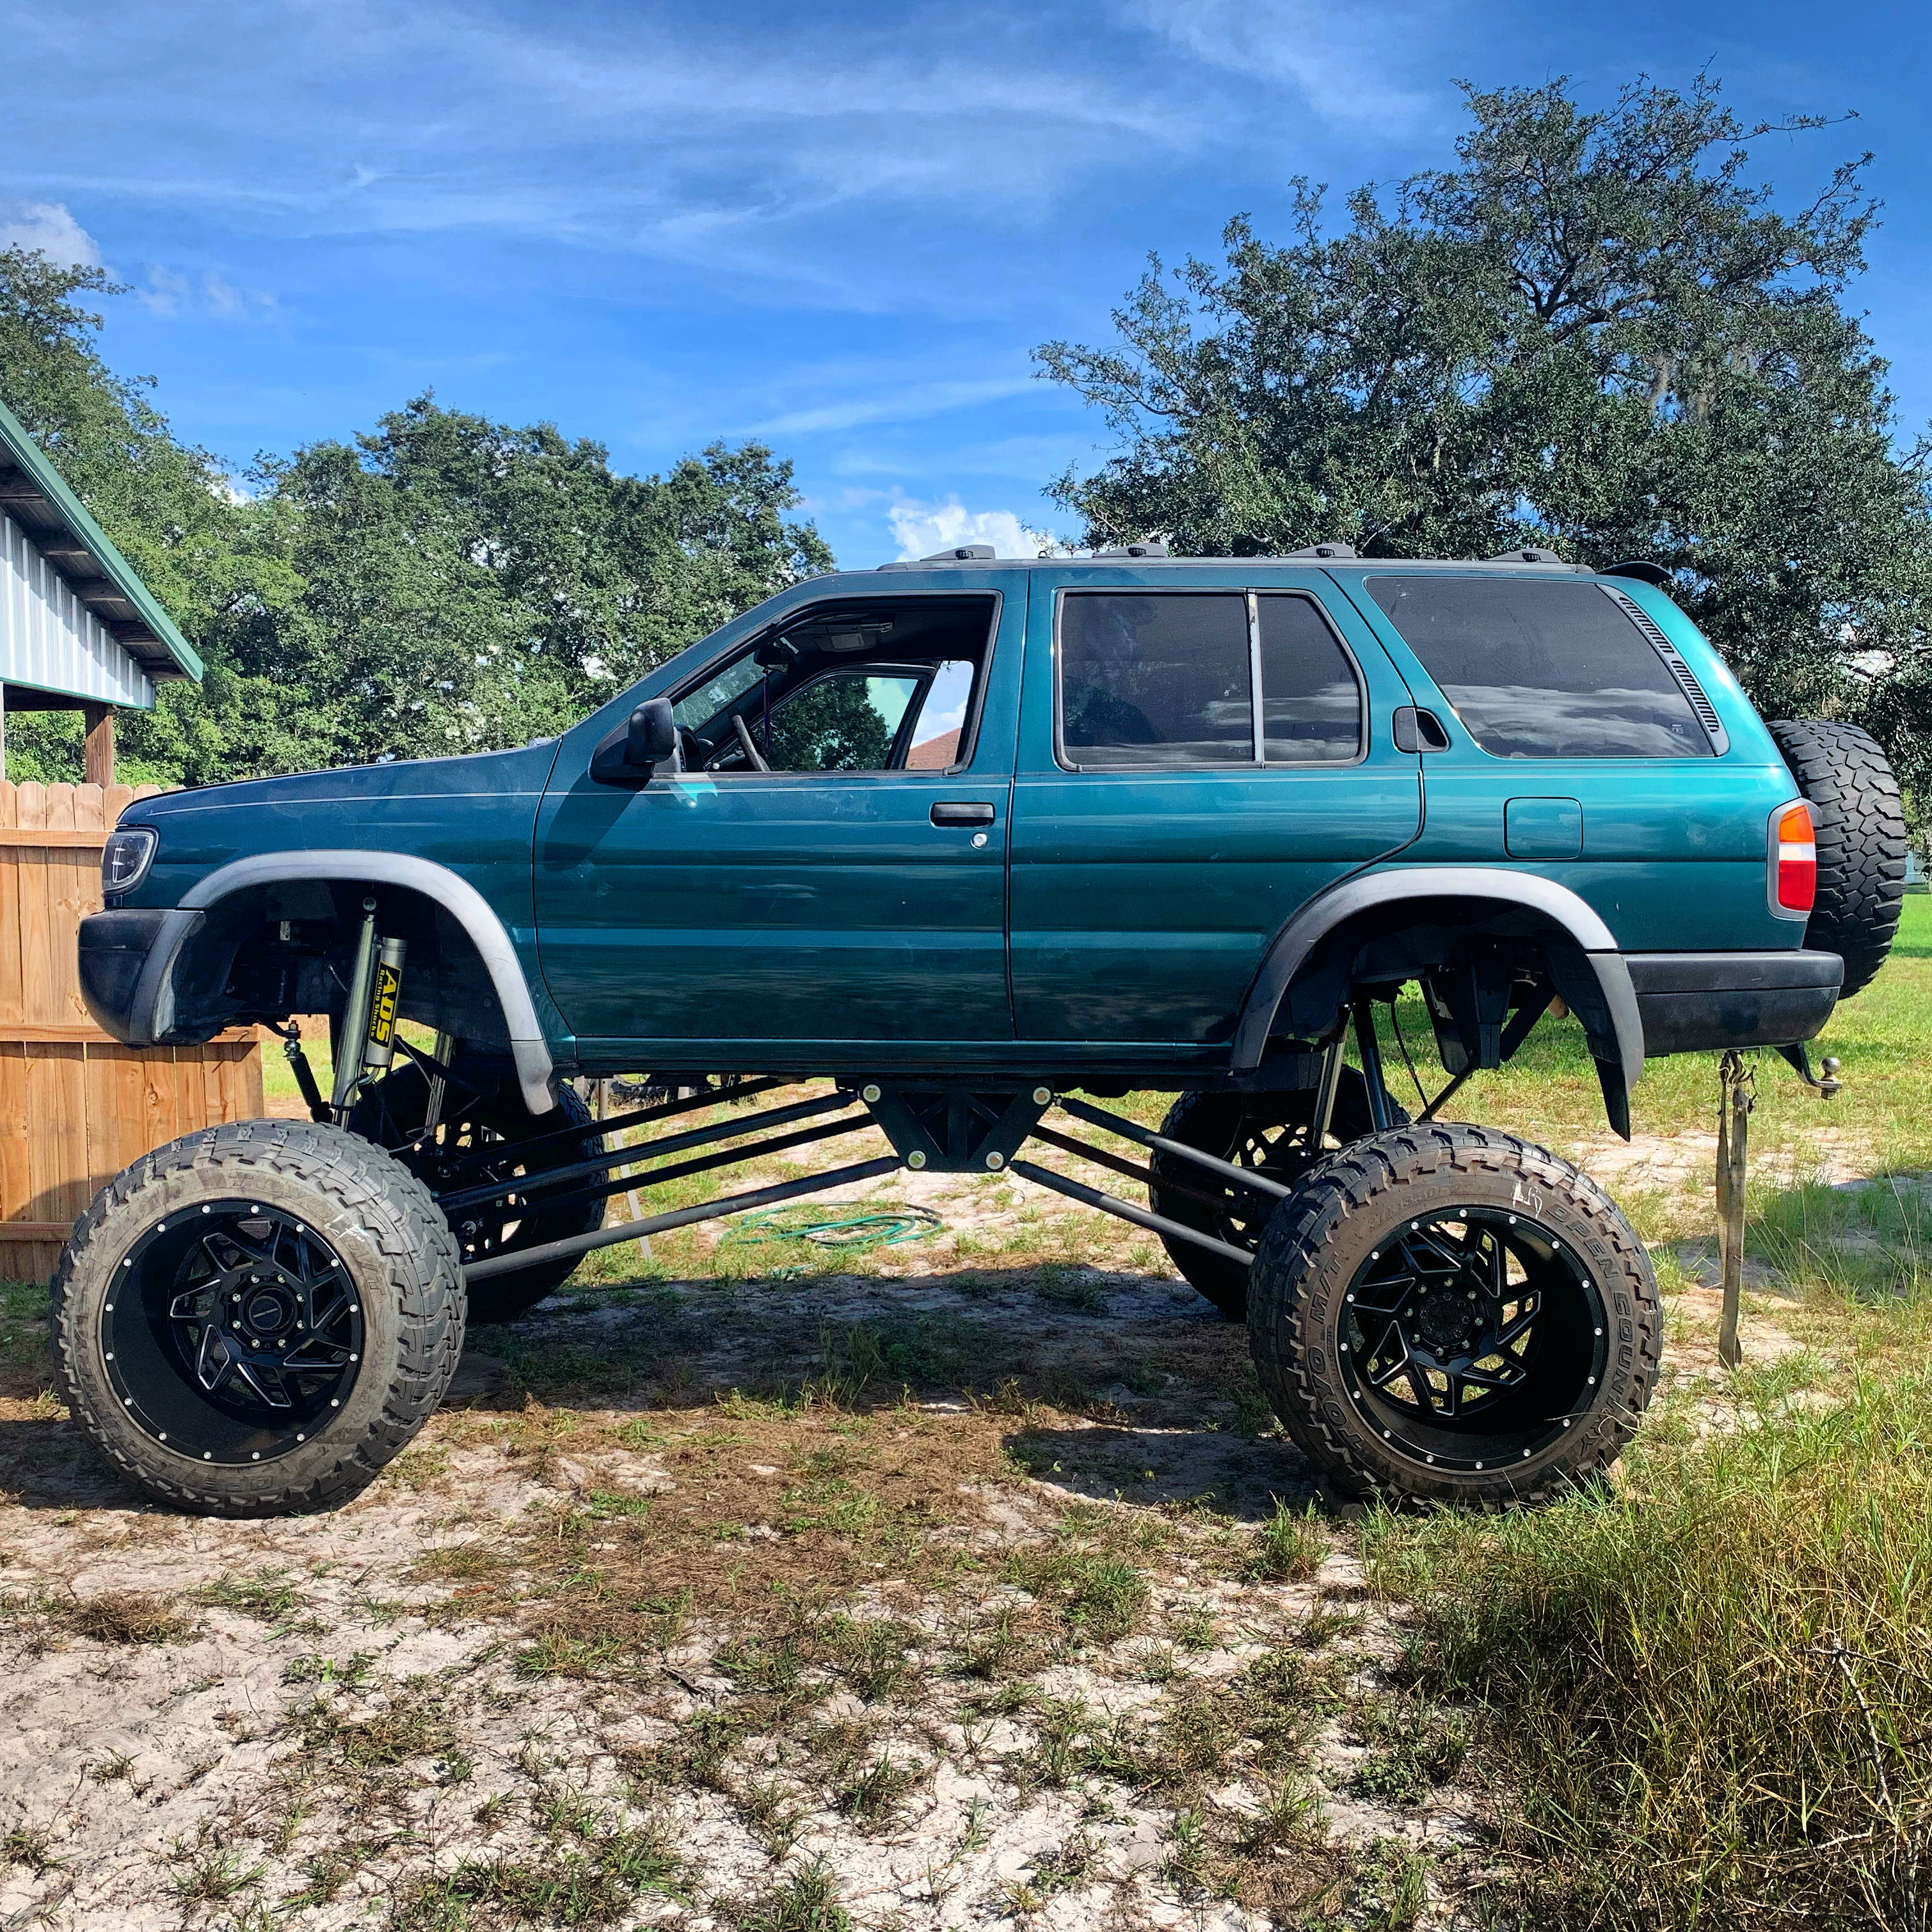
Id suggest getting more familiar with your car, and the kit parts first. I really don't want to sound rude, but it will help. There are lots of posts on installing them/pics of where they go I'd search "r50 pathfinder SFD install" online. There are 2 engine blocks (I think I labeled my pics). 2 front subframe blocks 2 rear subframe blocks You'll need a longer steering shaft. Use the search bar on this forum and search SFD steering link. Someone gave part numbers for buying them from woodward steering USA. If i remember correctly its a 108-201, 114-201 (joints), and a 5.75" 201 spline shaft with allen locks .5" either end. don't quote me though. Overall I would suggest just reading some more posts about SFDs and the install. The more familiarized you get before diving head first, the better and more aware you'll be of all the other costs, and what goes where. Hope this helped.
-
Here's a quick write up for doing the rear to front wheel stud swap. I haven't used the car is who knows how long so the rotors have some surface rust and everything is full of gunk lol needs a good cleaning... It's been done before so I don't want to take credit for anything, hawairish helped me out. Your gonna need to remove the wheels Loosen the 6 bolts (14mm), jam a screwdriver into the rotor under the caliper and that'll stop the rotor from spinning. If you have AUTO HUBS: remove the dust cap, remove the C-clip, remove the 6 bolts that hold the rest on, and gently pry the rest off. If you have MANUAL hubs: remove the 6 bolts that hold the face (mine were t15 torx, but may vary by brand), then remove the C-clip, then remove the 6 allen key bolts that hold the back half of the manual hub. Next your gonna want to remove the caliper and put it on something that will hold it up high enough so the lines won't get stretched, two 3/4" bolts. A 5 gallon bucket fits under the car well so maybe use one of those. Next you'll see two phillips screws, remove those Pull the big washer looking lock thing off (magnet will help) Put the screw driver into the big hole on the wheel bearing nut and spin the nut to the left till it's free. Put your thumbs onto the bearing and push the bearing in while pulling the rotor/wheel bearing assembly off. Now remove the previously loosened 14mm bolts. If you didn't previously loosen them you'll have a hard time here lol You can give he edge of the wheel bearing assembly thing a few whacks with a rubber hammer, or just pry the front half off of the rotor Next use either a press or a hammer (with the nuts still on to avoid messing the thread up) to get the old studs out. They are pressed in. Put the new studs into position and either press them in, or use a nut placed backwards to tighten it until it is seated in fully. Use greased washers behind the nut if you find any big enough. Prob around 1/2". Reassemble!!! Part number #610-320 on Advanced auto parts. 1.89$ US each. Sorry if the pictures come out upside-down or sideways... I have no idea how to control that.
-
Replacing Alternator on '01 Pathfinder
johann_peralta replied to ryjaytay38's topic in 96-2004 R50 Pathfinders
Just realized that this was for an 01, oops. Disregard my last post lol -
Replacing Alternator on '01 Pathfinder
johann_peralta replied to ryjaytay38's topic in 96-2004 R50 Pathfinders
i'd respectfully disagree. I got mine out in about 45 minutes. I put a screwdriver under the belt and tapped the starter, that popped the belt off really quickly. Next I removed the couple of cables, then removed the two bolts that attach it to the motor. I flexed the positive battery terminal over to the passenger side a little (about an inch or so) and the alternator came right out through the top. -
They all should have holes for a hitch/ strap down bracket.
-
R50 Tire Carrier Mod: Let's settle this!
johann_peralta replied to hawairish's topic in 96-2004 R50 Pathfinders
The hole near the bottom right is used to hold it open, just slide a pin or anytime of bar into the hole. -
I ran a new stretch of brake line. Much easier!
-
How-To: R50 Rear Disc Brake Conversion
johann_peralta replied to hawairish's topic in 96-2004 R50 Pathfinders
This write up is REALLY well done! Also, thats a really cool mod. On a side note theres a Facebook club for r50/qx4, and on there there is a guy by the name Shelby Fullen, who has also done a rear disk conversion on his r50 a few years back. -
I Messaged you.
-
-
I have 3 Kits up for Grabs! If you are serious about wanting one let me know! Message me or Email lol
-
Anyone still selling a subframe drop kit?
johann_peralta replied to NovaPath's topic in 96-2004 R50 Pathfinders
-
Anyone still selling a subframe drop kit?
johann_peralta replied to NovaPath's topic in 96-2004 R50 Pathfinders
I am, Message me or email me or Facebook me. glad to give you a rundown of the kits. -
front cross member strength
johann_peralta replied to missionstreet's topic in 96-2004 R50 Pathfinders
I've accidentally bent one by putting the jack directly onto it... no rust either. its fairly simple and won't hurt to spend a few minutes extra to cut a piece of wood to put in between the jack and the car. -
Restoring black plastic molding
johann_peralta replied to colinnwn's topic in 96-2004 R50 Pathfinders
i have had very good results with armor all. I put it on a rag and rub it on the flares, door handles etc... it lasts a few months and looks nice IMO -
maybe this will help you see it better
-
I would stray from these pictures because they have mistakes in them. Just a heads up...
-
yank em off, they clip in
-
no, they will work fine
-
R50 engine replacement possibilities? diesel or v8
johann_peralta replied to harddownshift's topic in 96-2004 R50 Pathfinders
it will cost more than the cars value to do that swap. probably more than 2X the value... unfortunately anything other than stock will cost an arm and a leg! most likely those diesel engines that bolt right up will have to be imported and that alone is crazy expensive:/ if you are dead set on a swap however, use a simple old school motor that requires little electrical and that will make your life easier -
What is the hose one the side? DIY breather?
