- Sign In Changes: You now need to sign in using the email address associated with your account, combined with your current password. Using your display name and password is no longer supported.
- If you are currently trying to register, are not receiving the validation email, and are using an Outlook, Hotmail or Yahoo domain email address, please change your email address to something other than those (or temporary email providers). These domains are known to have problems delivering emails from the community.
Leaderboard



Popular Content
Showing content with the highest reputation on 03/12/2019 in all areas
-
Did a led conversion. Sent from my iPhone using Tapatalk4 points
-
Stock should be 32” front and 33” rear, see post #171.2 points
-
Sent from my iPhone using Tapatalk2 points
-
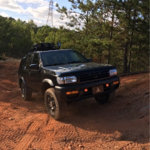
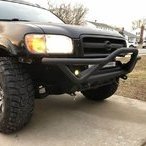
Has anyone done something similar to what the people with newer gen 4runners are doing with the high clearance bumper mod? https://trail4runner.com/2019/01/08/high-clearance-bumper-cut-5th-gen-4runner/ Subject, my 98 QX4 with 32s and 2" spacers. I have heat-gunned the bottom edges of my QX4s bumper to make it drivable. It's not rub-free, so I plan on taking only 1 more stab at bumper mod before I resort to waiting an eternity to build a tube bumper. However, keeping in the spirit of my ride, I didnt but it cheap for it to be expensive and nice! I bought it cheap so I could do things i would never do to my other cars... Like take a saw to the bodywork. Different kind of fun, right? My thought is same in principle to the 4runner; cut the bumper at an angle following a bumper contour, re-anchor the liner, add edge trim to cover the cut edge. I dont plan on the cut being as drastic, but should look cool and give ample clearance I was next to a new-ish runner with this mod last week. It looked nice, but I couldn't imagine cutting a $40k truck. The Q'y seems a prime candidate though1 point
-
Also towndog is the man. He also did welded my sfd back then. Awesome dude.1 point
-
Not to be argumentative, but simply to point out there’s differences in taste, I like the amber corners. In fact, I intend to put more amber on my truck (Raptor mod & maybe front & back running lights on rack). Unless you’re murdering out your truck (as above), I don’t get the clear corners. Honestly, I don’t even get it much in cars. It’s a European thing, not really a Japanese, Australian or American thing. In fact, some places put extra amber lights on the sides of the front fenders (secretly, I kind of like it because it reminds me of my Z). I also kind of like the bright amber running lights in Toyotas. That said, truly to each their own. I may just need to start an Amber Support Group (Oh, maybe Amber Anonymous), I’m starting to realize I might actually have a problem. I don’t dislike the clears in trucks, it’s just not for me. Also, I get that it’s an easy mod to do to just do something and I’ve certainly made changes for that reason alone too.1 point
-
the clear corner lights in my opinion make the truck look a lot better Sent from my iPhone using Tapatalk1 point
-
Instrument cluster Type 74 LED x4 Hvac unit T4 LED x4 Might need trimming depending on manufacture Awd selector. T3 x3. Might need trimming as well. Have fun with this one. Middle light only lights up knob. Other two is surrounding letters. I need to fix mine. [emoji23] Sent from my iPhone using Tapatalk1 point
-
My tan rig is totally stock if you want I can take some measurements tomorrow of fender height and whatnot1 point
-
What’s the bulb type & count on that?1 point
-
Hmm. Yeah, that's not sounding good then. If you had plugs crossed up, it would be missing on two. I'd pull the valve cover and see if one of the rockers for #1 is loose when the valve should be closed.1 point
-
I had it welded in.1 point
-
You could also go for OME MD (mid duty) suspension with their coil springs. That would provide better handling and lift .5-1.5”. It would also help with carrying extra weight1 point
-
no such thing. only way to lift an r50 is springs or spacers. sfcreation.com sells a great set of hdpe spacers for like 100 bucks that a lot of guys on here use. theyre made by forum member steve fluerys1 point
-
Now your ready to build the tank. Cut out an 8 inch long section of PVC. And drill two holes toward the bottom for the pumps. Make sure the holes are at least an inch and a half up from the bottom to allow room to put the bottom cap on the pipe. I used a stepped drill bit to make the holes. Go slow and check the fitment of the pump grommets to make sure you don’t make the holes too big. The holes need to be just big enough for the grommets to push through tightly to get a good seal. With the holes drilled you can insert the pumps, put the black cap on the bottom of the pipe under the pumps, and the red test cap on top. The test cap easily unscrews by hand to fill the tank. Once assembled, hook the wires and tubes back up to the pumps, (refer to the pictures you took earlier), and set the tank in place next to the battery. I used a piece of scrap metal bent to fit to make a bracket to hold the tank securely in place. One end of the bracket bolts to an existing bolt hole in the core support, and the other end I bolted to the tank with a nut and rubber washer on the inside of the tank so it won’t leak around the bolt hole. That should do it, add some washer fluid and enjoy! Sent from my iPhone using Tapatalk1 point
-
I’ll post some how to steps soon. It was actually really easy, and about $25 in supplies from Home Depot. Plus about $13 at Autozone for the cable and terminal to extend the negative battery cable.1 point
-
And finally have it out of the garage! Sent from my iPhone using Tapatalk1 point
-
Man your rig looks really nice!1 point
-
I approve of the license plate!!1 point
-
March and still going strong. I haven't swapped my fronts from the old design to the new design but will do so when the weather turns good. Not an issue for daily driver and light conditions but at full flex and load, the bolts could strip out of the spacer (old style only). I discussed this with Steve and he redesigned the front spacers to correct that issue before placing the kits for sale so you won't have to worry about my issue. As an engineer, I reviewed his solution and approve of it so even though I have not run the new design for the front, I am very confident that they will work fine.1 point
-
For the PNW Pathfinders, yesterday started as the Silver Pathfinder Emporium & developed into a full on SwinGateFest 2019. Thanks to @02_Pathy &[mention=39745]stpickens[/mention] and his Dad for coming up from Portland. Also, thanks to[mention=32880]ferrariowner123[/mention] for just stopping by to hang out. Most of all, thanks to[mention=37543]TowndawgR50[/mention] for providing the venue, expertise, product development, hard work and good cheer! It really couldn’t have happened without him.1 point
-
Mine lived an easy life & then at 106K, while on our way to get a Christmas tree - Game Over. 5 screws missing. Ultimately had to replace the engine. Do it now before you’re immensely sad!0 points