- Sign In Changes: You now need to sign in using the email address associated with your account, combined with your current password. Using your display name and password is no longer supported.
- If you are currently trying to register, are not receiving the validation email, and are using an Outlook, Hotmail or Yahoo domain email address, please change your email address to something other than those (or temporary email providers). These domains are known to have problems delivering emails from the community.

TrailChaser
-
Posts
1,073 -
Joined
-
Last visited
Content Type
Profiles
Forums
Calendar
Everything posted by TrailChaser
-
Simple and cheap mod is to disconnect the trigger wire from the starter, hook it up to a starter button, and install the starter button inside the cab in a well hidden area were you can still reach it. This will completely disable your key from starting the truck. You still have to use the key to turn the truck on, then you hit the button. They(thieves) can mutalate the steering column and will never get the thing started unless the happen to find your button. The button cost about $3 at a auto parts store. As for tools... all you need is a drill(for the button) and stuff to wire the switch up. Takes about 15 to 30mins. I've been using this method for almost a year. I did this as a temporary mod because my key wouldn't start the truck every time. I'm planning to leave it like this for the security reasons. After about a week I got used to hitting the button instead of using the key. The Club is pretty useful as a deterent. It may not STOP a thief, but most thieves will just move on to an easier target if you have one on the wheel. Around here we have a bunch of young punks that would rather break your window to steal a crappy radio or change($$$) from the ash tray than actually steal the car. Worse thing is... IF you catch'em you can't touch'em. You pretty much have the right to stand there and yell while they run away. Beat'em up or even just hold'em against their will till the cops get there and YOU will be the one on the way to jail. It's BS...
-
28 till August... I'd like to find out how the last 10yrs got by soooo fast??? Wasn't I just 18 the other day? :help:
-
I had the same thing happen. turned out the glue in the boot wasn't holding the wire very good and it was pulled up into the boot about a 1/2inch and wouldn't pop on. I just pushed the wire back down in the boot a little and it worked great.
-
I'm all for cussin in forums. But some places you just get the vibe that it's not cool. Like this forum changing the &^%*@$# bad words like that. For the most part I think people should talk to someone on a forum just like they would in person. I've seen people say REAL stupid stuff that you know they wouldn't have the balls to say to that person face to face... Pisses me off. -argue-
-
Here's How mine's set up. I just used some 10gauge steel plate. I cut it to the shape I wanted then put a 90deg. bend in it and drilled a few holes. It doesn't get in the passengers way at all. I bought that at Wal-Mart and now I'm thinking of replacing that with the double cup holder they sell. I like these because you can adjust it for whatever size cup/can you have and it grips it tight enough to run the trails and not have to worry about losing you drink on a steep hill. I took that pic in the dark, sorry for it being so blurry.
-
I like'em... They look a little like mine that I just made. You have good taste. Clicky click
-
I like the dent.. It addes character. If I'd have gotten that dent from a car hitting me it would be a defferent story.
-
Thanks, I really like'em. As for making more... I think it would cost more for shipping than it would cost for the steel.
-
I welded'em on. Three mounts on each side with 1/4" plate 5"x4" welded to the frame to spread out the load when I get on a rock or have to jack it up. Main thing that kinda sucks is that they are a little below the frame rail at the mounting points. It's not too big of a deal tho. I really don't want a body lift, but that would definately solve that problem.
-
Here's a rear locker for $235 That's where I bought mine. Scroll down till you see "nissan diff." at the bottom of the page. They dropshipped it from richmond gears, but I got it pretty darn fast. Less than a week. :o
-
Here's a really cheap locker for the front. If you're a millionaire.
-
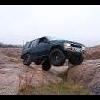
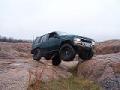
I built these at work in about 2 weeks of lunch breaks. They are 21' of 2" OD pipe. Here's a couple of pics from when I was figuring out the angle. I settled on 27degs. Here's the pics from today when I got home with'em finally on the truck. I had to block the sun with my hand. A little closer. In these pics I'm testing the sliders to see if they can handle the weight of the whole side of the truck. The front tire is off the ground and the rear tire is almost off. I was at an incline and didn't want to risk it moving back so I stopped at that height. Now I just need to sand off the oil crap that coats the pipe and then paint'em black. They're sooo close to the body that I'm considering painting the rocker panels black also. That might help mask the damage I've already gotten from Barnwell Mountian. You've probly seen those pics, but if not here they are. Drivers side... Passenger side... The scratch/dent on the door is rockrash that wouldn't be there if I would have had those sliders back then.
-
That stuff cost $$$. I got the steel for this free and I made it at work. The measurements are: 48"x15" for the main plate. The mounting brackets are 4"x9" for the rear and 4"x 10" up front. The mounting plate is 1.5" above the main plate up front and 1.75" above in the rear.
-
Now for the finished pictures. The white dot is the balance point. That way I can put the jack on the dot, put a little pressure, and unbolt it without worrying that it'll fall and smash something. Here's a little sand rash from high centering on a "sandcastle". Here's the "sandcastle". It had a BIG hole on the other side that you can't see in that pic. Next mod I'm fabbing up will be... Sliders. Do you think I'll need'em...
-
After I bent the bend out of it with the press and it was back strait.... It sits flush. Perfect. I welded on a tab for the transfer case. With that 1" angle iron it's solid as hell. plus it touches the first x-member and comes real close to touching the second one. Pics... Here's the angle iron I welded on. It's 1"x1" so it sticks up 3/4" which isn't too bad. Notice how much closer it is now than in the last set of pics. This is the front diff. It has about 1/4" clearance between it and the skid.
-
I took the front skid to work and welded some pipe around the bolt heads. It'll definately keep the rocks off the bolts. I thought about the flexing problem. I welded some 1"x1" angle iron on the topside of the skid for support. I want to be able to jack up the truck on any part of the plate without it moving too much. More pics. Close-up of the rock protection. Here's a couple of pics with the skid mounted before I put it in the 200ton press for a 3rd time to straiten it back out. I messed with getting it tighter up there before I took it back to work and put it in the press. No luck... I used the jack on it while it was still bolted up and made it touch the exhaust where it crosses. As soon as I let the pressure off it went back to the original angle like a spring. Then I tried this... Needless to say, that didn't work...
-
I had some 1/4" sheet metal set aside to make the skid out of but someone used it for something else. So instead of 1/4" I decided to use a 5/16" sheet. This thing is REAL heavy. 77lbs to be exact. I put the "skid" in the press brake to put the bend in it for the exhaust where it crosses by the tranny pan. I can not pick it up by myself while it's under the truck. I used my floorjack to lift it,and when I had it set in place where it'll go when finished I noticed that the bend was off by a couple of degrees. I put the "skid" back in the press to "unbend" it a little. Here's some pics from when I was lining it up for the holes to be drilled. This thing actually flexes a lot more than I thought it would. I'll have to give it a backbone. It also hung down more than I'd have liked it too. I also found out that it's possible to make the same style skid without the bend in it. You just need to make the mounts on the ends long enough to clear the front diff and transfer case.
-
First I had to make a template to know what I'd need to cover, and about where it is located under the truck and how big it is. Here's a few pics of the cardboard skid... The hat is for size reference. (I have a regular size head. )
-
That law is valid in just about all states. I think it mainly applies to big rigs. They call it Georgia Overdrive. I got 19mpg on the way back to Houston from Corpus using 4ozs of acetone to 15 gallons of gas. That was 245 miles on 3/4 of a tank. I'm wondering if it was all acetone. Other factors include: New (unwanted) Gears. 4.3xx instead of 4.6xx which lets me cruise at 70 with the RPM's at 2,300 with the torque converter locked up. Also the whole trip was on FLAT ground (except overpasses) with hardly any wind. Last but not least I followed a couple of car lengths behind an 18 wheeler running 70mph for about 85% of the trip. I had to fill up twice on the way down. The wind was blowing so hard I had to turn off the OD to maintain 65-70mph.
-
I've been wanting skids for quite awhile. I never could afford to actually buy any.(Not because Runnermans prices are high, it's from being broke all the time. ) So I decided to make my own skids. The front skid was pretty easy to make because it's so small and light. I made it out of 3/16" and 1/8" on the mounting points. The skid plate for the front diff, oil pan, exhaust, tranny pan, and transfer case turned out to be a beast. It covers everything from front to back. Made out of 5/16" this thing is heavy. 77lbs to be exact. :o I still need to make a skid for the rear diff and I'm going to weld some 10gauge stuff to the muffler to keep it from getting too much damage. I just finished drilling the holes to mount it and now I just need to finish welding a backbone on this thing.(It flexes under pressure a little more than I'd like it too.) Then paint it. For the bolt protection I just welded some cut peices of pipe to the skid and used a grinder to get rid of the excess metal so it turned out flush with the top of the bolt heads. Here's some pics. This is a pic of the front skid before I welded on the bolt protection.
-
Nice.
-
Did you floor it then when you let off it stayed floored? That's a pretty common problem. Check the how too's for a quick fix. To bad it's too late.
-
The bolt is the safety device. I just have bad luck drilling holes in the right place the first time, so I haven't drilled it yet.
-
I'm with 88. The ignition has been a problem with my pathy for a while. I wired the trigger wire to a start button that I put on the dash when my ignition went out. Now I have to turn the key to on.(If I turn it all the way like I'm trying to start it nuthing happens.) With the key in the "on" position I push the button and it engages the starter. When it starts I let go and drive. All you have to do to see if this is your rig's problem is... Find the starter. It's on the passenger side below the oil filter.(great place for it.) Find the single wire comming off the starter.(not the oil pressure wire) When you find it unplug it. Now run a wire from the pos (+) terminal of your battery to the starter side of that disconnected wire. If the battery and starter are both good the engine will turn over no matter what gear it's in, what the computer is doing, the key can even be turned off and the engine will turn over. (so be careful and watch your hands/arms/tools) Hopes this helps a little.
-
Here's the pics. I made this at work in about 20 minutes. You can buy them at this website for $50. :o A friend from a local forum pointed out that website. I could make some for a small fee if anyone that has tube sliders is interested. Good way to make your HiLift jack a little safer. That's the first one I made. I made a second one today and it came out better. I just need to drill the hole for the bolt. They weigh about 1.5lbs.