- Sign In Changes: You now need to sign in using the email address associated with your account, combined with your current password. Using your display name and password is no longer supported.
- If you are currently trying to register, are not receiving the validation email, and are using an Outlook, Hotmail or Yahoo domain email address, please change your email address to something other than those (or temporary email providers). These domains are known to have problems delivering emails from the community.


fleurys
-
Posts
2,177 -
Joined
-
Last visited
-
Days Won
50
Content Type
Profiles
Forums
Calendar
Everything posted by fleurys
-
bank 1 is passenger, bank 2 driver. sensor 1 is before cat, sensor 2 after. I recently did both sensor 1 on my 2003. The driver side one is easy to do as you can easily see and touch it from the engine bay. The passenger side is simply a matter of luck in my opinion... I was unable to touch it with my hands so much it was down there... I got myself a set of o2 sensor sockets, and was able to reach it with 2 extensions and a lot of patience... Once the sensor was broke loose, I used the wire to unscrew it... Installation was reverse... Since I could not reach by hand the o2 sensor hole, I had to drop it from the extensions in the hole, then use the wire to start the threads and eventually torque it with the socket... it is very sketchy to do on the passenger side.. It helps to do it while the truck is still warm. Good luck
-
Let your Pathfinder be the star ! SFCreation.com
fleurys replied to fleurys's topic in General Forums
Goo Good eye ! yes the last one is my now gone (due to rust) pathy. In that configuration, it was the AC coils..that was before I started the spacers company. Yes it was 265/75 and for the wheel spacers they were 1.25". Cheers. -
Let your Pathfinder be the star ! SFCreation.com
fleurys replied to fleurys's topic in General Forums
2018 October - November-December. ! -
2002 Pathfinder...the long road to recovery (build)
fleurys replied to system_f's topic in 96-2004 R50 Pathfinders
Super interesting... I am about to start the same kind of resto on my new acquisition... great pictures. tks ! -
The spacer goes at the bottom and sits directly on the steel support. Remove any rubber. You need a stable platform for the spacer I cant help you for the tire question...i simply do not know. Sorry
-
https://sfcreation.com/t/pathfinder-90-95-wd21-platform Will have some in stock in about a week. Inventory has been sold out. S.
-
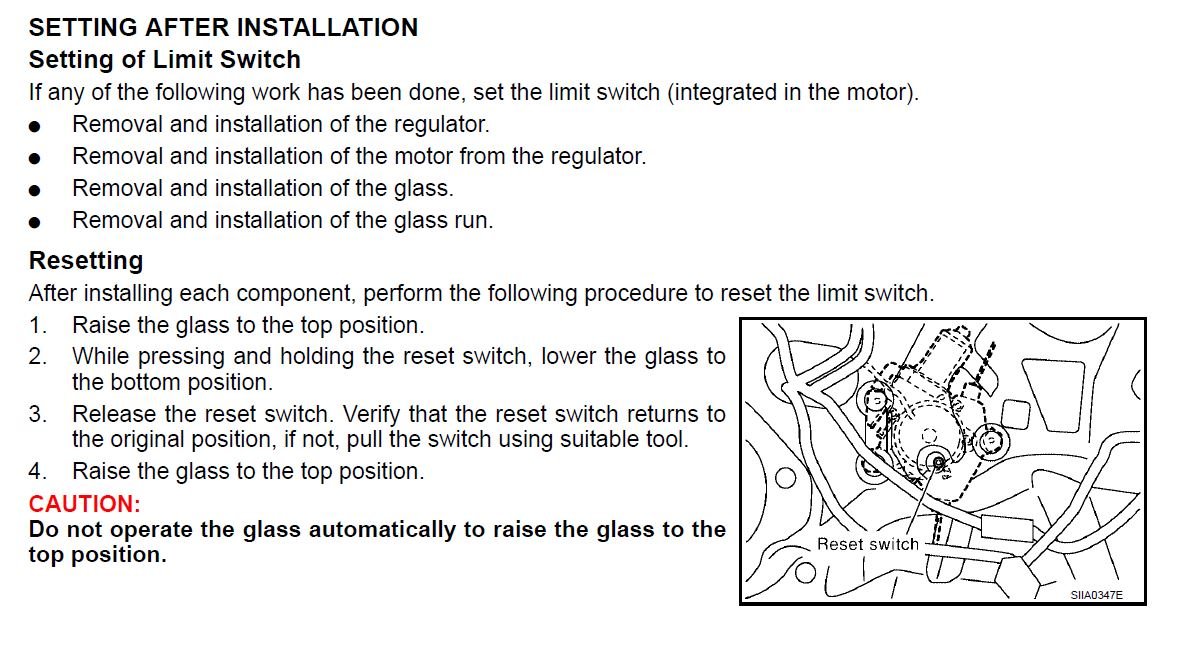
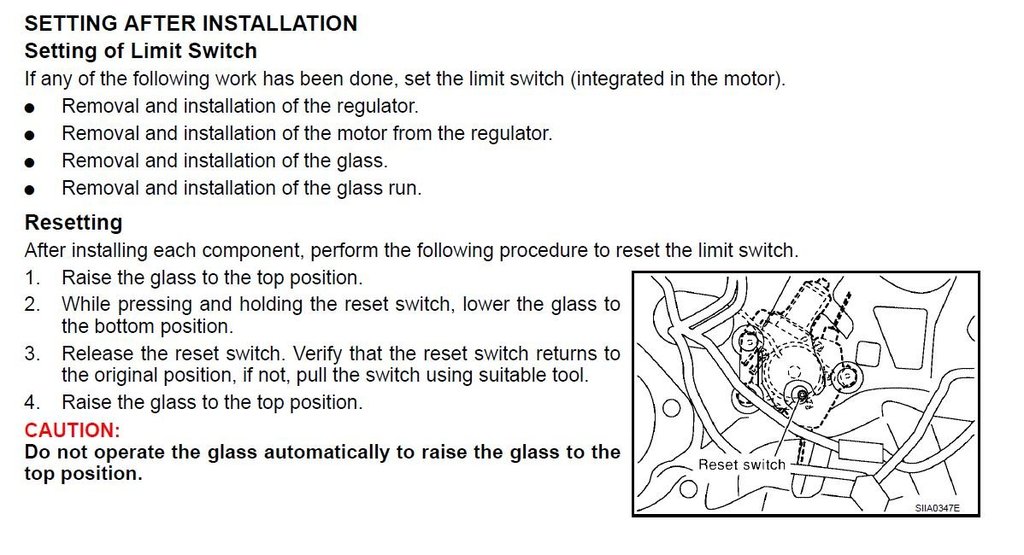
here you go.. (You will need to remove the door panel.then...
-
Free Lift Kit for your R51 - SFCreation
fleurys replied to fleurys's topic in 2005-2012 R51 Pathfinders
Thank you...but it seems that we just found our man with K9sar.. Discussions are already in process. Thank you for your interest ! -
Free Lift Kit for your R51 - SFCreation
fleurys replied to fleurys's topic in 2005-2012 R51 Pathfinders
unfortunately, no one has.... i'm starting to ask myself if there is any R51 owner that uses them to go off-road or has it just died with the r50 (pathfinder models I'm talking here)... I guess the next step is to go facebook, but I wanted to get someone here who is more implicated in the scene... -
Yes... I let the thing rest inside a bath of metal rescue for 24 hours. That pretty much removed the rust but did not free the pin... I tried a few hits with the hammer...no go :-( So I decided to sacrifice it for the benefit of everyone here :-)... The circle in the middle is a thin steel plate that I removed with a screwdriver... simply pulling on it... looks like it was welded or something..not sure but it came out with little force. You can see on the picture the arm that is suppose to rotate and this aligns with the square opening to let the liquid go through... I tried rotating the pin from this side and it would not budge... ho well... time to find another... cheers.
-
I am trying to rebuild my fan coupling. Part of the reason I think it is not working like it should is that the metal spring that contracts and expand was rusted solid. I have since remove the rust but the middle `pin`where the spring coils in, is not turning... I have tried with a pair of plier to force it to turn, but it won`t budge... I am under the impression that it should be turning when the coil expand due to heat. I have since open up the coupling and I am stuck there... I don`t want to force it more than I have to until I can find some info, hopefully, from someone that has some experience with this... I want to get to the other side of the expanding coil so I can unstuck the rotating pin that is connected to the coil.(This is what you see on the first pic)... how can I remove what you see ... is it pressed in, screwed in ??
-
LOL ! it is a nice place here...
-
After being part of R50 pathfinder family for so many years, Sfcreation is now looking to enter the R51 Pathfinder one. We will soon bring to market our 1", 1.5" front spacers and our 1",2",3" rear spacers. Now since the R51 pathfinder is IFS and IRS, of course the real height of the lift will be greater than the height of the spacers. This is where you come into play ! 2 options are available: 1) If you have a pathfinder R51 and you live near my location (Ste-Catherine, QC), and willing to drive to it, You'll get the lift kit, and I'll install it with you! Reserve yourself a full day ! Measurements will also be taken for a full set of skidplates. 2) If you are good with tools and are not afraid to use them, I'll send you all the items of the lift kits. You will need to install them, send the pictures and you keep it all. All the spacers have been made using suspension items from an R51 (struts, coils), but now we need pictures and real life data about the height in order to finalize the new product introduction. If you are interessted, please contact me at (info @ sfcreation . com) and send me some pictures of your R51. I am looking for clean and very little (if any) rusted R51. This pathfinder will be immortalized on our web site, facebook page, etc.. so it needs to look good ! Je parle francais aussi.. donc aucun probleme avec ça ! Steve.
-
if you can smell it, I would think it could be coming from the heater rad... I don't know the 3.3, but if they are easily accessible, I would try to bypass the heater rad simply by connecting the in and out hose. Then run it like this a few days and see if you are still losing coolant.... It could help you figure out where the leak is a bit... Cheers.
-
Let your Pathfinder be the star ! SFCreation.com
fleurys replied to fleurys's topic in General Forums
Here Are our June-July-August Stars.. Congrats to the owners!! If you are interested in having your truck on our home web page, and that you bought our products, send your pictures as info@sfcreation.com... Keep them coming !! -
You are correct. When the hubs are locked, all the normal options are available (2wd,auto,4hi,4lo).. When the hubs are unlocked, only use 2wd. Cheers. S.
-
Let your Pathfinder be the star ! SFCreation.com
fleurys replied to fleurys's topic in General Forums
Thanks...and please do !! Cheers. S. -
Let your Pathfinder be the star ! SFCreation.com
fleurys replied to fleurys's topic in General Forums
Hers's our new March-April-May STARS... ** Congratulation ** !! If you want your truck to be featured on our web site and have our products installed, send us your pictures at info@sfcreation.com !! -
Veeeerry niiice !! My kind of work... love it... I'll buy !
-
Send me a pm or email for your decal.. size, color and will work something out. Steve.
-
Our Way of saying THANK YOU ! Here are our 4 new stars for the next 3 months ! These are customer's pictures with our products ! If you want your truck to be on the front page of SFCreation.com, **AND** that you have bought our products, send us the best pictures you have at info@sfcreation.com. The winners will be featured on our web site front page for 3 months and will be mentioned here and on Facebook. CHEERS ! Now is the time to showoff your Pathfinder ! Now, for our December-January-February Stars !
-
In the FSM the P0755 is this : TCM detects an improper voltage drop when it tries to operate the solenoid valve. Check harness or connectors (The Solenoid circuit is open or shorted) - Solenoid Valve B Again according to the fsm, this solenoid operates with batterie voltage (12-14V)... First thing I would do is verfy that the solenoid is working by applying voltage to it and listening to hear if it moves. if it does, from there I would trace the wire from the TCM to the solenoid. The cable is labeled L/R ( i guess light red ?) from pin 12 of the tcm side, it then goes through 3 connectors. I guess the easiest would be to test the cable at each connectors... I'll try to put the fsm pages for you. S. ** Update The file is available for 90 days : http://wikisend.com/download/391266/p0755.pdf p0755.pdf
-
No problems ... You're welcome. Lol Envoyé de mon iPhone en utilisant Tapatalk
-
I do offer some rear spacers for Wd21 : sfcreation.com cheers.
-
Unless you`re planing on having your rear wheels off the ground often, you don`t need longer shocks... In case you are still looking for just the lift, have a look here. : sfcreation.com