- Sign In Changes: You now need to sign in using the email address associated with your account, combined with your current password. Using your display name and password is no longer supported.
- If you are currently trying to register, are not receiving the validation email, and are using an Outlook, Hotmail or Yahoo domain email address, please change your email address to something other than those (or temporary email providers). These domains are known to have problems delivering emails from the community.

nige
-
Posts
2,004 -
Joined
-
Last visited
-
Days Won
3
Content Type
Profiles
Forums
Calendar
Everything posted by nige
-
What To Attach A Factory Roof Rack With
nige replied to RustyButTrusty's topic in 86.5-89 WD21 Pathfinders
you need the tool to attach the threaded inserts. You drill a hole the same diameter as the insert,, paint the bare edges of the hole, thread an insert on the tool, dip it in silicone and drop it in the hole. When you squeeze the handle, the tool will spread out the body of the insert behind the sheet metal so you can't pull it out of the hole. It's similar to those heavy duty wall anchors for houses. I paid about $30 for a kit from princess auto here in canada. you can probably find something similar @ harbor freight. -
getting warmer
-
I wouldn't bother with them. They don't seem to correct ball joint angles when you crank your torsion bars. I won't recommend them to anyone. Go for the Superlift, Rough Country, Calmini or Rancho brand.
-
Jesus did you even read what Precise1 wrote about the kit in the second post? I don't know how he could make it any clearer.
-
might as well do a solid axle swap like steevo did instead of installing all those IFS parts
-
yup. i use an elbow and extension so i don't have to lean so far over the engine. There should be a tool in your spare tire kit to help you, but most people just use and extension. You can reach all the plugs under the intake manifold with a long extension. Make sure you clean out the plug holes before you remove the old plugs. i find adding a bit of anti-seize to the new plugs helps the come out a bit easier.
-
here, it was in the product reviews section: tranny cooler thread make sure you change your filter settings in the bottom navy blue bar right underneath the last post of the page. set the timeframe to show all. It should do this by default, but i don't know why it doesn't.
-
hahahah! Bender was welding up some more of it last week. I couldn't work on it this weekend 'cause i had to lay in the slush and replace my rear brakes... while the gold medal hockey game was on
-
if you drill a hole in sheet metal to pass wires/hose etc through, you can make a quick and easy rubber grommet to protect them from sharp metal edges. Just split some rubber vacuum hose down one side, and push it over the inside edge of the hole. continue all the way around the circumference of the hole until your ends meet, then cut off the excess. You can use a bit of silicone to hold it in place, but if you made a straight cut when you split the hose and have the proper length, you shouldn't need any adhesive. Use small hose for small holes and the larger diameter for everything else. don't forget the prime and paint the edges of the hole before you put the rubber tube on! I've used this trick for my snorkel, wiring lights and stereo equipment, and sonars and other electronics on the boat.
-
lol it's bigger yeah, but not too much heavier if you consider how much a class 3 hitch and stock bumper weigh together. It's really just a trailer hitch wrapped in 3/16" with some side armor.
-
i noticed a green 95 for sale in this thread. it looks pretty nice and was owned by an enthusiast http://www.nissantrailriders.com/forum/viewtopic.php?f=11&t=913
-
boom
-
i have an auto, but i wish i had got a 5-speed instead. I don't like the auto on the highway or city at all. I can handle a 5-speed on the trail, and i have also heard they have a tall 1st gear. Not sure if you can get them with 4.6 R+P gears, or if those gears came on the trucks with factory 31's. But yeah, having the ability to start the truck with a dead starter or weak battery is worth any "trouble" you would have with the MT on a trail.
-
Auto Locking Hubs To Manual Locking Hubs Conversion?
nige replied to Vanganator's topic in The Garage
yes warn hubs -
I think we decided to weld a plate underneath the gas can carrier and bolt the number plate to that. I wanted to keep it underneath the tire or something else so I still don't have to pay for road tolls that use overhead cameras instead of toll booths. yup, we'll find somewhere to put one yup, we have plans for some reverse floodlights for the corners. I have to pick some lights that are cheap, abundant and relatively water-tight (i can silicone them up myself). I have a feeling they might get broken or drown often so I want to make sure i can get more of them before we cut specific shaped holes in the bumper. I will probably get one of those receiver hitch led stop lights. You can't really see my middle brake light very well when the spare is on the back. I have a 3" body lift and some AC 3" rear coils yup we have some shackle mounts that need a bit of shaping. They will be welded to the back of the bumper, just inside the bends. We decided to cut the step in for function and style. It only took a few minutes to do and made a big difference. It's cut in relation to the spare tire which is why it is slightly off-center. Good idea, I will check them out. can you get them in blue, yo? ahahhaha If you look at Morpheus' rear bumper, you will notice he has some side protection. We will be doing the same sort of thing with this bumper, but i might have to cut off the bottoms of the quarter panels right to the wheel arch like R50's and 4runners. It's ok, because they are rusted out anyway
-
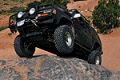
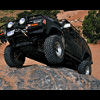
Bender and I have been working on a new rear bumper for the partsfinder over the last couple of weekends. I'll share some pictures with you guys to see first few steps of building. Last Saturday was spent doing a lot of measuring, planning, test fitting: Setting up the frame mounts (nice hat eh?): Test fitting the bumper to the mounts, centering and marking the places where we will notch the top: That was pretty much all we could accomplish so we called it a day. I had a list of things I needed to get before we met up yesterday, so I went shopping for some more steel. Bender wanted to have a nice, strong spine running behind the bumper, between the frame mounts. We chose to use some 2x4 1/4 wall tube to give the bumper some good strength and make sure the receiver is firmly anchored to something sturdy. We worked on the bumper a little more yesterday and got quite a bit done: Bender had cut the corners and notched the top of the bumper in preparation for bending and tacking: Here is the tacked corner, ready to test fit for body clearance: Next was cutting and mounting the receiver, you can see the 2x4 spine getting marked to be notched out: Bender tacked everything together after we had finished, then we test fitted it to the truck again to make sure the frame mounts line up close to the spine. We also decided to cut a chunk out of the top of the bumper to make room for a larger or different offset spare tire, and a handy spot to step on when you are fussing with all the crap you brought with you in your roof basket. Once that was finished, test fitted again and then tacked to frame mounts to the bumper after we decided it's final positioning on the truck. If I haven't said it enough, i'll say again: the AC 3" rear springs are stiff! The bumper is a good weight, but it doesn't really show it when you mount it up. We stuck the gas can holder up there at the same time to get an idea where everything fits: After that, I drilled out new mounting holes for the bracket on the frame, and Bender boxed in the chunk on the top of the bumper. At the end of the afternoon, the bumper is ready for some welding and grinding. Next step are the corners. Still lots of work to do before it's ready for a sandblast and treatment, but it had us giggling like schoolgirls every time we stood back and looked at it lol You can see the 2x4 spine clearly in this picture. Just need to trim off the corners of that backing plate and weld everything together. So i'm pretty excited about the way its turning out, we've got a couple more good ideas to make it really practical and unique. What do you guys think?
-
what tires do you plan to mount on these wheels Trooper wheels are pretty nice! the factory Lego wheels are damn near perfect for 31" tires on these trucks. I find the factory steel wheels don't look like they have enough negative backspace for 31" tires. 32" on my lego wheels rubs the outside of the frame when i stuff a tire.
-
unplug the O2 sensor under the hood and see if it changes. When troubleshooting, only change 1 thing at a time, then test to see if the problem goes away.
-
sorry, i should have followed up with this one. The bushings were around 5 years old. I must have an early design control arm because the bushings they sold me are too long, they needed modification to fit. Oh well, everything is good now.
-
lock-rite, skids and sliders or hi-lift locker in general. they really make big difference. i think air lockers are too complicated though
-
i don't think you would want an SR20DET motor as they have less torque at lower RPM's than a VG30. The VG30 has a very level torque curve which is a plus for towing and wheeling. I've seen Australians swap the VG30 for a 3800 V6 from holden commodores. I think it's the same v6 you find in a lot of 90's Buicks. I see you have an 88 SE which should come with the VG30I. You can get a set of headers and do a full 2.25" exhaust with a high flow cat. You should feel the difference, but yeah Precise1 is right. These trucks are not know for their speed and power I would change my gears to 5.13's before I spent the time and money doing an engine swap. IMO the VG30 is the most reliable part of the truck
-
maybe if you're ripping through the desert, but i don't think i would like to wear a 5 point belt around town or on the trail. I like to be able to lean out the window and watch my wheels
-
http://www.associatedcontent.com/article/40886/how_to_temporarily_fix_an_automobile.html use some red sealant with it too
-
There is this option which looks like a quick fix as well. I've never used one so I can't tell you if they work well or not. 4x4 parts zipboot