
CO_pathfinder
-
Posts
509 -
Joined
-
Last visited
-
Days Won
5
Content Type
Profiles
Forums
Calendar
Everything posted by CO_pathfinder
-

What did you do to your Pathfinder today?
CO_pathfinder replied to RedRider3141's topic in The Garage
I know, I was just joshing you about the wheels. I guess that's what the off-topic section is for, but it would be nice to have a dedicated thread. Anyways, I pulled my entire headliner today so that I could put my Xterra rack on. I don't trust jack nuts, so I'm going with grade 8 bolts and nuts, with a pair of fender washers sandwiching the roof. Didn't have a whole lot of time to work tonight, as I cut my hand pretty bad on one of the dome light clips. On the upside, I finally got my radar detector installed where I want it, and now have the wiring running up through the rear-view mirror hole. I'm going to sand and paint the rack black tomorrow. My plan is to do something Colorado-y with the headliner, since I don't have the handpainted flag on the hood anymore... going to try to bedline the headliner, and then paint over it with an acyrillic paint in the design of the Colorado flag -
Ask and you shall receive.. http://www.wranglerforum.com/f274/how-does-sway-bar-disconnect-work-111375.html Second post, see the picture And then watch the first minute and a half of the video at the very bottom of the thread for a good laugh..
-
The upper link just sits there, and is just short enough that even with the opposite tire stuffed into the fenderwell, the free-moving swaybar end does not tag it. As for the link connected to the swaybar still, for now at least, I just lay it down and zip-tie it to the swaybar. Functional, but not quite what I want.. I'm probably going to drill out one of the holes and stick a long pin through it into the swaybar.. I'll post pictures tomorrow when I get a chance
-
The only serious loadings on the swaybar connectors are axial. I could hook a load meter up to it and jack the axle up on one side to see exactly what the forces are, but the only thing to worry about is the pins shearing; if I see any bending over the next week or so of any of the pins, I'll drill the holes out larger and use larger pins.. The middle ones of your three choices by the way. Yea I'll snag a pair of pictures with the wheel off tonight. Plus it looks like the original photo link already exploded itself.. your idea would require that the truck be on level ground and that your coils/shocks are in equal condition and hold the two sides of the truck at the same level. eh. its what I had on hand. Had some ProLube but I was using some old bits so I really didn't want to use the nice stuff
-
Recently, before setting off on a 4th of July trail run (the first for my in my Pathfinders), I wanted to test the rear articulation of my mostly stock truck. No surprise, it sucked. As most of us know, one of the easiest ways to increase your rear articulation, with nothing more than minor modifications, is to disconnect your rear sway bar. This, however, requires you to crawl under the truck, and unbolt the sway-bar connecting rod, which isn't a fun thing to do, especially if you are older, or, in the case of many off-road trails, "muddy conditions." Now, initially, I cut the sway-bar connector with a dremel, right in the middle. I hadn't actually ever intended to make disconnects, but on my way back from my trail run, I was forced to swerve at high-speed to avoid a deer on the highway. Without the sway-bar functioning to keep the body of the truck mostly parallel to the rear axle, I nearly rolled my truck. So, when I got back home, I rooted around my garage for the supplies to make: Rear Sway-Bar Disconnects. 1 - Steel Spacer, Zinc (1/2" x 5/8" x 3 or 5") 2 or 4 - Steel Codder "Hitch" pins (.093" x 1-1/2"-ish) > .093" is approx. 3/32" (.094), which is the drill bit size to use for a snug fit. If you prefer a snug fit that is also a little easier to insert/remove, go with 7/64" You'll also need a dremel, or some other tool to cut the connecting bar in half, and a drill. It helps to remove the rear wheel before starting, as it gives you direct access to the rod. n Once cut, simply slide the spacer onto the top piece first, rotate the bottom piece into place, and then slide the spacer down slightly so that equal portions of it sit above and below your cut line. You may find it helpful to tape the spacer in place so that you can do the next step: drilling. Drill a hole in the top part of the sleeve, using Wd40 as you go, since the bit will get hot and may dull more quickly. Drill all of the way through both the sleeve, the rod, and the back side of the sleeve. Insert one of your codder pins into this hole. You're halfway done. Repeat the drilling process again for the bottom part of the sleeve, and again insert your codder pin. Tada! You're done, and now have a disconnect system for your rear sway-bar that cost you less than $5 in parts, gas, and WD40 together!! Heres what mine looked like when I was done. Please ignore the rust and dust. Please note: I actually had the sleeve that I used lying around in my garage, and had the codder pins left over from another project. When doing this yourself, you'll want the sleeve to be longer than the one pictured (1.5") so that you don't end up with a slight bend in the rod. In reality, this isn't actually a safety issue, as the only purpose of the disconnect is to keep the two halves together on the road, and allow for the bar to be quickly disconnected when off-road. As soon as I find the time, I'll head to nearest hardware store (30 miles) and snag a longer sleeve. Until then, this seems to be working just fine!
-
What did you do to your Pathfinder today?
CO_pathfinder replied to RedRider3141's topic in The Garage
Well, the spare needs to go for sure, for safety. But so do the wheels, eventually.... yuckkk -
Looks kinda like mine did for a while; got cut off by a jeep in the rain and 5000 lbs of steel does not stop quickly, lemme tell you..
-
Sniffle.. the white Pathfinder next to yours in the picture.., RIP More importantly, however, welcome to the forum!/ welcome to the Pathfinder family.
-
What did you do to your Pathfinder today?
CO_pathfinder replied to RedRider3141's topic in The Garage
if you'll look closely, there is a spare on the vehicle. Correct me if I'm wrong but I'm pretty sure that replacing a spare tire is the utmost important thing that he could do, because spares aren't exactly meant to be driven on for long periods of time. /rant -
What did you do to your Pathfinder today?
CO_pathfinder replied to RedRider3141's topic in The Garage
get rid of those crap wheels first haha -
What did you do to your Pathfinder today?
CO_pathfinder replied to RedRider3141's topic in The Garage
+1 oven cleaner works too, let it soak for a few minutes, then scrub and wash away. If you use kitty litter, try to crush it up and make it as powdery as possible -
What did you do to your Pathfinder today?
CO_pathfinder replied to RedRider3141's topic in The Garage
Bizarre. Working on cutting and fitting my Xterra rack to my roof. Attempting to remount the front pads the way B suggested, by cutting the leg out and using the same hardware as the original setup. Except I found that I had lost one of the little metal tabs since removing the rack from the JY back in November... so I just used spare parts sitting around my garage and fabbed one up myself.. behold.. Now, what you see above consists of the following: 1 - metal seatbelt clip used to secure car seats (left in the glovebox by the PO, a grandpa who used the truck to drive grandkids to school), cut to the length / shape necessary to fit the rack tube 1 - T-nut, because I don't have my welder to secure the nut to the clip, and don't have a threader 1 - snip of a marking flag, in order to keep the t-nut from spinning as I tighten the screw If this doesn't qualify as jerry-rigging, then I don't know what possibly could -
lol i would kill to be able to get mine off to change them... sucks that they were dicks to you though..
-
What did you do to your Pathfinder today?
CO_pathfinder replied to RedRider3141's topic in The Garage
Did the screw happen to be attached to an engine mount? Lol -
What did you do to your Pathfinder today?
CO_pathfinder replied to RedRider3141's topic in The Garage
Stuffed all of my oil/dirt rags into the right rear fenderwell, behind that little cover. Works great and keeps the smell of oil contained -
What did you do to your Pathfinder today?
CO_pathfinder replied to RedRider3141's topic in The Garage
picture for the above post -
What did you do to your Pathfinder today?
CO_pathfinder replied to RedRider3141's topic in The Garage
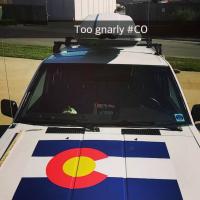
Washed it and myself, as this happened yesterday... More pictures over here at http://www.nissanpathfinders.net/forum/topic/40384-slaughterhouse-gulch-july-4-2015/ -
it adds character, and its a good chance to look at the booty though... But in all seriousness, that is a possibility. something easier to do though would be to remove the interior door panel, and see if you can see what the problem truly is. Also, dont shove on the the door with the handle pulled... slam into it, and then pull the handle.. sometimes with these trucks, being mean and just hitting stuff actually does work
-
UNP Spotting, South of Denver, Colorado. HELP IDENTIFY
CO_pathfinder replied to CO_pathfinder's topic in General Forums
dammit hahahahaha i do. -
What did you do to your Pathfinder today?
CO_pathfinder replied to RedRider3141's topic in The Garage
Sway bar bolts melted with application of PB blaster, so I just cut the rod and will figure out a way to sleeve it and disconnect/connect it later. Let the 4th of July trip... begin! -
Unidentified. Nissan. Pathfinder. WD21, light blue. 3+3 lift on 31's, ARB front bumper, custom roof rack. Sounds like your typical pathfinder. Lots of off-road stickers. Anybody have any clue who this truck might belong to, as in are they on the forum? Kinda looks like Kingman's 88
-
I VOTE 1J SWAPPPP
-
Thats the symptoms that mine would exhibit. give it a shove and let me know what happens
-
Hey guys, trail run at Slaughterhouse Gulch this Saturday, July 4th. Meeting at the gas station just before the turn to the trail on 285 at NOON. Please let me know if you plan on coming, as I am likely bringing burgers!
-
What did you do to your Pathfinder today?
CO_pathfinder replied to RedRider3141's topic in The Garage
Sprayed t-bar adjusting bolts with pb for the third day in a row... hopefully by Friday they will be ready to adjust.. Speaking of, calling all Colorado folks. 4th of July trail run at Slaughterhouse gulch.. meeting at noon at the gas station off of 285. Let me know if you plan on coming so that I know how many burgers to bring!
