- Sign In Changes: You now need to sign in using the email address associated with your account, combined with your current password. Using your display name and password is no longer supported.
- If you are currently trying to register, are not receiving the validation email, and are using an Outlook, Hotmail or Yahoo domain email address, please change your email address to something other than those (or temporary email providers). These domains are known to have problems delivering emails from the community.

CDN_S4
-
Posts
1,562 -
Joined
-
Last visited
-
Days Won
78
Content Type
Profiles
Forums
Calendar
Everything posted by CDN_S4
-
I've done the exact same thing with mine too! There was a LOT of dirt and debris in that box that got blasted straight into the cabin. I would definitely recommend this to anyone with a base model.
-
LE accessory intall: heated seat problems.
CDN_S4 replied to MotiganXD's topic in 96-2004 R50 Pathfinders
JY= Junk Yard -
LE accessory intall: heated seat problems.
CDN_S4 replied to MotiganXD's topic in 96-2004 R50 Pathfinders
I've always wanted to pull an overhead console from the JY. There is a pretty detailed DIY thread on here somewhere. Based on what I saw, I was deterred in attempting it. Seemed quite tricky. But I would be curious to hear/ see how you did it. As for the heated seats, never tried it, sorry can't help. -
My Halogens were upgraded OSRAM Nightcrawler or Nighthawk or something like that and they did not provide as much range as the current LED's. The question that remains is how these hold up over time and if they are blinding to oncoming traffic. Given the height of my Pathy, I pretty much blind any car, regardless of bulb, however, I haven't had anyone flash their high beams at me yet. I've only had limited night time driving so far. But again, given the low cost of these bulbs, it isn't a big deal to experiment with. Personally I love them so far.
-
Ready to take the plunge but have a lot of questions
CDN_S4 replied to Dave.Bert's topic in General Forums
Other than upgrading the bulbs in them, or converting them to LED or HID, the only thing, and possibly best option is to tear them out and put aftermarket "off-road " LED's in there. This might take some customization, but that's the name of the Game when you own an R50! Sent from my iPhone using Crapatalk -
Pretty much my thoughts exactly buddy. The light output is good but the high beam is pretty much useless on mine. Also no way to adjust them. I was able to get the weather seals back over but it was a pain in the butt and I'm not sure it will stay put. I do think they should have an air escape due to the heat build up so in itself as long as you song drive through hood deep water, should be fine. But as a daily driving light, especially in the winter months, I think it's worth it. Especially given the affordable cost of these. Sent from my iPhone using Crapatalk
-
It was Aliexpress I think it was called Light in the Box. There are MANY to chose from on the Internet. Sent from my iPhone using Crapatalk
-
Max tire size VS Lift Kit Used VS Custom or OE Wheels
CDN_S4 replied to fleurys's topic in R50 FAQ's & Pinned Topics
No that's the 3.75 BS -
Max tire size VS Lift Kit Used VS Custom or OE Wheels
CDN_S4 replied to fleurys's topic in R50 FAQ's & Pinned Topics
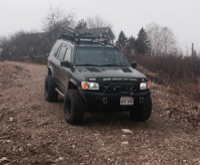
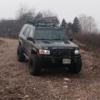
^^ that's probably the most common setup on R50's so you will find plenty of photos of that. Even just a Google search will show you. This is mine with 2" lift and 31's last year. Sent from my iPhone using Crapatalk -
Max tire size VS Lift Kit Used VS Custom or OE Wheels
CDN_S4 replied to fleurys's topic in R50 FAQ's & Pinned Topics
Since my last post on here is all screwed up due to crapatalk, and is out of date, here is another post of my setup: 1999 XE 15x8 Pro Comp Rock Crawler steelies 33x12.5 R15 Goodyear Duratrac tires 4"SFD plus OME HD in the front 6" WJ coils in the back with Bilstein shocks (33-185569 // 5125 Series) 1.75" Rugged Rocks wheel spacers Trimmed front fenders - untouched rear fenders Pacer universal fender flares. -
Max tire size VS Lift Kit Used VS Custom or OE Wheels
CDN_S4 replied to fleurys's topic in R50 FAQ's & Pinned Topics
simply get a soft 8 or rock crawler rim with 3.75" BS. This will provide sufficient strut spacing and is the most commonly found BS size. And if you ever needed or wanted wider, you can always add wheel spacers. If you get what you said above for dimensions and sizes, then you will sit like Ferrariowner and need to trim just a tad of the fender liner as the 31's will rub at stock height. A quick google search will provide you the answers to your other query: http://www.4wheelparts.com/tire-wheel-package-guide/wheel-offset-backspacing.aspx -
To be honest, these are better than expected. In combination with my other LED's which are pretty much aimed at the ground, the total light produced is quite awesome. Sent from my iPhone using Crapatalk
-
This pic is without the off-road lights This is with them on Sent from my iPhone using Crapatalk
-
I didn't. Sent from my iPhone using Crapatalk
-
Installed LED headlights. So far I like them. Long term review will follow. Sent from my iPhone using Crapatalk
-
I decided to play Guinea pig for this. My verdict, they work, they put out better light than the halogen ones. I haven't driven on the road yet so I don't know if they are blinding to oncoming traffic or not. That's the good part. The bad part, they generate a lot of heat (which I find odd since LED is supposed to not do that) which means they require a built in cooling fan, making them quite tricky to fit into the tight rubber grommet that keeps the inside of the headlights clean. The second thing which I am not sure yet if it's my installation's fault or the bulb's. But when I put the high beams on the patterns seems to go wider instead of taller. There are diodes on 2 sides so I'm thinking I just have them sideways. Will give them a spin and see if that changes things. So as long as these don't melt, or just stop working like a lot of cheap bulbs, they might be a decent option. OSRAM Halogen Driver side LED, passenger OSRAM Sent from my iPhone using Crapatalk
-
Received and mounted my front diff guard. As others stated its a WD 21 OEM part but perfectly fits the R50. Sent from my iPhone using Crapatalk
-
The question is not what I did I TO my Pathy, but rather what did I do WITH my Pathy today? Drove 818km in the last 2 days including through a snow storm. Pulled one Lexus out of the ditch. Stopped at some others in the ditch but they already had a tow truck coming. Sent from my iPhone using Crapatalk
-
I would love a set of leathers too. Power mode would be easy I think. Even basic models are already wired for all the options. For example there are fog light wires and plugs, heated seats wires and plugs in my basic XE. Sent from my iPhone using Crapatalk
-
Any my project number 2 for today was to install more power outlets in the cabin. Now I have 2 USB plugs and 1 cig lighter plug plus a voltage reader plus a light inside my arm rest. Sent from my iPhone using Crapatalk
-
Got a little carried away with a project to mount a licence plate light to my carrier with an independent power source to avoid having a wire from the body to the removable carrier. So I used a small scooter battery housed inside an ammo can, fed via a solarpanel battery trickler. I've installed the power such that I can simply switch the light off if need be. But since the lamp is an LED light it draws minimal power and "should" be able to run permanently while the carrier is mounted. Everything is set up to be easily removable and modular. This way I can simply drop the carrier as a whole without having to fumble with lighting and wiring every time. Sent from my iPhone using Crapatalk
-
Canadian. And yes he does write back. Might not always be the fastest but he will get back to you. Sent from my iPhone using Crapatalk
-
Yeah I would say anything from 15-35 would work. Sent from my iPhone using Crapatalk
-
I think mine is only 15" or so and it is MORE than enough! I honestly find the full length light bars to be overkill. Sent from my iPhone using Crapatalk
-
And Flowmaster my ASS!!! I honestly cannot hear a difference in tone from the original generic muffler. What a disappointment! Sent from my iPhone using Crapatalk
