- Sign In Changes: You now need to sign in using the email address associated with your account, combined with your current password. Using your display name and password is no longer supported.
- If you are currently trying to register, are not receiving the validation email, and are using an Outlook, Hotmail or Yahoo domain email address, please change your email address to something other than those (or temporary email providers). These domains are known to have problems delivering emails from the community.

CDN_S4
-
Posts
1,562 -
Joined
-
Last visited
-
Days Won
78
Content Type
Profiles
Forums
Calendar
Everything posted by CDN_S4
-
More pics from the last trip, dubbed the "Bomber Run", 3 day rip around Maine with various stops, the main one being the B-52 crash site. But photos of debris are not interesting to look at so here are my favourites. Curtesy of our in-house photographer, Ryazan: Day one, one route Swinging hanging bridge first stop on the mountain side TBC...
-
If I had that option I'd have a full on rear facing gunner station set up. But I already have a machete there so I have to stick to my trunk ninja's instead. Sent from my iPhone using using Crapatalk
-
The machete is sharpened with a file, it's just not as sharp as I keep my knives. I did use a file too. And I have an axe in my truck that's plenty sharp. It's mounted by 2 quick fists in my trunk also. Megaton, good point about the accident though. Due to the amount of things in my trunk, I'm planning on either installing a pet barrier or a raingler (sp?) net to keep anything from flying forward should I ever be in an accident. Sent from my iPhone using using Crapatalk
-
Where are you thinking about mounting it? Sent from my iPhone using using Crapatalk
-
Haha yeah that's a legit concern, but I've slammed the door a bunch of times and it spent 3 days on washboard gravel roads in that location and didn't budge. It's also very light and not overly sharp. I'm honesty not worried about it. Now if this was Final Destination 8 on the other hand... LOL Sent from my iPhone using using Crapatalk
-
Good to know! He did advise me of this too. I'm going to pull the rubber out then. Thanks Sent from my iPhone using using Crapatalk
-
I've always meant to put a 12V outlet in the trunk for convenience. When I saw the dual charger with USB and regular "cigarette lighter" plus volt meter on SPARKYONBASS's pathy, I knew that would be the way to go. Found this for $11 on eBay! Sent from my iPhone using using Crapatalk
-
Maintenance schedule after 192,000 Km for 03 Pathfinder A4?
CDN_S4 replied to Chook's topic in 96-2004 R50 Pathfinders
Make sure the timing belt has been done. Off the top of my head, I think it's supposed to take place around the 150-160.000 km range. Other than that, obvious oil change, filter, transmission fluid, front and rear diff fluid. Check breather hoses for cracks. Check all drive belts, check for grease in the hubs, BPT pack new grease. You will likely find things that need attention as you check all the above. Find out when the last time was the shocks and struts were replaced, maybe even the springs as these parts wear out and settle as you probably know. Sent from my iPhone using using Crapatalk -
Haha other than a belly plate I pretty much have all the armour there is. Added fuel, well I can carry 2 5gals on the back and I have 4 more I can put on the roof rack. I wouldn't put on run flat tires as I need the ability to air down. Key is simply to have a full size spare ready and a tire repair kit. I didn't build it AS a bug out truck but you are right, it definitely has taken that direction. Secretly we all hope for a zombie apocalypse lol. But seriously though if something happened that would call for people to bug out, I would be called into work lol. I might still need that bugout sticker though Sent from my iPhone using using Crapatalk
-
So I've been having this buzzing coming from behind my glove box that would go away when I applied some pressure on it with a finger. So I took a look behind it and stuffed it with rags to create that pressure from the inside. That didn't help so I decided to put a screw through it (this is where Hawairish will cringe lol) in order to apply constant pressure. So I figured if I'm already screwing into my dashboard, I might as well make something useful with it. Thought about a handle. But figured a handle would be better suited on the A pillar. So I decided on a strap to mount Molle pouches to hold various items that could be of use. And this theme matched my pathy as I already have a bunch of pouches all through it. This is the end result. And since I was already drilling into the interior, I decided to permanently mount my machete. Sent from my iPhone using using Crapatalk
-
Sounds like a pretty decent list of upgrades. Once you are underway with this project, you won't be able to stop lol. Looking forward to this thing coming to life! Sent from my iPhone using Crapatalk
-
Still not mounted, but here's another sneak preview of what's to come. The install of these is much more extensive and complicated than I expected as the unibody "frame" sits behind the rocker panels. So instead of angling the connectors I'm welding on drop brackets to give the mounts a full flat surface to grab onto. This will also aid with protection of the undercarriage as the sliders will be flush with the crossmember brace underneath. Sent from my iPhone using Tapatalk
-
K thanks for the info. I'll look into the Bilstein option. I like mine now. They are just too short. Sent from my iPhone using Tapatalk
-
Are these the right ones Patrick? http://www.amazon.ca/Monroe-911194-Reflex-Light-Absorber/dp/B000CD5QDG
-
hahaha ok, enough said!
-
Awesome thanks! I read through muddyvaines thread and saw he is running the rancho shocks. Aren't they by Monroe too? Sent from my iPhone using Tapatalk
-
This reply is not directly related to the above posts, but I am looking for info on longer rear shocks for the R50. I have the 2" lift Bilstein shocks, but I am lifted at 5" and I need a longer shock. I've spent a lot of time searching but I'm not coming up with conclusive info. Most shocks that are advertised for the R50 only give 2" extra length. Is the F150 option the way to go in this case?
-
Thanks! And you are absolutely right. My intent was to get a roof rack basket, a 2" spacer lift and 31's. That was it lol. Buuuuut as we all know, a vehicle is NEVER finished and the gears keep turning and new ideas keep developing and more money keeps getting spent. Sent from my iPhone using Tapatalk
-
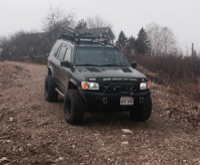
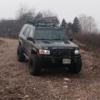
No luck with the sliders today. Should be done by the weekend though. But I like the new stance: Sent from my iPhone using Tapatalk
-
We'll see how it holds up. May or may not remove the rubber isolator depending on how it holds up or if I manage the pop a coil out under full flex. Although that is unlikely unless I get longer shocks. Sent from my iPhone using Tapatalk
-
Since I put on the SFD and cut my front fenders some more, I've been meaning to raise my rear a little bit beyond the 4" from the WJ coils without going to the 6" lift coils as that would be too much for the 4" SFD in the front. But since I usually carry my spare on the back, and with full camping gear, I wanted a bit more lift. Fleury's spacers from 4x4 designs are meant to go on the bottom of the coil. They do however also fit on the top. And if you are like me and kept the pigtail on the bottom and made an adapter for it, your coil will be cut on the top and have a very close to OEM outer diameter. The install is pretty self explanatory. A bit of a pain in the butt since spring compressors are required and those are always a bitch to use. Step 1: Raise the rear and put the frame on jack stands to keep the rear off the ground. Don't forget to place blocks in front of the front tires. Step 2: Remove rear wheel, disconnect the sway bar, or better yet, get rid of it!! (I don't use mine and I don't miss it). Disconnect the upper shock mount. Step 3: Put your jack under the opposite side of the one you are doing first. Raising it will cause the other side to drop and take pressure off the coil. OEM coils at this point could be pulled out, not the longer WJ coils. This is where the spring compressors come in. Get them compressed to the point where you are able to grab and pull out the bump stop. This is in the way and can be pushed back in later. You can either remove the whole coil as I did on my first try or just compress it enough to slide the spacers between. Step 4: Take a spacer and slide it into its seat: http://images.tapatalk-cdn.com/15/09/12/3a7c50def3dda790ddfd27a9fca850bf.jpg[/] Step 5: Release the pressure on the coils and align them with the grove on the spacer. Step 6 Release the tension on the jack and level out the axle. Push the bump stop back in. This can be a bit frustrating but I found that some silicone spray and a screw driver got it done. Before: After: Sent from my iPhone using Tapatalk
-
I raised the rear end an inch higher today. Will make a separate post for it to support Fleury's spacers. Here is a pic: And a teaser of things to come with the sliders: Sent from my iPhone using Tapatalk
-
Funny the guys posted on page one were 18 back in 2003 when this was posted. Wonder if they still drive their Pathy. I'm only 29+5. Sent from my iPhone using Tapatalk
-
These are gonna go on this Sunday: Sent from my iPhone using Tapatalk
-
Nice! I dig those wheels too!! Sent from my iPhone using Tapatalk
