- Sign In Changes: You now need to sign in using the email address associated with your account, combined with your current password. Using your display name and password is no longer supported.
- If you are currently trying to register, are not receiving the validation email, and are using an Outlook, Hotmail or Yahoo domain email address, please change your email address to something other than those (or temporary email providers). These domains are known to have problems delivering emails from the community.

CDN_S4
-
Posts
1,562 -
Joined
-
Last visited
-
Days Won
78
Content Type
Profiles
Forums
Calendar
Everything posted by CDN_S4
-
THIS is a great idea!!! I will do just that. But I will probably still get louvers because they look badass!! LOL
-
I honestly don't think rain it as much of a concern as it's being made out to be. I mean everything inside the bay CAN get wet. I wash my engine bays out with soap and water and never had any issues. But if absolutely necessary, one could fabricate a second layer really close to the top layer of the hood that collects water and delivers it to the sides. Looks like Silverhorn has the same louvers, but not the XL size, which is what I would get. The weatherstrip could be interesting to look at. Or creating a better flow towards the rear by either trimming the firewall down just a tad in some spots, not sure if possible at all, just throwing ideas around. Just thinking of ways to let the air out better. I'll have to take a closer look... I'm sure something will pop into my head if I stare long enough lol.
-
God damn it tapatalk you're messing with my mojo!!! Sent from my iPhone using Tapatalk
-
Some good info here. Yeah I've seen andy's, and that's what gave me the idea. His louvers look exactly like the ones I've linked. While letting hot air out is great, maybe better would be to draw more cold air in AND let hot air out. So maybe having 2 louvers, or 1 further forward that face forward and push air into the bay and having 1 or 2 louvers higher up closer towards or parallel to the windshield where all the hot air would pool, would be ideal. Also some half trays could be fabbed to keep rain and snow off some of the more sensitive areas. Sent from my iPhone using Tapatalk
-
Yeah I've seen his louvers. By the looks of it, he has similar ones as the ones I linked. I read up on his and followed the link to the ones be bought, basically the same. He put his quite cantered on the hood, which is where I was thinking about putting them too, mostly engine block there. Maybe I'll fabricate a half tray just to keep the water off of the spark plugs wires. Maybe a third louver that runs parallel along the windshield would be a good idea too as that's where most of the hot air would get pushed to at any speed. So now that I'm thinking a bit more about this, maybe ideal would be to find some that point forward and pull air in, put those further forward and place a larger one at the back that lets hot air out. Sent from my iPhone using Tapatalk
-
Yeah placement is key. Definitely will have to be over hot components and not over electrical stuff. Even though the engine bay can be fully hosed down and they get wet in the rain and on the trails so it's not like a drop of water is going to kill it. Sent from my iPhone using Tapatalk
-
Yeah, these ones: http://hoodlouvers.com/wp-content/uploads/2012/08/Large-Natural-Aluminum-Regular-Flow-2.png I think they would look pretty cool and seem to work well too.
-
Infamous shake body vibration between 45-65mph
CDN_S4 replied to BuffaloR50's topic in 96-2004 R50 Pathfinders
Your shocks might be worn! When I picked mine up stock, it also had a vibration that went away after I replaced all 4 shocks, sorry struts and shocks to be more precise. -
Yeah it would have been, all sitting on the control arm, so the ball joint. I do have my OEM one that is still in really good shape as I had them both replaced not long ago. But I don't see any damage to this one either. Sent from my iPhone using Tapatalk
-
Lol Yeah I'm sticking with the KYB, despite the issue. I'm going to attribute it to either too much or too little torque on the nut. I'll get another Excel-G, as that's what I have on the other side. Struts are only 11 months old so no need to get them both replaced. No dent in the hood as I still have the hood liner in. This will go once I put in hood louvers. Sent from my iPhone using Tapatalk
-
It wasn't a nylon and it wasn't by hand of course. It was a flange nut. I never leave home without a socket set and a torque wrench. Luckily this happened while slowly driving up a winding gravel road to the top of a mountain. I had just turned a hard right when something popped and the truck pulled hard to the right. I immediately pulled over. This is how we were able to find the nut, which despite the 4"deep SFD spacer managed to fling out of the engine bay. Had this happened at cruising speed I'm sure it wouldn't have ended this well. Sent from my iPhone using Tapatalk
-
Infamous shake body vibration between 45-65mph
CDN_S4 replied to BuffaloR50's topic in 96-2004 R50 Pathfinders
Don't happen to have spacers on it? I've chased a vibration down for a long time and replaced a lot of parts and in the end it was the spacers. Sent from my iPhone using Tapatalk -
Oh and BTW, reference one of your much earlier posts, don't put anything but regular 87 into a Pathy. It says it right in the manual. Sent from my iPhone using Tapatalk
-
2002 Pathfinder, 5 Speed- what rpm on highway?
CDN_S4 replied to TRUTHABSOLUTE's topic in 96-2004 R50 Pathfinders
Mine with 33's does 2800 rpm at 70mph. Sent from my iPhone using Tapatalk -
Not sure, it was just hand tightened. It was the stock nut with the built in washer, know what I mean those nuts with the wide flat end on one side. I'm thinking it wasn't tight enough and therefore it wiggled itself off and in the time it took the threads got damaged from getting banged around. Sent from my iPhone using Tapatalk
-
Yeah the nut had loosened from the vibration of bombing down dirt roads and after some playing around in a gravel pit, this happened. Luckily we found the nut and nothing was actually broken. But the threads are toast so I'll have to get new struts. Sent from my iPhone using Tapatalk
-
Sent from my iPhone using Tapatalk
-
Got back from the B52 trip. Had some unexpected challenges. My strut had popped out. Luckily with some creativity, a high lift, a crow bar a BA hammer and some ratchet straps we were able to pop it back in and continue the journey. http://images.tapatalk-cdn.com/15/09/06/becb3caa78fbb0a7af82f2fbf68f73fd.jpg http://images.tapatalk-cdn.com/15/09/06/e58ff369b7db21d6baed0ae6d9cf5e92.jpg http://images.tapatalk-cdn.com/15/09/06/99e5814998a8e5f2cd58a58af3abe395.jpg http://images.tapatalk-cdn.com/15/09/06/114a1ead37bfdaf72a1b1ad1af7aa769.jpg Sent from my iPhone using Tapatalk
-
Oh I know! I make light of her rust all the time lol. The sliders are arriving on the 4th. But I will be out in the woods until the 6th so it will be an after trip install unless they arrive a day early as I shipped them down to my buddy in Maine, where I'm headed for this trip. Sent from my iPhone using Tapatalk
-
Haha funny Patrick! Yes she's got her fair share of rust, she has her quirks, she rattles and squeaks, but she always comes through for me, never disappoints, always delivers and surprises me with how capable she really is, even when I try to push her limits. She's not the pretties of them all, she's not the fastest and not the strongest, but she can be trusted, she's reliable, surprisingly low maintenance, sexy in her own way, confident and best of all, she's mine! Sent from my iPhone using Tapatalk
-
Honestly I have no idea what you're talking about lol Sent from my iPhone using Tapatalk
-
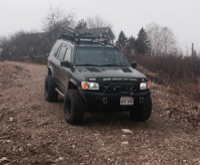
Time for a random photo. Also been talking to Fleury to make a rear spacer for the top that is designed for the WJ coil for all those running the SFD with WJ coils setup. 1" stackable as usual. Although mine sits pretty level I would like to raise the rear just a tad more. Especially now that the fenders in the front are cut more, it looks like it's lifted higher in the front. Sent from my iPhone using Tapatalk
-
I used an aluminum bar to mount my lights to the rack and ran the wiring like you described through the rain gutters down the the sides of the windshield into the engine bay. I covered them up with tape lol. A bit ghetto but beats drilling holes. I didn't take my wires out of the plastic sleeve that they come in, otherwise I would probably tuck them into the weather stripping. Check out page 12 of my build thread, there are some photos of the install. It has moved since then but the idea is still the same. Sent from my iPhone using Tapatalk
-
I run 15's on my 99 which came with 16's. The fit is extremely tight and with new pads, it won't clear them. So you have 2 options: 1- shave the calipers with a grinder. Super simple and free!! 2- get spacers. This will cost you some but the additional width of the stance looks awesome!!! I love it on mine. I used to just run shaved calipers until I had to get one replaced as it was seized. The new one still cleared it but only because my pads are halfway down. Now I have 1.75" spacers: Sent from my iPhone using Tapatalk
