
theexbrit
-
Posts
1,266 -
Joined
-
Last visited
-
Days Won
33
Content Type
Profiles
Forums
Calendar
Posts posted by theexbrit
-
-
Theexbrit, where is your version?
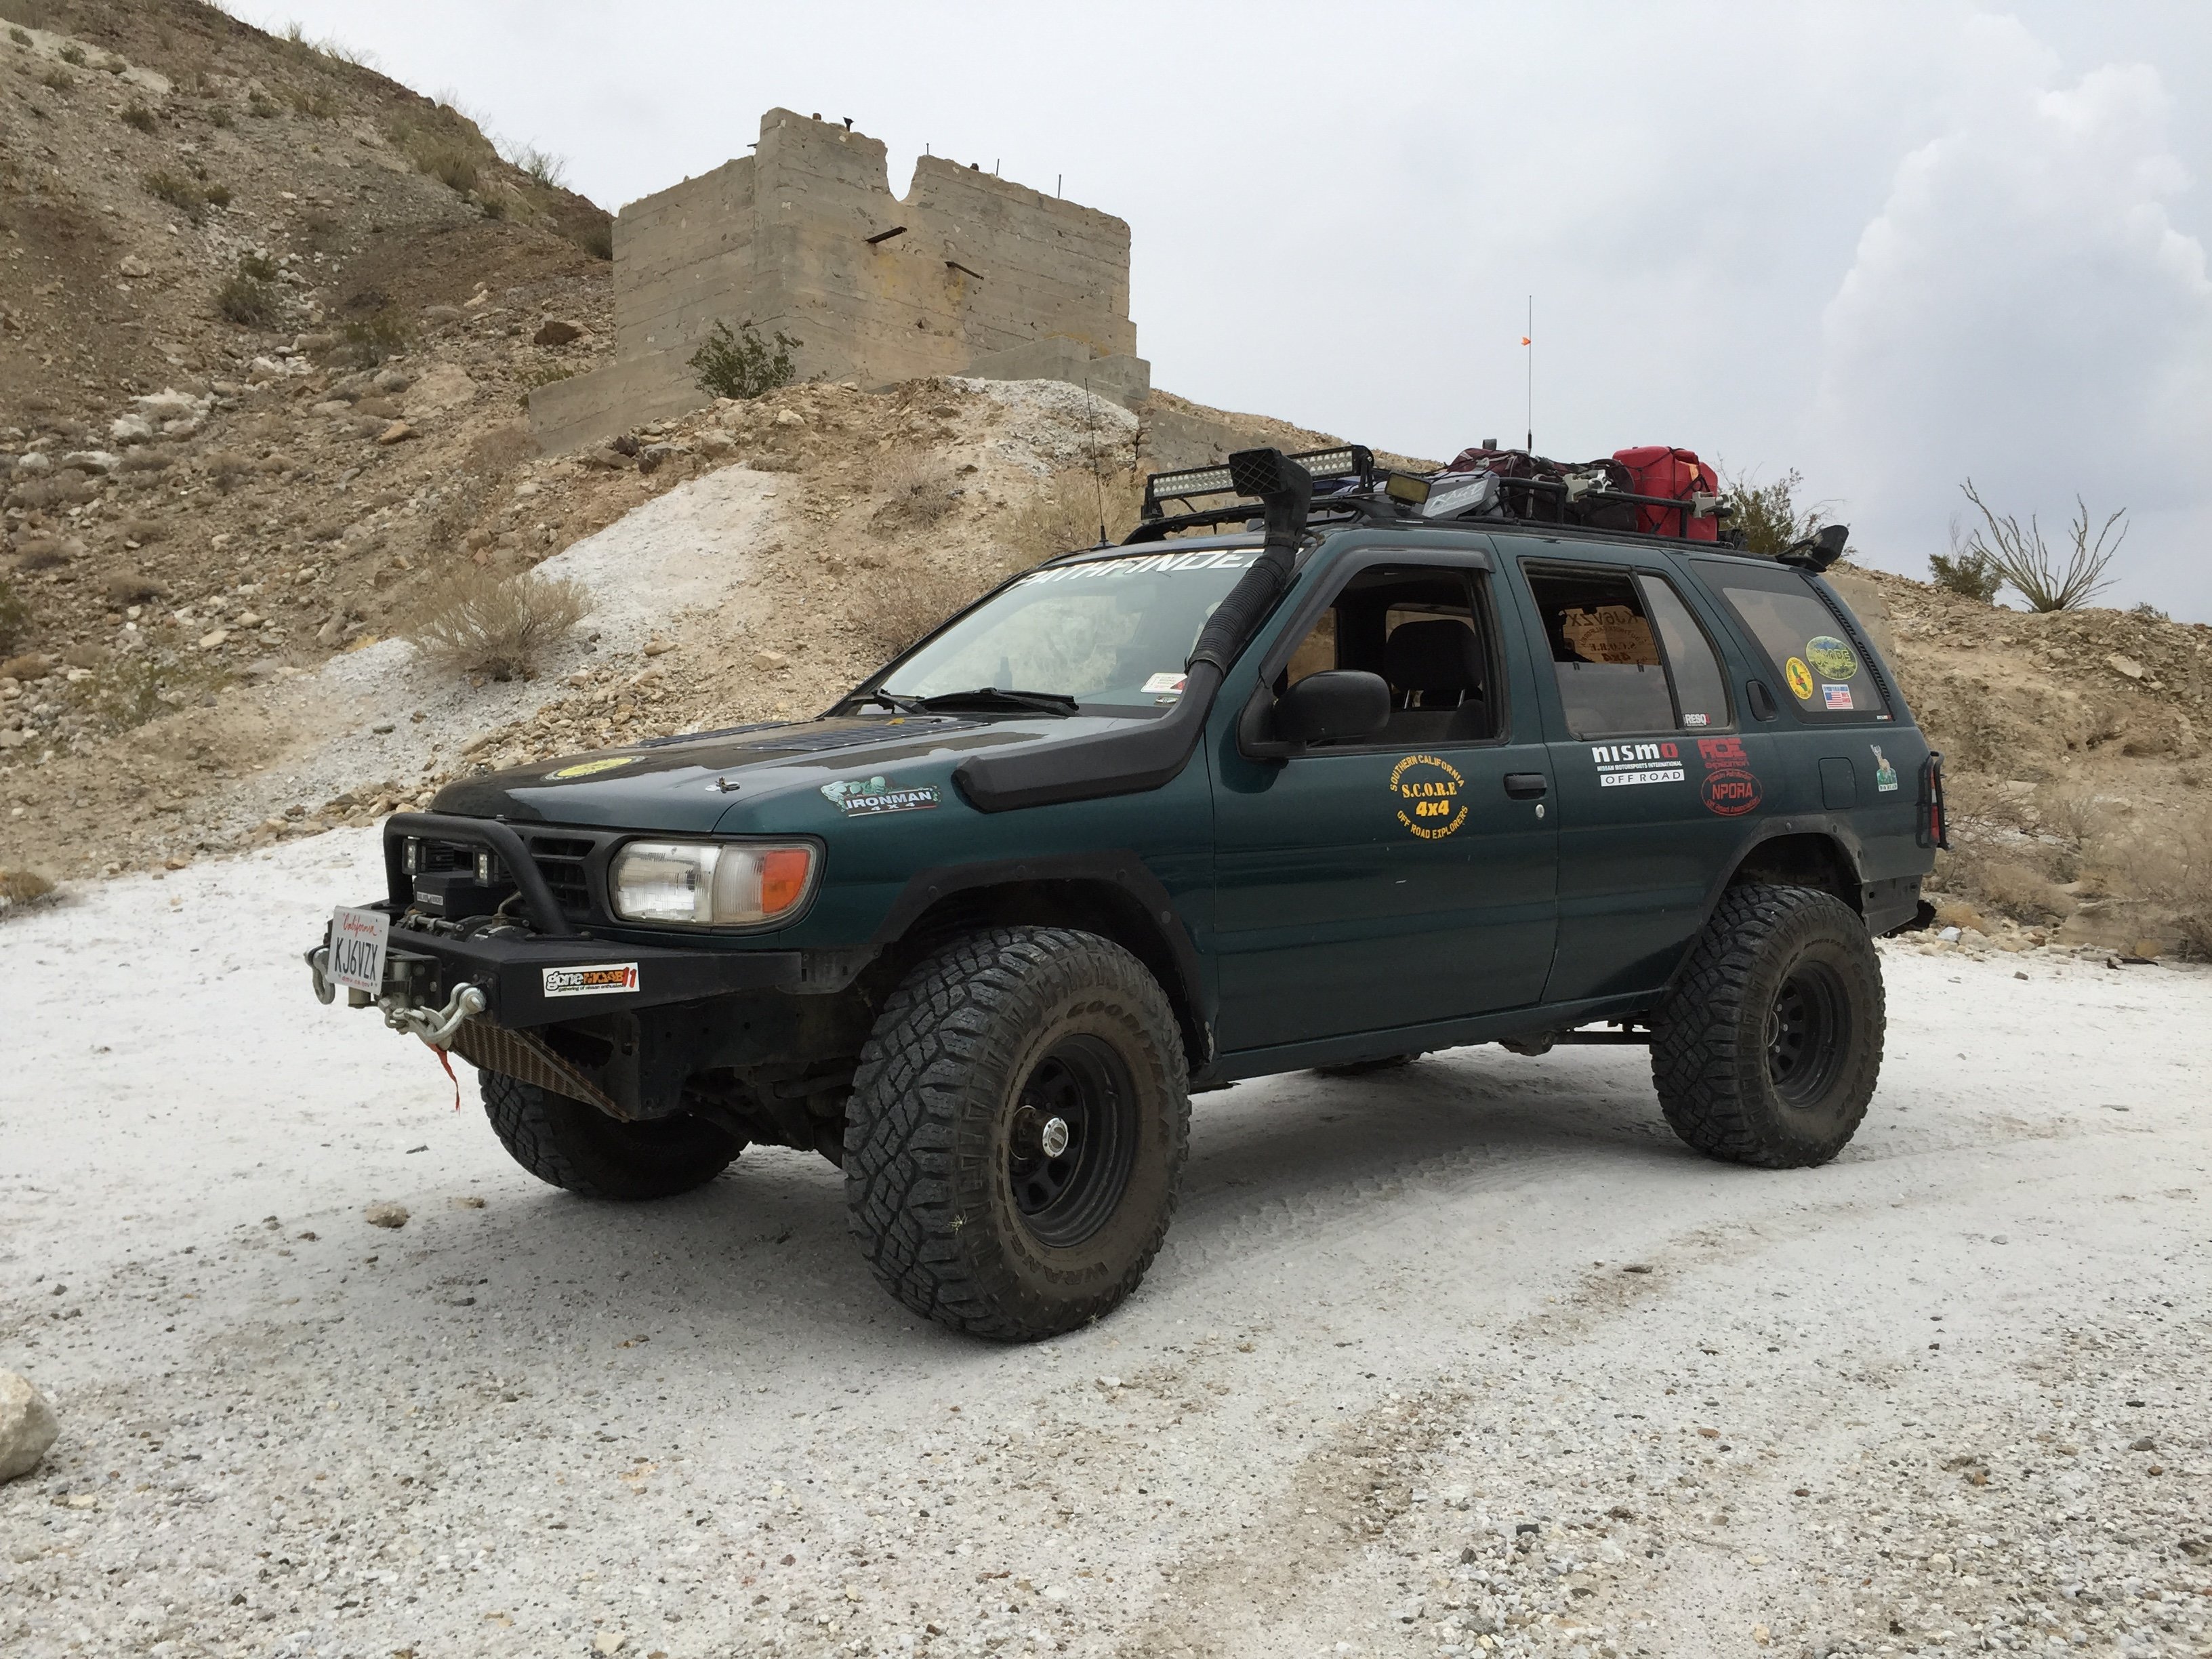
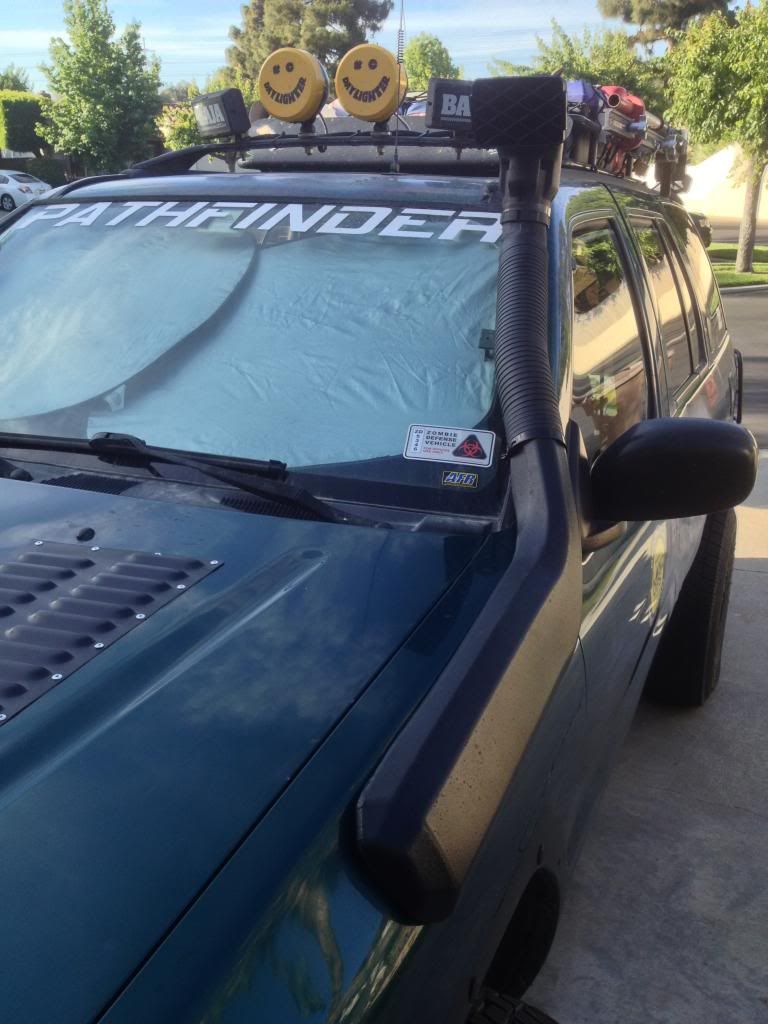
Here's my finished product. Not exactly home made, more of a heavily modified Cherokee snork.......

Cost me less than $150 total.
-
 1
1
-
-
When you've finished cutting you should end up with a hole the shape of the louver but the width of the masking tape smaller (the "lip" to mount the louver). I didn't take any photos of this, sorry.
Anyway, remove the inner strip of masking tape so that you're left with the tape that marked the actual edge of the louver & put the louver back on the hood so it should look like this again with the louver sitting on the inner lip that was under the inner masking tape.........
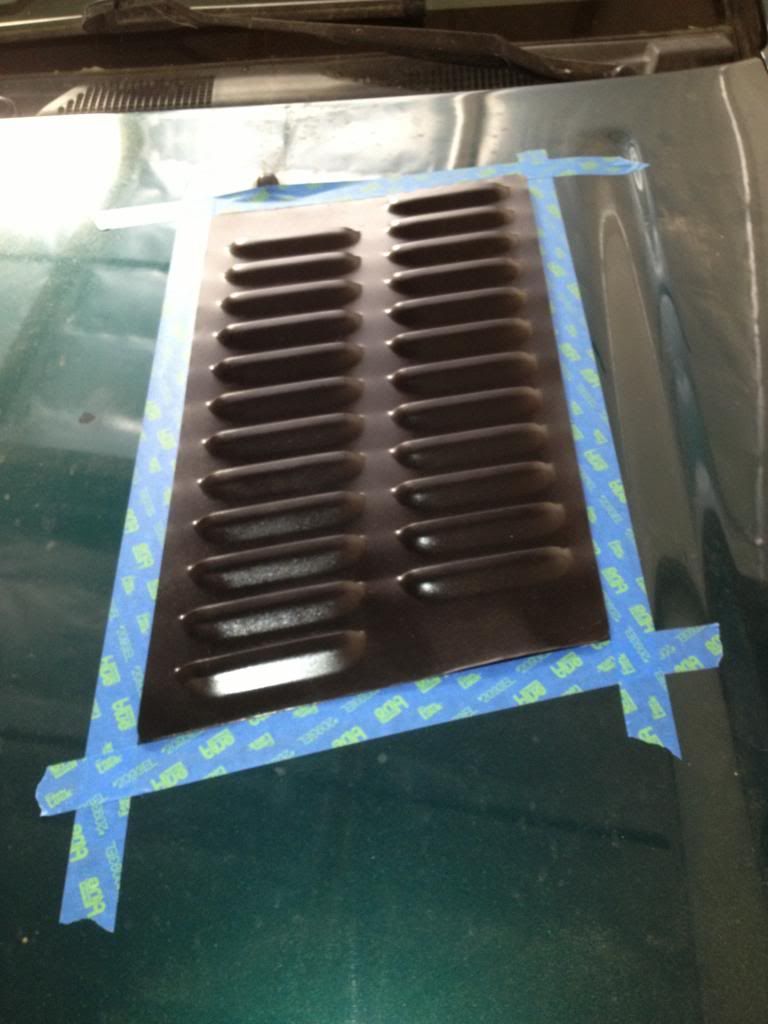
Then, holding the louver in position, drill your mounting holes in the louver & through the hood (as many or as few as you think you need) & bolt or rivet the louver to the hood (I used stainless steel rivets).
When you're done it should look like this.......
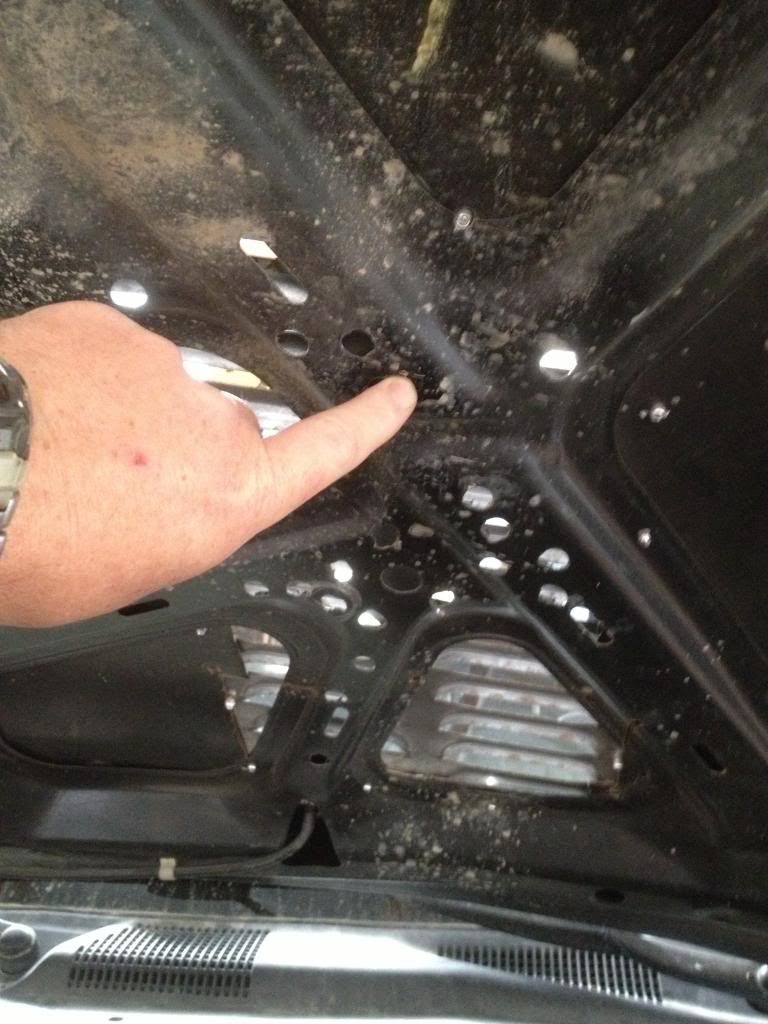
Here's a shot of the inside of the hood with the louvers fitted, as you can see the hood strengthening supports are still there, albeit blocking a little airflow (yes, I removed the horrible black insulation from the underneath of the hood).......
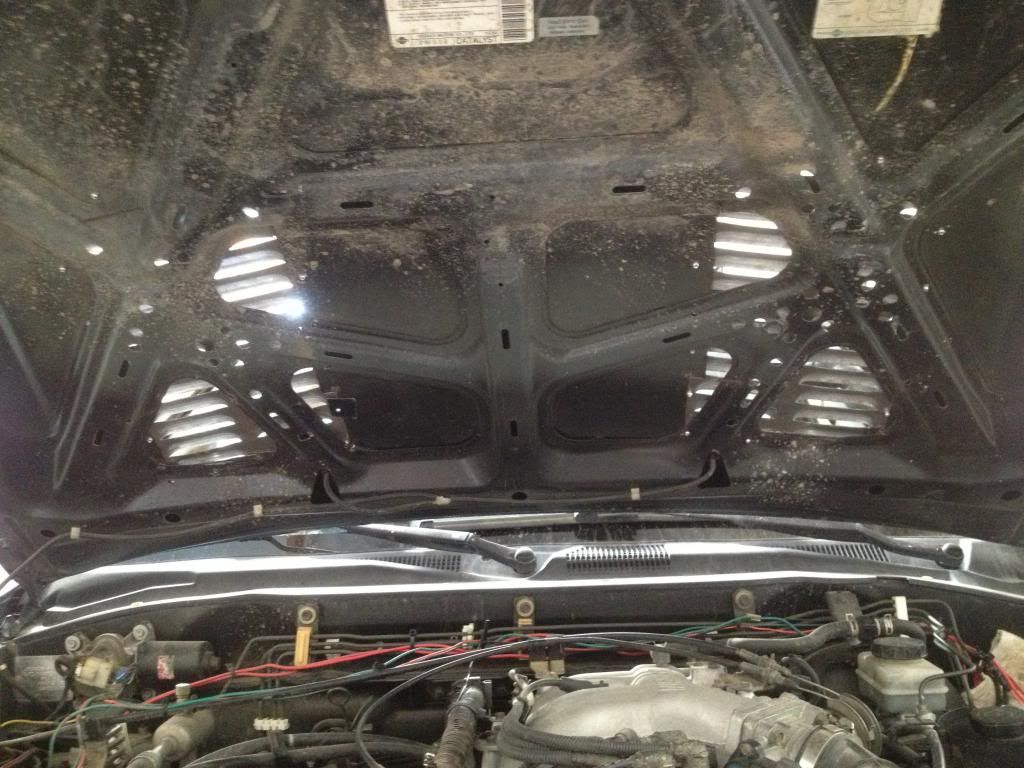
As you can see I drilled a few holes through the hood strengthening support to increase the airflow. I am going to cut a bit more out of the support for even more airflow.
Do NOT cut or drill the edge of the support (indicated here) as this is where most of the strength is........
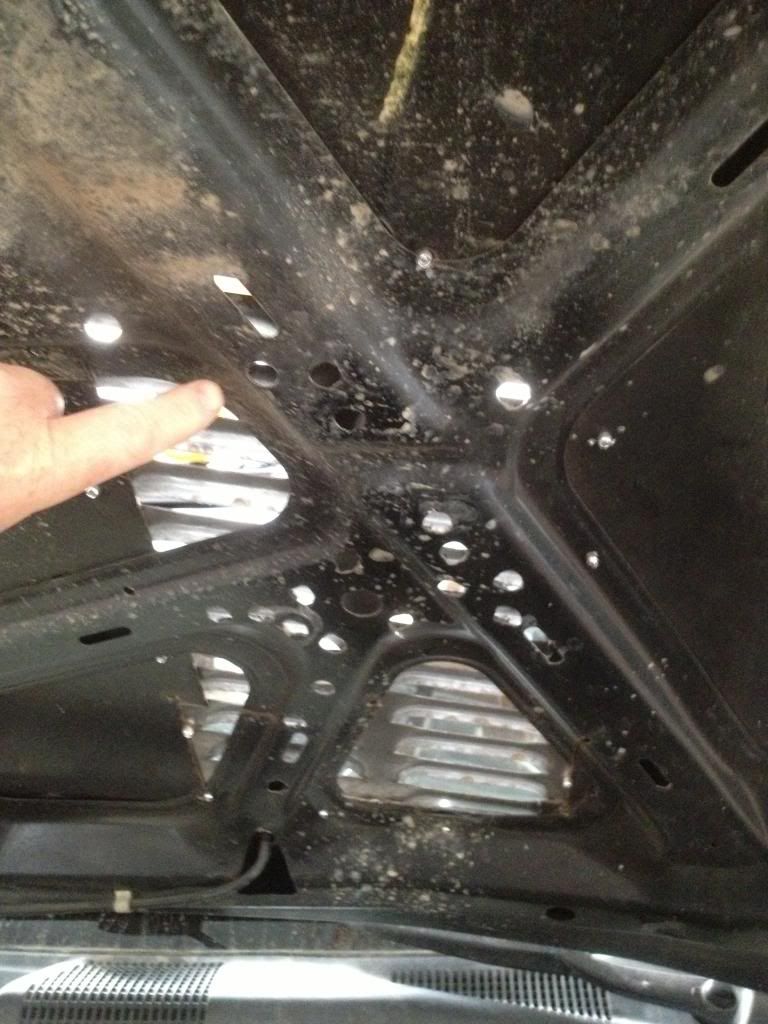
Only drill or cut the MIDDLE of the support as indicated here........
-
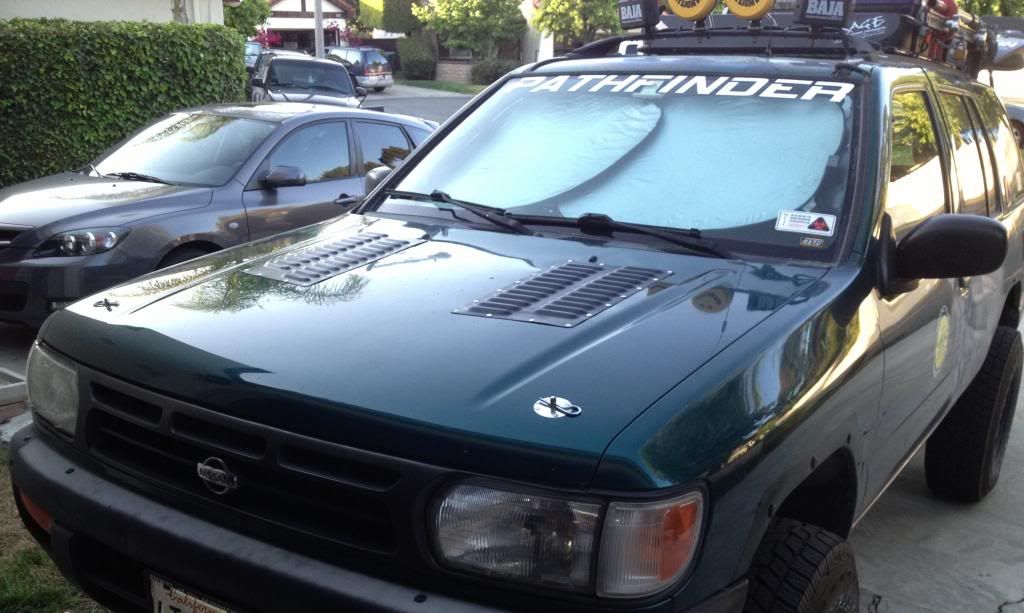
This is how I replaced my "Pep Boys Special" hood louvers with some decent steel ones.
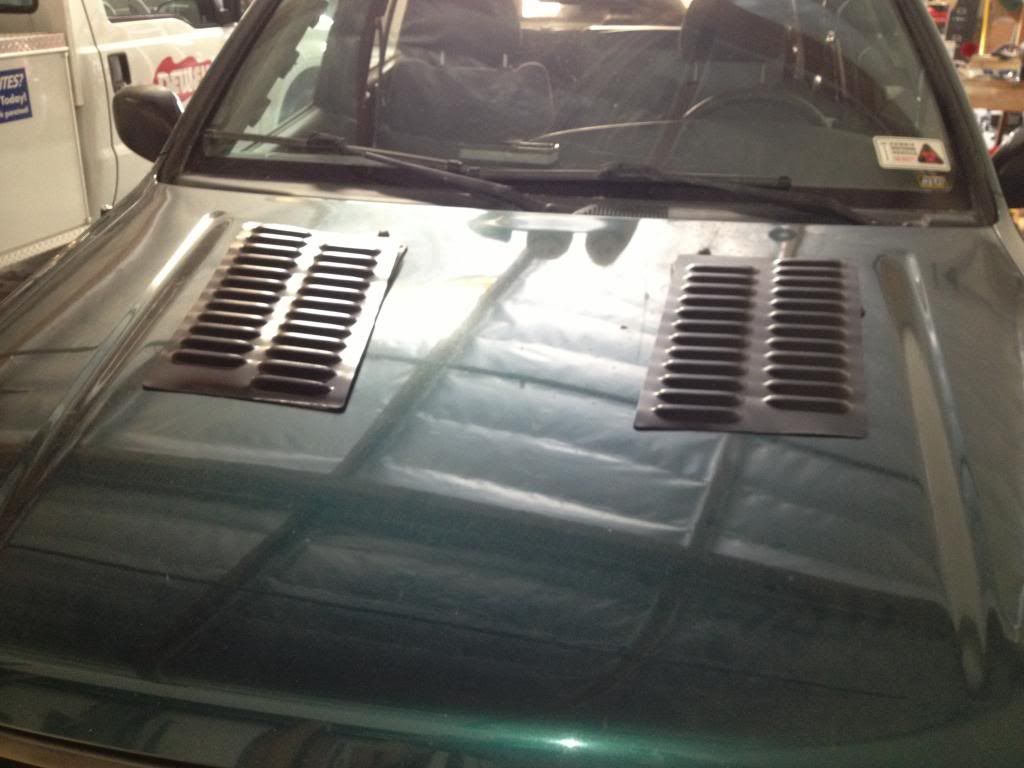
Here's the original "El Cheapo" ones........
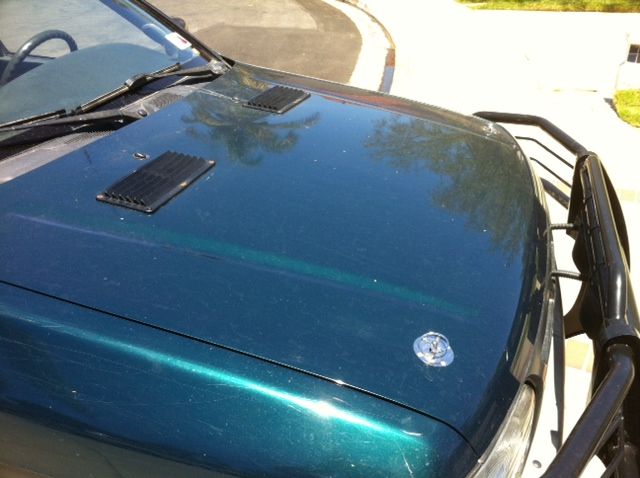
First, place the louvers in the position you want on the hood. I used the contours of the hood to help me in getting them straight & even with each other......
Hold the louver in position (I used some Hercules putty) & run a pencil around the outline of the louver. Remove the louver then put masking tape around the louver with the inner edge of the masking tape running along your pencil lines (the louver has been put back in this shot).......
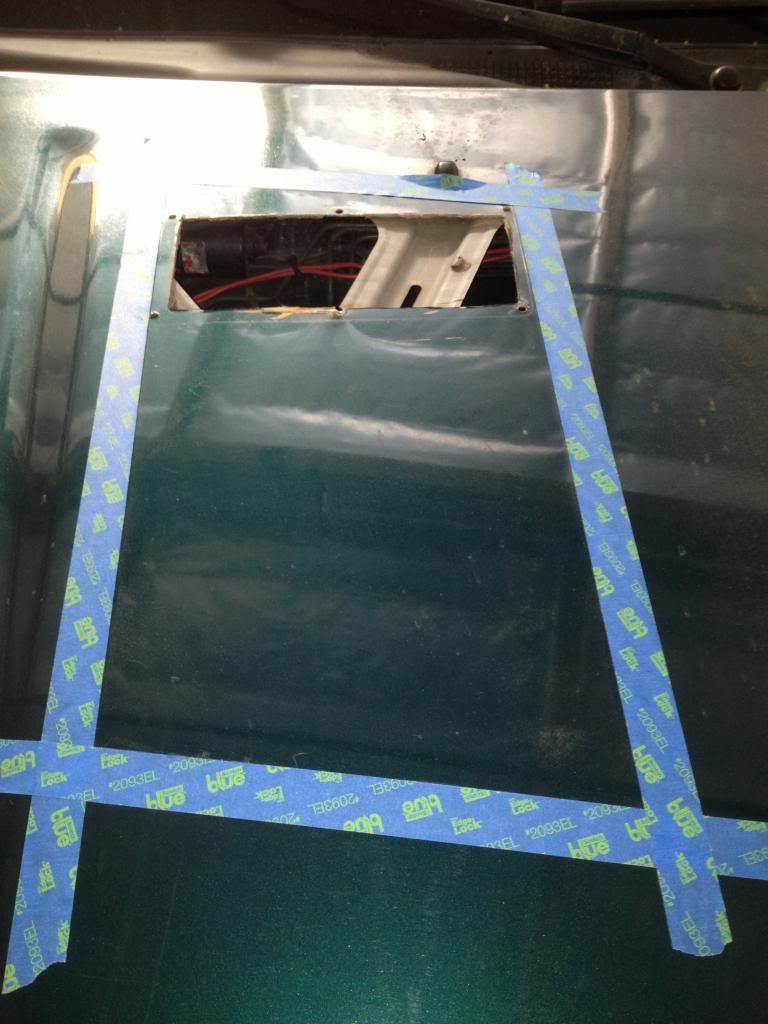
Do this with both louvers (note the hole from the original vents on the passenger side of the hood.........
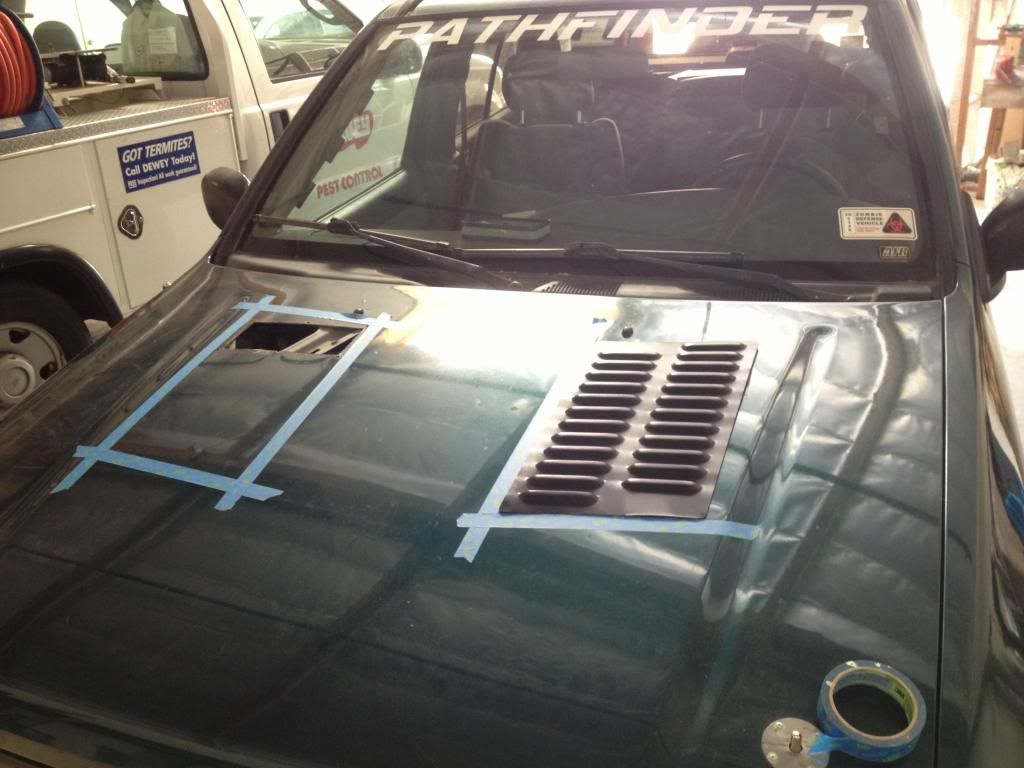
Then put another "inner" set of tape butted up to the first tape all the way around the louver template, this will give you your "lip" where the securing bolts or rivets will hold the louver to the hood......
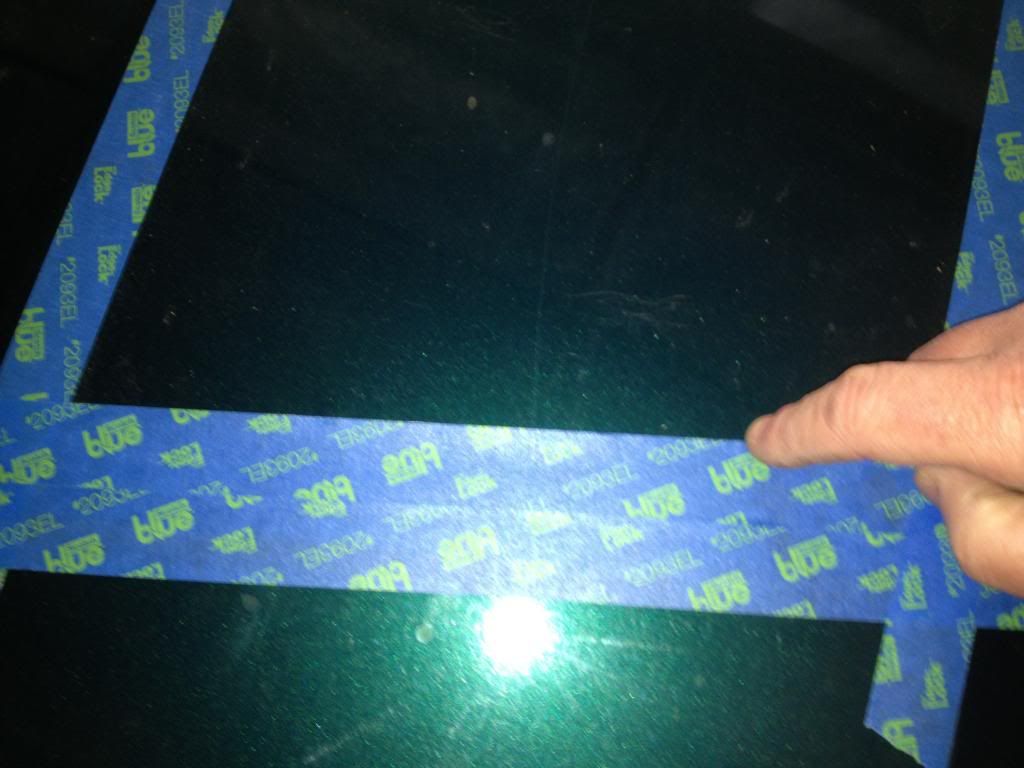
Then, using a Rotozip, Dremel or some such tool make your cuts along the inner edge of the inner masking tape (where my finger is in the previous photo. You need to set the depth of your cut to just a bit more than the thickness of the hood steel (about 3mm I think). Do NOT go deep enough to cut through the hood strengthening supports!!!
This photo only has the outer layer of tape as I was making sure the new louver would cover the hole left from the old vent, but you can see the hood strengthening support here.......
-
I was thinking about a solar controller, that's probably the easiest way I guess. Thanks.
-
Hi all, I have a question regarding a solar battery charger.
I bought the Harbor Freight 1.5w solar panel battery trickle charger for when I'm parked & have my radios, lights, etc, on.I mounted it on the roof & my question is can I leave it connected to the battery 24/7, even when the truck is running & the alternator is working or will it damage something. I would think the alternator would overide the solar panel or maybe they would both be delivering a charge to the battery? Will it damage the solar panel if it's in "competition" with the alternator?
Thanks.
-
Now that I see the louvers on your hood, I REALLY like those. I might just get myself a set. Not too difficult to put in, are they? PS. Awesome job retrofitting that snorkel to work! It looks pretty darn sweet, and I think that yours has (in my opinion) the best looking top end. Did that come with it or did you find that separate?
Not that hard really, I have some photos that I can post of how I did the louvers step by step. The louvers were less than $30, they come in a square shape & I just cut angles on the ends, I thought it looked better with the angled look. I got the louvers here...... http://rodlouvers.com/
Thanks, I'm pleased with the way the snork turned out, it was a lot of cutting & sealing but it turned out how I wanted it. Rebelord in Miami got me thinking about building my own, I liked how he did his especially the fact that he kept his stock airbox, but I wanted the "Safari Snorkel Look" for various reasons. I found a place where you can buy just the end intake for $100 but when I bought the Cherokee snork kit it came with a end intake, so now I have a spare!!
 :laugh: Because I wanted the end intake I couldn't use 2" pipe like Rebelord & that's where I ran into trouble. The only 3" pipe I could find was some really heavy waste pipe at Home Depot. I cut it & tried fitting it but it was so heavy I couldn't get a bracket to work. Then I found the Heep kit on Amazon. Because of it's design, I couldn't have the fender hole the same as Rebelord & that's where a little inner fender cutting comes in. I removed the fender & cut a slot in the inner fender square frame that goes towards the headlights, ran the hose thru there & under the the fender to the stock airbox hole. Another good thing about the Cherokee kit is tthat the 3" hose is really flexible & can be turned at nearly 90 degrees without kinking, a problem that Rebelord had with the shop vac hose (which I bought & still have by the way
  ).
).The Cherokee kit was around $100 & I bought a $14 3" exhaust flexpipe from O'Reilly Autoparts, so the whole thing was less than $150 including shipping. not as cheap as Rebelords but still way cheaper than an ARB, etc.
-
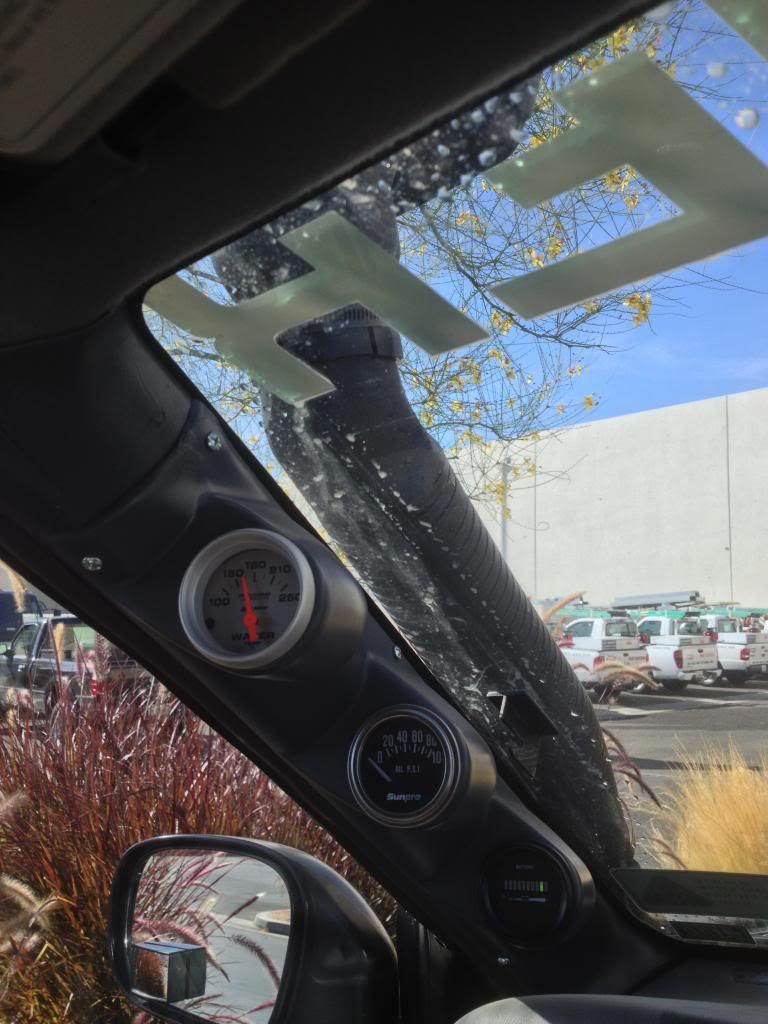
I'm also going to replace the shee-ite Sunpro oil presure gauge with another Autometer oil pressure gauge same style as the top one for water. When I fit my dual batteries I can also replace the bottom "battery condition" indicator as the dual batt kit comes with a much better batt voltage indicator.
-
Nice dude. Looks good! Jelly here of it!!
Dude!! Where did you get that Zombie Defense Vehicle decal?! Do want. Also which gauge pod is that? Need one similar for setting tranny temp gauge and such.
Thanks bro, you inspired me to start making one myself, I just couldn't get it looking right as I had to use 3" pipe (can't remember why now), then I saw this Cherokee snork for $100 & thought that I should be able to adapt it. I just cut it & used 3" muffler pipe as an extension (it sat too low for my liking).
You can get the decal here........ http://www.amazon.com/s/ref=nb_sb_ss_i_1_15?url=search-alias%3Daps&field-keywords=zombie%20defense%20vehicle&sprefix=zombie+defense+%2Caps%2C306
As for the gauge pod, I got a generic one at Shlepboys for $30. I used a heat gun to heat it up enough to wrap around the stock pillar (after cutting some holes in the pillar for the gauge wires, etc) but I rushed it & could have finished it a lot better. I'm going to paint the screws (or maybe switch to rivets) & use a little filler to blend the edges into the stock pillar. If someone took their time I bet they could make a really nice job of it (stioc
 ). You could even sell them as there isn't a gauge pod for the R50 as far as I know.
 -
interested in this new snorkel idea. Ohyeah and the back looks great also!! I am considering building a rear cargo platform just don't know if I want to make the plunge!
I made the back so that nothing is permanent, it all comes out with the removal of a few bolts & then the seats can go back in. Go for it MR, as long as you don't cut anything you'll be able to take the platform out whenever you want.
Here's a couple of pics of the semi home-made snorkel (& no, I haven't repaired the door yet
).........
What it looks like from inside......
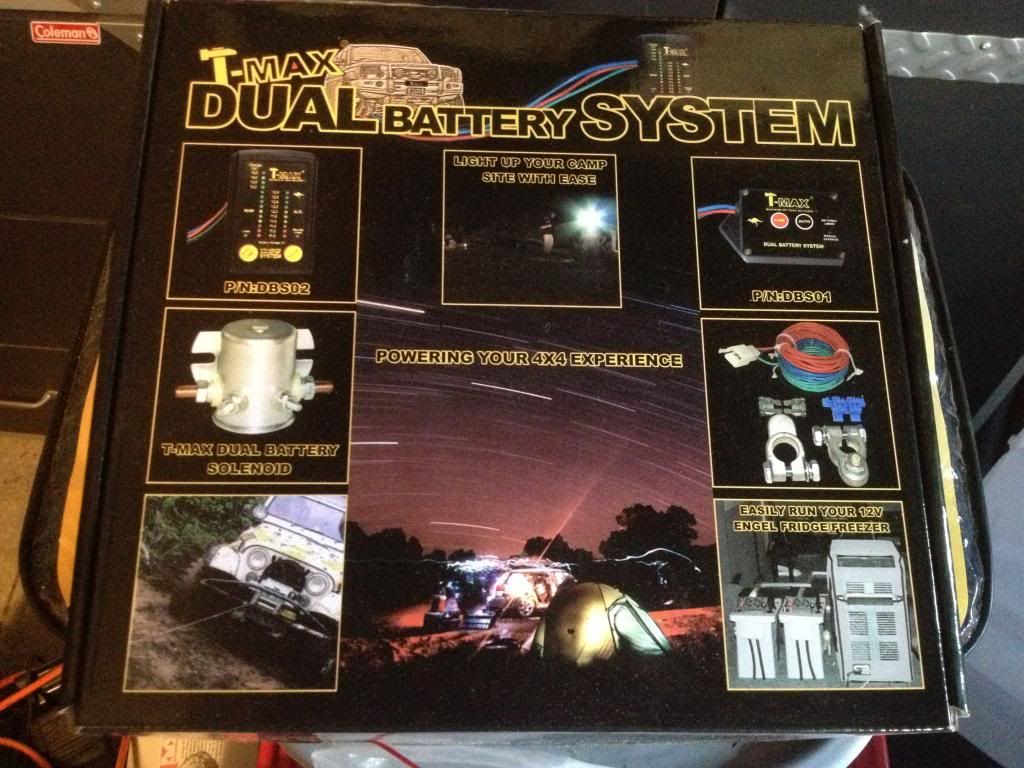
Here's the next project, this dual battery control cost $125 on Amazon. I think it's an Aussie kit, got good reviews.......
-
1
-
-
Had my Mile markers for a couple of years, still work great. Cost me about $80 I think.
-
I believe that an Xterra bumper can be adapted pretty easily, that may only be for the R50 though. Take a look at some XJ bumpers, I found one that was nice & small, cheap (around $400) & looked like it would be easy to adapt for a Pathy.
-
Nah mate, you have to go to the YouTube video page & copy the addy from your browser search bar then paste it directly into the message box here on the forum. Don't use the YouTube "Share" or "Embed" codes,for some reason they just give you the link like you have in your post.

That way you get this.........
-
Looks like it's the "R50 in Panorama shots" competition this month (except for the very clean "November Blue" WD21 with the window trim hanging off)
:laugh: -
True that.
NOT knocking the R50 at all here.....just SUVs and people in general
The R50 was going into the SUV craze: when SUVs moved from being sport UTILITY vehicles to being suburban mall crawlers and soccer mom vehicles that had 4WD to make people feel cool....and leather seats and all that jazz.
There was an article a while back in one of the automotive industry magazines, that stated based on their polling 70% of the people who own 4WD SUVs have never used the 4WD. I was shocked by that but then again we have had people trade in their 3,4,5 year old vehicles here who didnt even know they had 4WD.........
I think the R50's, 4-Runner's, etc, up to the early 2000's were the last of the "capable" SUV's. Every year they're geared more & more to the mall cruzers, even the new Heeps are going that way somewhat although they are still geared towards froading.
Alkorahil, your comment about the 4wd made me laugh, I was asked to use 4 low on my last Big Bear trip & I didn't know how to get it into 4 low!!
:laugh:I always in 2wd & use 4 hi if I need 4wd as most of my trails aren't really tough. I had to read the little instruction card that's on the visor
Still, at least I know now how to put it in 4 low if I ever need to.

-
:laugh:

-
Well, OfftourRoadie96 wanted this nominated...........
-
1
-
-
'Ere ya go guvner, you should be able to find it here...........
-
I'm with stioc, the R50 is really a compromise car, for mall mom's with the side thought that maybe someone will take it off road a little. I have the missing link & like stioc I can't say as I've noticed a great difference, but then I haven't really paid too much attention. There's usually so much screaming, hanging on, praying & crying (all from me I might add) when I go off road that I wouldn't notice it anyway
-
4
-
-
Niiice theexbrit,
Wicked set-up. I am wondering about a couple of things like:
The platform for your fridge...it is removable, correct? You have it bolted to the seat belt tie-downs? What did you use underneath it to keep it level?
That metal bar...is it just a spreader bar to hang stuff on? And you use it to keep stuff from sliding/rolling forward and as an attachment point for bungees?
That is great! I am tired of my table with folding legs and (when I get me truck back) am thinking of putting in something more...permanent (like STIOC's set up but with drawers instead of cubbies, 2 drawers in the centre and a cubby on each side) I still need the rear seats for my kids so I can't touch anything beyond the cargo compartment.
Gotta think ahead as we may be getting a dog in the near future and I want to be able to fit him in there along with a cooler, and camping stuff.
The fridge platform isn't permanent but it is bolted to where the seat bottoms mount. It would probably take about 15 mins to get it out & put the seats back. I took photos when I was making it if you want to see what I did. If you cut it right it's pretty level already & seems to hold the fridge weight (& my weight) without a problem. My main concern was stuff bouncing around in the back when I'm on the trail, stioc's dog was airborne for most of the mine trip that he came on with me! I now have plenty of tie downs in the rear area & I'll try to post a photo of it in use. The metal bar is just a Pep Boys adjustable cargo bar, it helps divide up the cargo/back seat area, stop stuff from covering my fridge air vents & you can tie stuff to it if you want.
I'm working on my snorkel at the moment, it's a $100 Cherokee snorkel that fits with a little work. It looks just like a Safari snorkel for about 1/4 of the price. Just a little tip though, you have to remove the fender to fit it, no big deal as it's only bolted on with about 8 bolts.
-
Thanks S. I have two constant 12v sockets in the back, I used the 15amp wires from the OEM amp that I removed, I might put an permanent inverter on one for 110v.
Nothing going this weekend, I'm planning the return to reward mine & the inyo mountains trip for early November. I'll check out ExPo for your trip, would love to do Moab.
. -
Thanks.
I didn't finish it as well as I should have done, had to hurry the last part to get it ready for the weekend. Still, not like my truck is any shiny, pristine example of an R50
:laugh: -
Hi all,
I just about finished converting the rear area of my 96' into a more "cargo friendly" area. I never take passengers on my trips except for my one gas money buddy
 So I removed the rear seats (bottoms & backs) then cut some plywood to shape & covered it with carpet, added some tie down rings & now I can store my trail gear much better!
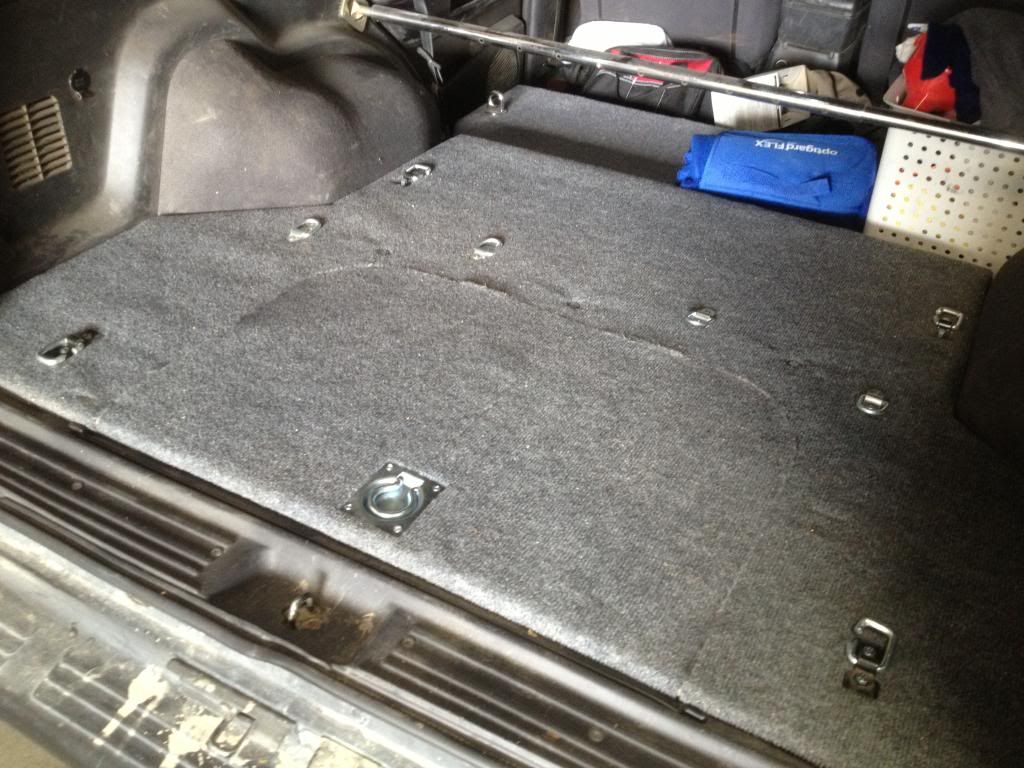
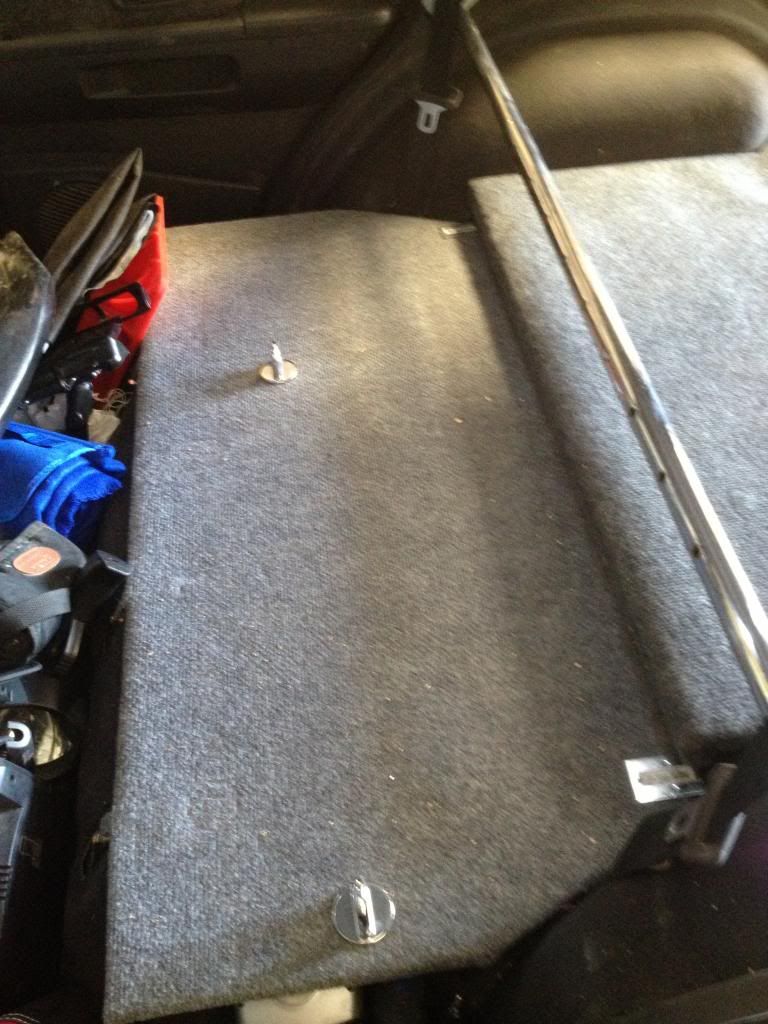
I managed to keep the nearly useless space under the cargo area floor, it don't hold much but every inch of space is precious.....

& 2 tie down points for my ARB fridge......
The setup worked great in Big Bear last weekend.
-
1
-
-
I'm closer than a lot of you, if you can do it then so can I!!
:laugh: -


How to install hood louvers
in The Garage
Posted
Yeah, this is definitely a "sun belt mod!".
I'm sure it wouldn't be that hard to rig up a way to close them off or "drain" in wet weather. On the temp note, I did several temp mods around the same time, Radiator Reviver, louvers, adjusted electric fans, etc, so it's hard to say the temp difference but there IS a difference. When we were in the Inyo Valley a few weeks ago the temps were in the high 90's & it ran a lot cooler than before I made the mods. The vents really seem to help in cooling it down quicker when the fans kick in, they don't run nearly as long as they used to or as often.