- Sign In Changes: You now need to sign in using the email address associated with your account, combined with your current password. Using your display name and password is no longer supported.
- If you are currently trying to register, are not receiving the validation email, and are using an Outlook, Hotmail or Yahoo domain email address, please change your email address to something other than those (or temporary email providers). These domains are known to have problems delivering emails from the community.


5523Pathfinder
-
Posts
7,355 -
Joined
-
Last visited
-
Days Won
33
Content Type
Profiles
Forums
Calendar
Everything posted by 5523Pathfinder
-
A little bit of metal is ok. What you are worried about is chunks or something that just doesnt look right. Usually a small amount of metal "flakes" will collect on the magnet. You should be able to make out the magnet when you pull it out. Hey, keep a camera handy and take a pic and show us, maybe that will help.
-
Try disconnecting the air flow meter and running it in fail-safe. Does it then still act up?
-
Mmmm.....patrol, man I wish we had those in the states. The terrano/pathfinder has been quite capable for me. I guess it depends on what you do with it and how it works for your needs. I have made jaws drop offroad because they cant believe a Nissan could do that!
-
Right off the bat is sounds like a throwout bearing. When was the clutch last replaced? It could also be one of the bearings in the manual transmission itself. I get noise in mine too until its warm. You may want to check the fluid in the trans itself. Maybe its clutch time.
-
Ok, pretty much everthing from here is reassembly. Make sure to check your hoses and belts. If anything is out of order, fix or replace it now! This job isnt that difficult if you have some mechanical skill. It will always be a good idea to have some kind of repair manual near to reference as needed. I hope this helps and I am glad I could do it. If there is anything that need clarification, let me know. If someone wants a different picture of something, let me know!
-
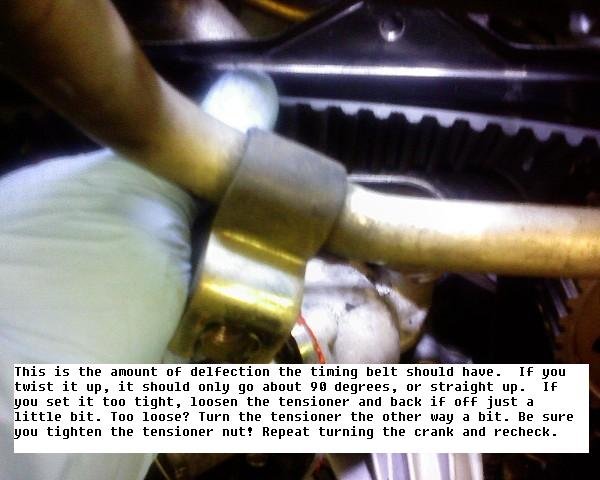
Once you've set the tension and back to TDC, you need to check that belt tension. Give the belt a twist and it should not go any further than 90 degrees. Any more than that and I will make noise. A little less, or tighter, is ok, but it may make noise also. The closer you get to a half twist the better!
-
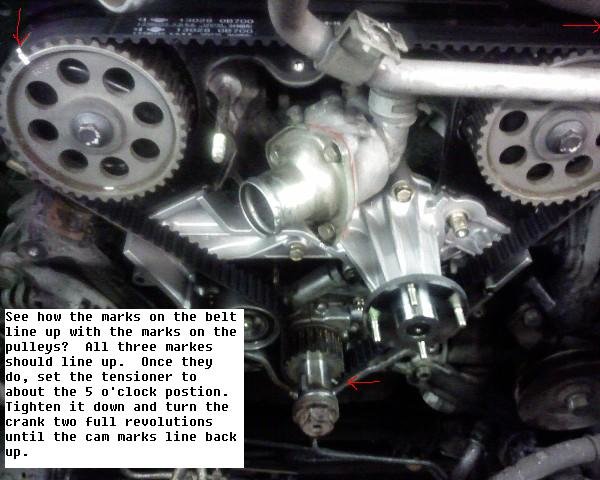
When the paint is dry, install the belt onto the pulleys. If you marked everthing right, the marks will all line up. You need to set the belt tension by turning the tensioner counterclockwise to about the 5:30 position. It lines up with the lower oil pump side, almost a straight line. Follow the instructions in the photo...
-
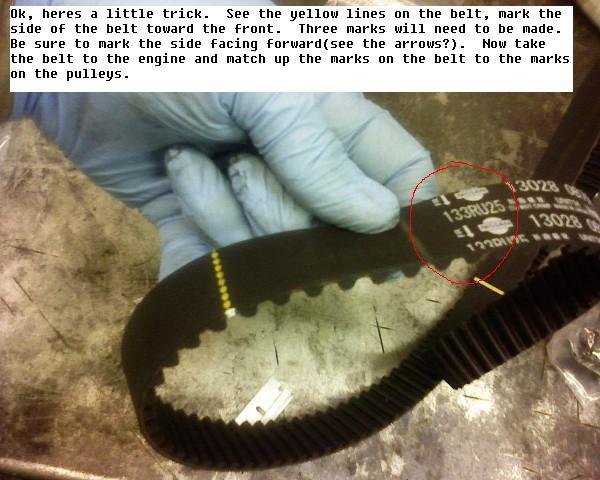
Heres a quick tip...use that marking paint that you used on the cam and make marks on the side of the timing belt.
-
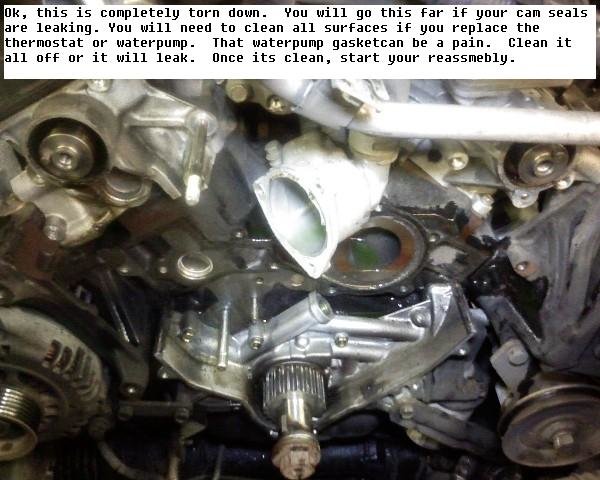
Now, if you are only replacing the timing belt, your work is done. But many of us know thats usually not the only thing your gonna do. Check that tensioner for noise or play. Check under the water pump at the seep hole for leakage and check the drive shaft for play. Check for leaks from the cams seals or the coolant plug on the 3.0. When was that Thermostat replaced? Now is a good time to replace what you want. The camseals can be replaced by removing the bolts on the cams, bolts on the rear cover and remove the seals. Upon reassembly, if the cams move, just line up your marks. DO NOT TRY TO FORCE THE CAMS IN EITHER DIRECTION! The waterpump is as easy as removing the bolts and pulling off the pump. Watch your feet as coolant will come down, grab a pan to catch it. Use your scrapers or spayable gasket remover to remove the waterpump gasket. Make sure everthing is nice and clean before reinstalling. Dont overtighten the pump bolts, is only aluminum! Thermostat is the easiest. 3 bolts, give it a tap and remove it from the housing. Clean all of the silicone from the housing and pipe snout. Install the t-stat with the bleeder valve at the top. You will probably use silicone to reseal, it works best but some have gaskets. The belt tensioner is removed by loosening the nut completly and sliding off the stud. Check that stud for tightness and integrity. Swap the spring to the new tensioner and reinstall. The spring arm will need to rest against the smaller stud and then turn it clockwise back to 9 o'clock. Here is what it looks like completly torn down...
-
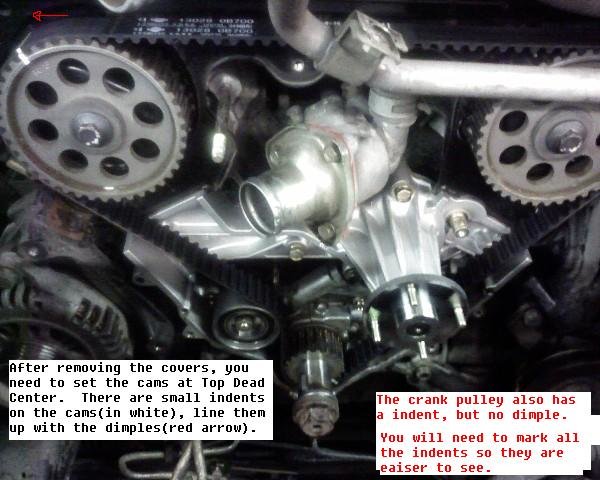
So now you should have your timing belt covers removed. You will need to set the cam gears at Top Dead Center. It may help to clean all the gears and find the indents with letters LH and RH below them. Also find the dimples on the rear cover and note where they are at. Your marks will look something like in the photoafter you set it at TDC. A dab of white paint or highly visible marker on the indents and dimple helps alot! You can now loosen the tensioner pulley nut a half turn or so. You will need to install a hex key that is 5mm. Turn the tensioner clockwise to remove tension. You will only need to turn it to about the 9 o'clock position depending on tension. Now you can slide the belt off.
-
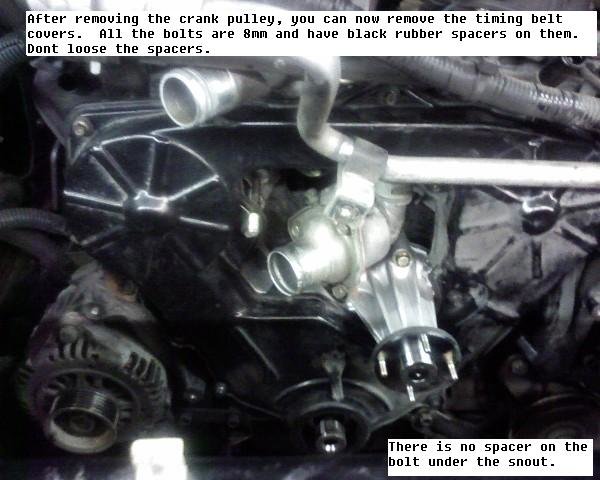
Now you should have somthing like whats in the picture. **R50 owners** when you remove the upper timing cover, the A/C line will be in the way. This will take some time, but you can lightly pull up on the line while jockying the cover out. DO NOT PULL TO HARD!!! If the A/C lines breaks, you have a new mess to worry about, refridgerant will come out! *this pic was taken after I reassembled, yours will not look as clean
-
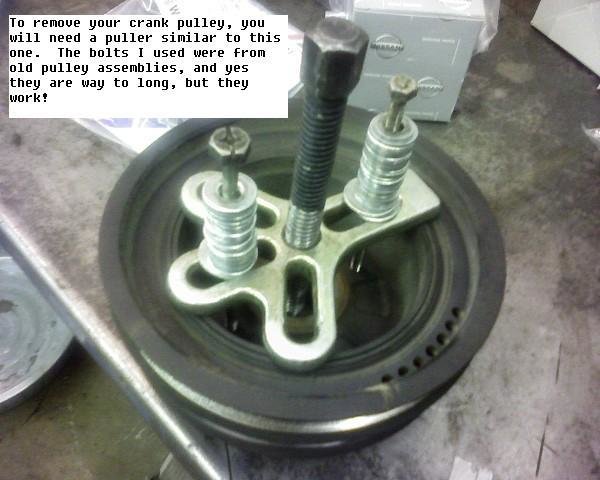
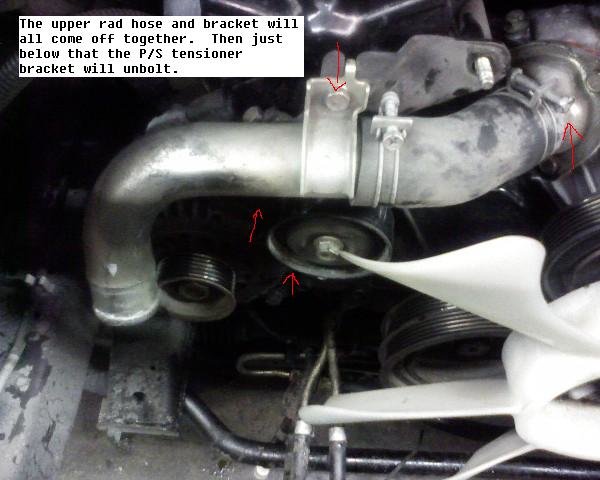
After removing the belts, there is a pcv hose that needs to be disconnected. There are 2 10mm bolts holding it to the upper timing belt cover, remove them. Grab your pliers and release the clamp on your left and pull the hose toward you. Slide it up over the upper coolant pipe to give better access. Then its time to remove your crank pulley. Get that big socket and breaker bar. You will need to block the engine from turning over by removing the starter and blocking the flyhweel, or if you are a manual transmission, let the powertrain do the work for you. I have seen guys use a strap wrench to hold the pulley and someone else loosen the bolt. You may need to figure a way on your own. If you are lucky enough to have air, be glad! Then use the puller in the picture to pull the pully off the crank snout. The smaller bolt treads I believe were 6mmx1.00. WD21 owners just remove two bolts from the front of the pulley to install tool. R50 owners will need to find the holes and install the tool.
-
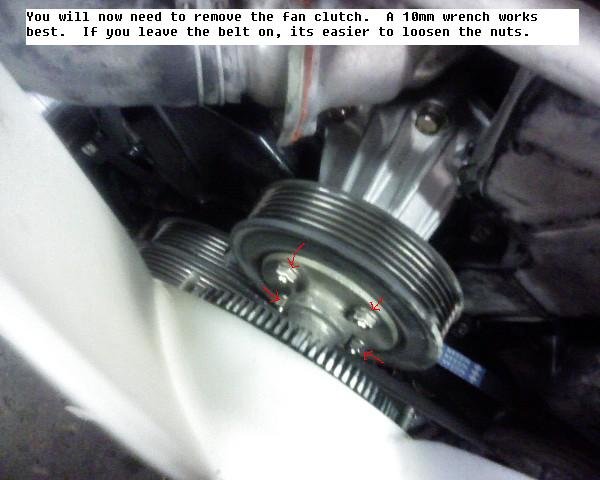
The fan clutch can be done before or after the previous steps..
-
Letting the photo do the talking...
-
You can take off your drive belts at any time, I tend to leave them on until I need to remove the brackets, but whatever works for you.

-
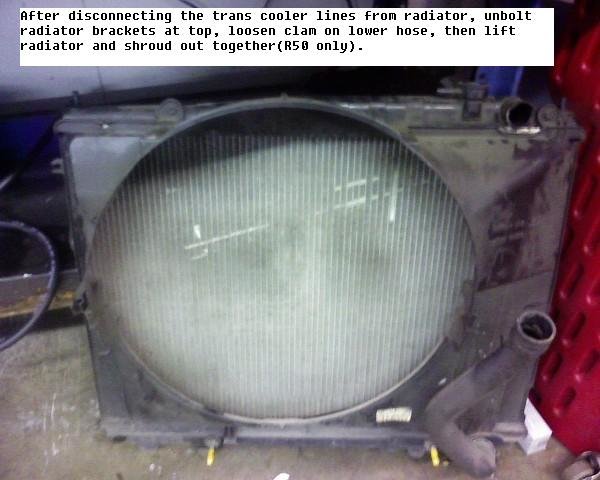
Once you've gotten all that out of the way remove the radiator. The fan shroud will come out with the radiator in the R50's. You will need to unbolt it and remove the shroud the the radiator on a WD21. There are 4 screws that hold it to the radiator, a stubby phillips is best. 2 on the top and 2 on the sides.
-
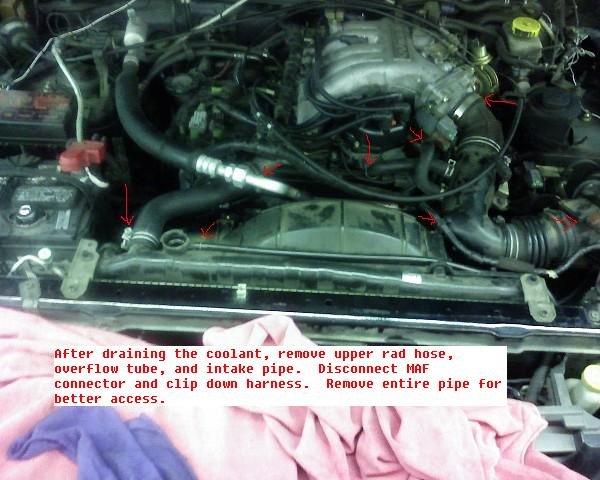
Ok, so a lot of people are wanting to do thier own timing belt. This job can be time consuming and picky. You will need time, tools and patience. The vehicle I used was a 99 QX4. This engine is a 3.3L, but its pretty much all the same from 96-99. I will try and post everthing you may need, if I forget anthing let me know. Ok, Gentlemen, Start Your Engines!!! First, gather your tools. You will need metric sizes from 8mm to 19mm in sockets, and wrenches to be on the safe side. Your crank pulley bolt is a 27mm(1 1/16ths i think (Yes-). You will also need... Breaker bar (longer the better) Pliers (mulitple) Screwdrivers (flat and phillips) Metric Hex wrenches or sockets(5MM) Scrapers Extensions(3 and 6in) Puller (there is a pic of what it looks like) Other tools may be listed with the photos Next step is getting started. You will need to drain your coolant from underneath. Remove the lower skid plate and find the drain valve. WD21's will be on the left side of the radiator, R50's will be on the bottom right, you will need to remove the skid support brace to access it. While you are under there, remove the lower fan shroud and disconnect the transmission cooler lines if you are a A/T.
-
DAMN! That thing is looking bad a$$! I like the rear bumper, did you have it made? Man, your rig is looking good!
-
I lowered my 91 300zx. I guess I tackeled the handling first. It was a 2+2 non turbo, so power options were few. But once I got the suspension working, it moved like it was on rails, and could drift like crazy. Oh yeah, I also lowered a 02 Frontier 2wd a while back. It looked alright when I finished, but my work sent it out to get tinted and had a big NISMO sticker put on it! Oh well, I still liked it.
-
Heres is my front skid I got before I knew about Black Panthers skids(which I can find a website for anymore). Anyways, you can tell where I got it. I think it was about $100. I like it because it protects the front of the frame and clears both tow hooks.

-
The BPT valve is what controls the EGR vavle. Exhaust pressure is what comes out of that hose. It pushes up on the valve inside and allows vacuum to travel to the EGR vavle and open it. If no exhaust pressure, no EGR operation. That is the system in a nutshell. Usually the EGR system is what is effected when the exhaust is opened up too much(lack of backpressure).
-
The little valve you have your fingers on is called the Back Pressure Tranducer Valve (BPT). The little rubber hose under it looks cracked and probably leaks. Just replace the piece of hose and go from there. Sometimes, I have found thats metal hose plugged where it goes down by the egr vavle. Wanna here something crazy, I am replacing a timing belt on a 95 Pickup with a V6, and there are no EGR components. Looks like factory block plates are installed. Definately dont look like aftermarket or someone had tinkered with it.
-
Well, the Warn hubs are completely different than stock. If its just a rebuild kit, its pointless without the warn hubs. Well, maybe nice as a backup later on.
-
Wow, thats cheap, but it has to be for only 1 hub is my guess. I paid a little less than what the frontier hubs cost on that page. I got mine from A/C's website. Mmmm....not to sure what to say about that. Heres the link to the hubs. Maybe do a comparo.... http://www.4x4parts.com/public_html/shop/i...35b8f33abf3d6ca
-
My brothers Qx4 was doing that. I looked at all of the solenoid voltages and verfied eveything was ok. I did a transmission fluid flush and it has not happened again. Its been about 2 months since the flush.