Leaderboard


Popular Content
Showing content with the highest reputation since 03/27/2010 in Posts
-
After years of chatting about our own Pathfinder projects—and often, grumblings about having to make our own parts or hack together something—it’s become clear that Jacob (@TowndawgR50) and I (Patrick) have a common passion for our trucks. We’re always bouncing ideas around and sanity-checking each other’s work, ultimately realizing we have highly complementary skill sets that extend beyond working on trucks. We’ve also grown tired of a serious lack of aftermarket support for our trucks, especially when there’s an obvious demand to keep them on the road and make them more capable than they already are. To counter that, we’re teaming up to fill that void. That’s right: it’s time to turn a hobby into a business! In the weeks to come, we will be making more announcements regarding the status of the company (still working on the name!) and our product offerings. We’re still in the early stages of the company formation, and have some challenges ahead of us (most notably the 1,400 miles that separate us!), but we’re ready and stoked to get the word out there. If any of our individual projects have piqued your interest, then our collaborative efforts won’t disappoint. Our initial focus will be on subframe drop (SFD) kits, as this is the most important component required to move beyond 2” of front suspension lift. Unlike prior versions of kits that have existed, we intend to offer complete kits and à la carte components in multiple heights—including strut spacers—to support various lift configurations. Our particular focus is to provide high-quality finished products that simplify installation for the average DIYer (hint: strut disassembly not required), and without having to replace aftermarket components you’ve already purchased. While we won’t go into detail about all the products (and services) we’ve been discussing, we will tease that trailing arms and panhard bars (both in static lengths with poly bushings, and adjustable lengths with rebuildable joints), skid plates, missing link, and bumper brackets are on the product roadmap. That said, we’re looking forward to a productive 2019, so stay tuned!23 points
-
11 points
-
Hello, a lot of you may have already seen this but I designed a fold and weld bumper kit. There are still some little adjustments that need to be addressed and I won't be able to test it with a winch for quite some time. Anyway, I wanted to see if there was any interest in the kit being sold, the price would likely be near the $500 mark. Side Note: It has been quite some time since I have been on here. The new layout is much more user-friendly, so props to those of you that worked to make that happen.11 points
-
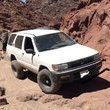
Made a recent trip to out east, exploring the area as we went along with no real plan in mind. The state turns to dry, arid desert really quickly. 2hrs from home and it was about 40 degrees hotter and dry. Great short trip with my family.10 points
-
Dual swing out tire carrier is done. I thought about building a full bumper but wanted to keep the factory look of the vehicle as much as possible. I have to figure out what to do to pretty-up the hinge holes in the bumper plastic, but other than that it is done. The latch I had to order from Amazon, works perfectly. I used an axle shaft off my old Pathfinder as the wheel mount. I don't care for the look but I like the nostalgia and it is hidden when the tire is attached. These are the best hinges I have found. Double shear, nice bearings and have the nice lockout feature when open. I didn't get a rear facing shot, but I did get a side shot. I can still use the review mirror and see out of the back due to the tire being offset on the passenger side. The driver side swing-out is going to get some rotopax cans and other goodies when I can afford it. The next items on the to-do list are: -Pull transmission/tcase and drop subframe for oilpan gasket/rear seal/oil soaked clutch <- this is going to be the SUCK...maybe over xmas holidays. -Fix the rear passenger fender extender -Build slid out for fridge -Build sleeping area in the back and storage area -Lights Lights and more lights, need lights For the future: I want to go back to having an off-road trailer and I am going one of two ways: Go all out and build a sleep in (tear drop style) trailer that weighs less than 2500lbs or build a roof top tent trailer that weighs less than 1000lbs. I am leaning towards the tear-drop style sleep in with a spot for the roof top tent on top. This sounds like a good excuse to become proficient at aluminum welding. The rooftop tent weights 125, tires and wheels about 180, axle about 45 , and at least 15 gallons of water 120 so that is a start off weight of 485.9 points
-
Garage day w @RainGoat &@ferrariowner1239 points
-
Well, it's as done as it's gonna get before my CANVAZ trip this weekend. I will eventually put some plate up top and some additional brackets under the quarter panel for support. I've been pretty pleased with the cuts. My AZ flag apparently had some hidden lines that got cut, but I went with it. Cheapo MicTuning lights off Amazon are wired to the reverse lights...and make the OE bulbs look like garbage. I also made a new missing link and mid skid... Super pleased with the results. It slides on/off just like the front skid, and now all the hardware is matched for a single socket. ... I know this thread started off for front bumper brackets, but I've come a lot farther than expected. I'm still planning to go through with the front brackets for those interested, but still need another week or so to finalize a few things and put some numbers to things. I'm absolutely exploring options to make skids and missing link available, too. Stay tuned!9 points
-
Like Hawairish mentioned earlier, Ive started working with him on the design of these brackets. He sent me the data to punch out a set, using his current iteration, so I can start mock up on my rig and work with him on the R&D end. I have a chunk of time coming up and plan to push on this project so I can finally get rid of the XJ bumper and help however I can to get these on the market!9 points
-
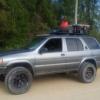
Finally had some free time so I just drove on some forest roads, and I low key like the moon dust grey [emoji23] Sent from my SM-G960U using Tapatalk8 points
-
Just wanted to reflect over what I’ve learned from this forum. When I joined I was 16 in high school with a stock pathfinder and was clueless. Now I’m 25 with the same pathfinder and it’s about as built up as it can be until I go custom fab with it. Through reaserch and communication I have been able to build my pathfinder into what it is today. I feel that this forum is so much better than any Facebook group or things of that nature. I have joined some of these groups recently and I have found that all it is is people who have no idea what they are talking about making posts and wanting there car magically diagnosed and everyone asking questions about what lift I have or what size tires I have or how many miles are on my car etc etc etc when I have answered the question time after time and made posts about my build info. It made me realize how lazy people are and the lack of reaserch that is performed in order to make your dream pathfinder a reality. I just wanted to take a moment to thank people for telling newbies to go do homework before asking questions, that all the answers are literally right on this very forum and that it’s easy to find and get answers without bothering everyone with simple questions. I now have a coil lift with a sub frame drop, full belly skid plates, supersliders, locking hubs, 33s, and an endless list of other modifications, it took many years of hard work and experimentation but without this forum I would be where I am today. Here’s to those who have walked the same line as me and built their dream with the help of this forum. Cheers.8 points
-
Complete noob on here so let's see if this works
 8 points
 -
Dang, sorry to hear that. I dont have schematics. What you see on the image you posted is close. Since you already have a set id suggest doing what Onespiritbrain said. Can you weld or have a friend that can? If so you can salvage your material and save money but cutting the flanges flange free and setting it up yourself. The orientation of the bottom flange does not matter as the top hat spins 360° but the angle of the tube and the orientation of the angle are the key. If your tube is anything other than straight up and down its wrong. The whole point of the SFD is to "translate" the suspension downward. Just like the subframe blocks are only providing vertical lift, the strut spacers need to do the same. So you need to cut the tube at the proper angle and orient that angle so that the tube ends up matching the subframe blocks.8 points
-
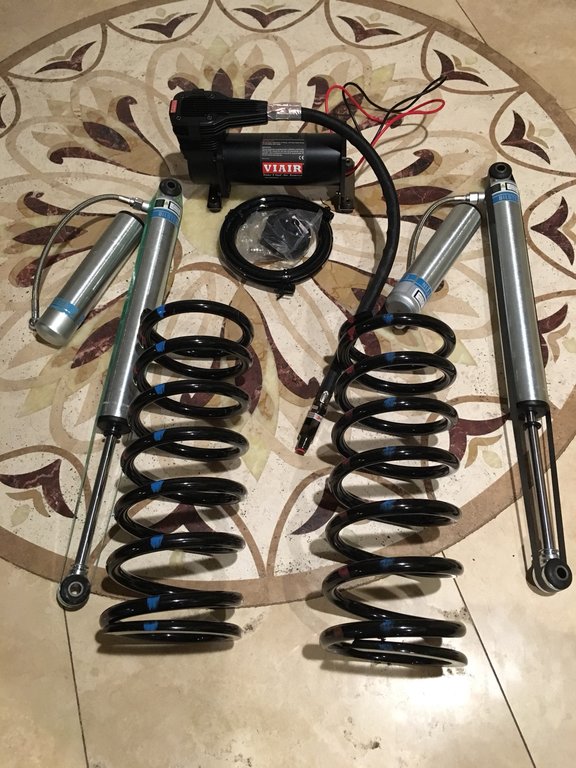
Hey y’all! Doing a little update on what’s been going on with the Pathy and some upgrades hawairish and I plan to tackle this weekend. For starters, this Pathy already fell into my hands with a -3” SFD -4.636 gear swap -R200 Lokka -H233B LSD rear diff (repacked @ 150 lb/ft torque) -airlift 1000 -3” strut spacers -2” coil spacers -Warren Manual hubs And much more in the link below http:// https://expeditionportal.com/forum/threads/2002-pathfinder-r50-overland-build.134475/ Originally this pathfinder was Duke90’s, my brother, he then later sold it to me and I’ve had the truck over the last 10 months or so. As his was, this Pathy is also my DD and within the first month I notice some pulling and vibration on the passenger side wheel which eventually became so severe I had to garage it till I could tow it out for repair. The damage from what I later understood was a crack on the subframe cross arm which attaches also to my control arm. That side of the frame was completely torn from the bolt. *I assume this was initially caused by some prior trips we did in the Pathy. Never heavily offroaded but did do 300+ miles of various overlanding terrain with no ‘missing link’. I’m assuming this initially created some sort of damage that had slowly got progressively worse. I figure it must of been a drop or rough hit because the damage needed a lot of force for such a tear to occur. I had great difficulty finding a fabrication shop willing to take on the repair. I mean not even collision centers wanted to touch it but from one referral to another I finally got in touch with tnj performance and got my Pathy back on the road again. Note: the truck sat till around the middle of August (with frequent starts to continuously run fluids). Since then I’ve been fortunate enough to be in touch with hawairish and added a aluminum mid-skid and ‘missing-link’ to the truck. I’ve taken it on my first 4x4 trip to cathedral valley/canyon lands/ spider rock/ Tucson and then Anza borrego on the SoCal xterra event and ocotillo Wells after. Have had no problems then and since the trip so all seems clear with the repair. (Put roughly 4K miles on during this time) As for the parts update This weekend [user]hawairish[/user] and I are planning to do -LR Defender 90 Rear coil springs #NRC9448 -Bilstein 5165s #25-261400 -Viair 485c OBA install Keeping the rear spacers this should bring the Pathy up to a 4” lift in the rear and the much added convenience of OBA that also future proofs the Pathy for adding air-lockers if eventually decided. I’m happy to have this truck and looking forward to all the additions we’ll go through and trips we’ll make through the years. Sent from my iPhone using Tapatalk
 7 points
 -
So today I did a little more work on the r50. I started off by making the steering link to go from the steering wheel to the Jeep steering box. I sleeved it with some SUPER thick tube, and drilled holes in the tube so I could weld in the holes. Once all welded I Painted it black and installed it. Next I welded up the steering box reinforcement plates I had a custom power steering line made at the "local" hydraulic shop. Runs from the r50 power steering pump to the Jeep steering box. The return line I just used hose clamps for, as that is what the original used on the jeep. I have to make a little retainer bracket to hold the "loop end" of the hose, so its not swinging around or rubbing onto anything. Ill bolt it onto one of the oil pan bolts. I rolled the axle underneath the car for the first time! as it sits, i'm content with how well things are lined up. I make a cardboard template for the trackbar bracket, but forgot to take a picture. More than likely ill get that all welded up and installed tomorrow. https://imgur.com/a/BuJnL26 Things left to do: cut out the trackbar bracket and weld it on, make/buy longer trackbar, weld on 4 link brackets, weld up 4 links, make coil buckets & frame reinforcements in that area, install custom brake lines & purge system. probably missing some stuff here and there, but its been a long week lol ALSO sorry that these pictures have been coming up sideways and upside down.... I haven't any idea how to fix that. Ill try a different website next time to get picture into a URL form. Pictures are too large to use the "drag files here to attach , or choose file" option. Sorry!7 points
-
It’s not always terrible. I once tuned into a truckers’ convo while stuck in traffic on the freeway in eastern AZ, and one trucker was adamant that people get fecal matter in their ears because they use their phones in the restroom. That was worth its weight in gold, and all thanks to having a CB.7 points
-
7 points
-
I'll throw my hat in the ring, since this is as close to sunset as I could get that evening. Nominating Hawairish.7 points
-
Doing some snowheeling this morning near Banff.7 points
-
Well, looks like we're fast approaching September... The bad news is that early/mid August goal didn't happen. The good news, though, is that the conversion of garage to shop is progressing well. I added several new circuits the other week, finished installing an air compressor and lines (I #@$%^& hate pneumatics) this week, and finally put the plasma table through its first cycle (no cutting, though) the other night. The heat in the garage has became too unbearable, so I dropped some coin for a mini-split AC, which I'll be installing this weekend. Then, lastly (ugh, I hope), I'll put in a fume extraction/ventilation system. I can't explain the anxiety I've had from having to drill so many holes into the outside of my stucco house. The grand finale will be a 6" one...still building up courage for that one. Bottom line is that I'm getting there! I hit up the steel shop the other week to grab various plate scraps for some initial cuts once things are ready. I've not looked into any actual material costs yet, though, so will still need to come up with pricing numbers for those interested. As before, stay tuned. This is gonna happen.7 points
-
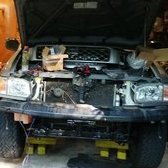
Today the title arrived in the mail. It's nice to know that after all this work it is legally mine. In Texas, at least major cities, we have to get vehicles inspected (even trailers over 4k GVWR which is a freaking pain in the a$$) before we can register them. When I was doing the title work I asked the clerk how I am supposed to drive my vehicle to get the OBDII monitors to a ready state so I can pass inspection when it is not road legal? She said I would have to get insurance on the vehicle and get a 30 day temp tag without registration. So tomorrow I start paying for insurance and I hope to get a temp tag so I can legally drive the thing if I am lucky enough to get it road worthy this weekend. Getting closer, but it is going to be a BUSY weekend. I had to pull the passenger cat after having the exhaust completed because I installed the manifold to cat gasket incorrectly. I wish junkyards could be more sneaky with the paint markings. All that's left under the hood is: -Intake manifold upper sections -computer harness from dash -belts -throttle and cruise cables -connect vacuum hoses -A/C idler -install battery -drain any existing oil and take a sample <- maybe I should have done this before installing the engine -cut open existing filter and examine <- maybe I should have done this before installing the engine -new oil and filter -pull plugs , vacuum cylinders, crank engine to build oil pressure -complete cooling system installation/radiator/fan -vacuum and charge A/C -fill all other fluids Installed new rack poly bushings. Shinny driveshafts new ujoints and balanced AND thanks my favorite junkyard for writing, in paint on the front face of the rims I purchased I have to figure out how to get that paint off without damaging the machined wheel surface. The bag of goodies...like I said, busy weekend. Oh, and I know all 8 of those rear link bolts are seized and are going to require cutting out with an angle grinder Not pictured: wheel spacers (shipped today), rear brake shoes and hardware kit, plugs...and OH I forgot an air filter7 points
-
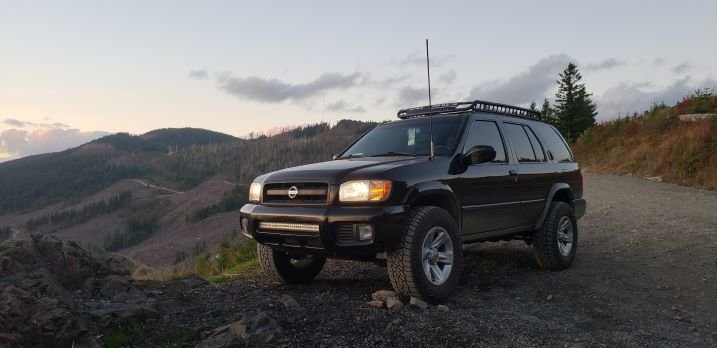
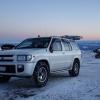
Quick overnighter outside of Darrington.7 points
-
7 points
-
This is what happens when you use one truck as a toolbox while you work on another. She’s been patient while I worked on my Mom’s new 4Runner. Now it’s time for some love for the Pathy. Actually, all the developed products for the 4Runner have given me some good ideas on how to jury rig similar mods in my old girl! I’ve even got some RRO Sliders that have been sitting in a box unopened for almost 2 months. So much to do!7 points
-
Hello, My name is Johann and here is what I've been up to lately (SAS). I've been collecting parts for the swap for close to two years now. Mostly waiting on good deals on parts and tools. Recently I was gifted a motor picker, and that was one of the last tools I needed to start the swap. So about 4 days ago, it began. A few months ago I bought a 97 pathfinder for 300$US. It had shot wheel bearings up front, and as expected, very worn down suspension components up front. The ad had no pictures so I had no idea what i was going to go look at... As soon as I saw that is had a steel bumper, I knew I was buying it. Its a manual, and runs fine, other than suspension issues up front, which made it the perfect candidate for the SAS I've wanted to do for years. So soon after i acquired a hilux snorkel for free and mounted it to the r50 A few days ago I moved the big pathy (my green one) out of the shed, laid down some wood, and backed up the white one to be stripped down. It took about 5 hours, but I got the car way up on jacks (the jacks are welded to the rims and tires are flat) and removed the entire subframe. That subframe is WAY heavier than I thought! So the subframe is what holds the motor up, so to remove the subframe, I put a thick strap around the motor, and a jack under it (to hold it in place). Next I got the motor mounts I made and temporarily installed them to make sure they fit. I then decided that the frame was going to get reinforced anywhere that something was getting added. so I added a piece of steel behind it. These motor mounts were then welded in. I then did the same exact thing on the other side Once they were welded in, the motor was now being held up with no subframe! This was the hardest part so far because there was barely any space under the car with the jack in the way. Now with the jack out from under the car and with more space, I started cutting and removing all the old steering stuff. everything from the firewall up was removed. there are two little brackets holding the original steering bend box (90*, not sure the specific name for it). I cut those out with a reciprocating saw. once all the old was out of the way, I ground the "frame" down to raw metal (where the new jeep steering box would go) when I went to mom up the steering box, it wouldn't fit because the wheel well was blocking the back end from sitting on the rail, so I eyeballed it and cut a slot into the well to allow the box to sit. Once up, I mocked up some steel reinforcement plates to the frame, drilled them & the frame, and temporarily bolted up the box to make sure everything fit. Tomorrow the box will come back out so I can trim the reinforcement plates up to size better. Once they are trimmed up, the box will be mounted, plates tacked in, box removed and the rest of the plate will be welded in. I started tinkering with the shaft connecting the wheel to the steering box and am debating on how I am going to splice them together. Probably will cut to length, weld, sleeve, then weld the sleeve to both ends. Any better ideas? the left one is the jeep one, the right is the stock one. I need to connect the top piece from the left one (goes onto the steering box) with the bottom of the right one (goes into end of steering on r50)6 points
-
Hey all, don't know if this has been posted on here yet. Thought it may interest some of you. A local Vancouver (BC) company that makes beautiful front and rear bumpers has just started selling a weld together front bumper kit for the R50. I've seen their work in person on a number of other vehicles and can vouch for their quality and excellent design. Here's a link: https://www.coastaloffroad.com/product-page/r50-nissan-pathfinder-high-clearance-front-bumper-kit Also side note, anybody know who's truck that is in the pics? It's a beaut!6 points
-
6 points
-
Pretty interesting stuff here.6 points
-
CB Skip6 points
-
No problem. There tends to be a lot of variance and opinion when it comes to wire selection, but it really depends on usage/application. A chart like this is a lot closer to my wiring preference for most 12V electrical... ...except when wiring up a stereos/amplifiers, other high-draw lighting/accessories (compressors, winches); I'll almost always increase to the next gauge. You'll never hurt a system with wire that's too thick (keeping it reasonable), but at some point cost exceeds benefits. On the other hand, wire that's too thin will affect performance and is also a hazard. If unsure, jump a gauge. I'll usually choose a wire gauge based on 50%-100% of my expected nominal draw with the circuit loaded...this gives me some circuit overhead for any overdraw conditions, plus some wiggle room if I want/need to put another accessory on the circuit.6 points
-
Some shots from a November trip to Anza-Borrego and the Salton Sea. Great time, but pretty sure it accelerated my control arm bushing disintegration...6 points
-
How many R50s is too many? Dad's, Girlfriend's and mine... Haha I need to put my running boards back on soon too.6 points
-
Here's one for old-time's sake.6 points
-
Done! They look good and seem pretty solid.6 points
-
6 points
-
I'm torn! Love @hawairish's ride (and the amazing work he does to benefit this community & our rigs), but I'm in love with how clean and well put-together @02_Pathy6 points
-
Gidday all. Long time reader, first-time poster, thought i'd finally share my R50. Used to frequent g20.net (had three P11s and a P10), I miss trawling forums and it's really cool to see such an active one in 2018! Anyway, here's my 1997 Nissan Regulus RS-R (JDM Infiniti QX4, badged as such), 3.2 turbo diesel (QD32ETI) & 4sp Auto. Currently sitting on 250k kms (155k miles) with no signs of letting go. Had it for two years now, has hardly seen any off-road action from either of the previous owners or myself and to be honest it probably won't (i'm too scared to scratch it!) but it does venture off-tarmac ever now and then. Have spent the last month building a bed platform for it, trying to keep it as tidy and professional looking as possible while being practical as well. Still has a usable rear seat with the bed out, and the bed can be retracted to make it a five-seater on the fly (though still working on hinging the front platform so I can actually store it in the back when removed). Managed to find a sturdy fabric that matches the leather/plastics which was a bonus. Rear electrics include two voltmeters for each battery (currently only has one, however), two thermometers (in/out), a clock, red/white interior lighting, a mini safe, cooling fan, usb/12v power outlets, controls for exterior lighting and yet to be wired: second ignition, window switches, monitor with 4x cameras and a power inverter. Also have insulated the side & rear glass and added a small viewing window. Made a custom mattress to fit and it's comfy enough! Far from complete though, still many things to add, will start a proper build thread in the R50 section in due course ? Ta! Dan6 points
-
Side by side Mr Cox 96R50-97JR506 points
-
Finally finished welding up my low profile winch bumper last week! Sent from my SM-A520W using Tapatalk6 points
-
Pathfinder Pest Control. Tried a new way to kill off the moles who are destroying my yard....we’ll see if it works?6 points
-
6 points
-
Today I picked up 600 lbs of steel plate...enough to make the initial 6 bracket sets...and some skids plates. I'm still debating whether that means front or mid skids. For sure, I plan to make a mid skid to match my front skid. There might be some other revelations along the way. For now, still focusing on the remaining V2 tweaks. I'm still dividing my time across several projects to build up some confidence using the plasma table. I've not fired it up for a few days, but this week I will be cutting out the brackets and other items for my rear(!) bumper, which I (finally!) started last week. The truck has been without a rear bumper for months now, and the goal is to have it done before CANVAZ. Lots of work left to do!6 points
-
She moved under her own power. Still more work to do, but a couple of quarts of tranny fluid, replace the diff fluid, and I may drive her to work.6 points
-
Alright! I got the AC installed the other weekend, and it is GREAT! Fired up the plasma cutter to do some by-hand cuts last week, and tonight I cut my very first pieces on the plasma table! Nothing special, just some mounting tabs for a bracket to hold up a massive ventilation fan that @TowndawgR50 hooked me up with. Getting the rest of the ventilation pieces tomorrow, and will hopefully weld up the fan bracket and get things installed over the weekend. I think that's the last item on my list to complete the garage-to-workshop conversion...well, could use a TV in here, maybe move my mini-fridge from the other garage, some more lighting....anyway, details. Over the weekend, I also got around to converting all my original parts and some V2 modifications into the CAD/CAM application I was hoping to use for both my CNC router and plasma table. The application (Autodesk Fusion 360) is very frustrating, to say the least. Some issues are surely learning curve induced, and it might get me where I need to be in time, but I'm going to explore some other options first. Notably, it allowed me to cut my parts tonight, so at least I know we're heading in the right direction.6 points
-
6 points
-
It's in progress, I guess I'd say. My plasma table is here and assembled, and early (maybe mid) August still seems reasonable to have the shop ready.6 points
-
Throwback Tuesday........6 points
-
6 points
-
Go to a different inspector that knows his arse from a hole in the ground.5 points
-
Custom brackets made for the viair and the fuse box Sent from my iPhone using Tapatalk5 points


(1)_opt.thumb.jpg.035a5eb628baefe0934fbb6e70f9b39e.jpg)