- Sign In Changes: You now need to sign in using the email address associated with your account, combined with your current password. Using your display name and password is no longer supported.
- If you are currently trying to register, are not receiving the validation email, and are using an Outlook, Hotmail or Yahoo domain email address, please change your email address to something other than those (or temporary email providers). These domains are known to have problems delivering emails from the community.
Leaderboard




Popular Content
Showing content with the highest reputation on 10/11/2018 in all areas
-
Complete noob on here so let's see if this works
 8 points
 -
Hopefully these load Sent from my SM-G960U using Tapatalk3 points
-
Alright second post. For the rack I used a Rola Rack with extension as the length almost fits perfectly on the roof of the pathy. For the hardware that I used were electrical conduit clamps that I picked up from Home Depot (they come in a pack of 5), lock washer, locking nut, bolt that threads into the stock sliders in the rails and a washer. Most of the hardware I had were Cerakoted black as I didn’t want a galvanized beacon on top of the truck which wouldn’t look so sharp. I chose Cerakote because it is extremely durable as it is a ceramic coating and they can withstand the abuse of the elements and tree branches. Cerakote also is flexible so when you clamp the conduits to the rack it doesn’t chip off. Cerakote application is a little involved as you have to get the materials for it and bake it but I have a certified Cerakote applicator at my work and he gave me a really good deal so I did that route. I used 10 clamps total and it holds the rack very securely, I can rock the whole vehicle by grabbing onto the rack and it doesn’t move or creak at all. I’ve driven up to 90 mph with it and had about 60 pounds of cargo up there and had no issues with it. I can flex the vehicle just fine without the unibody flexing the mounts off or ripping them out of the rail. The rack sits very low to the roof which could be a plus or minus. I can still open the sunroof but the glass touches the bar ever so slightly. After a couple of deadlifts of bending the bar upwards the glass still touches it. The rubber mouldings along the roof sit maybe a ¼ inch or less between the rack. I’m going to fix this issue by probably getting thicker washers and slightly longer bolts to help sit the rack a little bit higher so I can fit straps underneath the lower bar and the stock roof rack rails. Sent from my SM-G960U using Tapatalk2 points
-
Alright so first real post here. So after skimming the internet I came across a pathy with frenched in backup lights in the rear bumper and I thought that was pretty slick. (I saw it on expedition portal and I believe his name was Allof75). He sparked the idea for me to do this mod so I went for it. I bought the Hella ValueFit 6 led floodlights off amazon and the wiring harness for a decent price as they were the size and shape I wanted. These lights almost fit perfectly in the rear bumper where the stock reflectors are. So what I did first was remove the plastic cover off the rear bumper to expose the steel bumper underneath. Where the reflectors are, there's already a open spot in the steel bumper where you could mount the lights in and there's a piece of sheet metal in that space where I mounted the lights to. Then the next step I "carefully" dremeled out the outline of the reflectors in the plastic bumper so it would contour to the lights. Then it was a matter of putting the plastic bumper back on and off to readjust the lights and to trim a little bit of the plastic to fit well. After everything was set I moved on to wiring. I ran the wires through the rubber grommet where the stock tow package wiring harness goes into the cab of the truck then I routed the wires behind the interior panels all the way to the front and out the firewall where there's a hole for the clutch for the manual's I assume. Instead of splicing the back up lights to the stock back up lights I opted for a on/off switch as I don't want to compromise the stock wiring and cause a short or something. Also I did this because I could turn it on when I want for lighting up work areas, campsites, tailgaters and what ever I need it for. I don't necessarily need them all the time so the switch works out perfect for me. This "mod" was pretty straight forward the most tedious job was trimming a hole in the rear bumper and mounting the lights to the steel rear bumper. Again first post here so I might've forgotten something along the way on this install but feel free to ask questions and I'll try my best to respond to them! Also I'm having issues uploading pictures here so standby for those.2 points
-
An aftermarket or custom bumper can distribute load across both recovery point areas somewhat. To be more effective, though, they also need to increase the number of attachment points and the overall contact area. I don't recall if I had a good picture of the nut-strip I'm using for my bumper brackets, but it slips into the chassis tube and sandwiches the tube wall using 1/2" bolts. The problem with putting a bolt all the way through the tube, even with a sleeve, is that it greatly increases pressure at the attachment point and under-utilizes part of your bracket; it's not distributing pressure enough. Your pipe sleeve would have to be a fat round spacer to the exact width of the tube to be the most effective (but a difficult task since the tube opening is smaller and not uniform). Two analogies to hammer the point: Imagine two magnets on a piece of steel. One is 1" diameter, and the other 3" diameter. Which is easier to slide around? The 3" magnet has about 9x more surface area, and consequently harder to move. This scenario represents area distribution. Imagine holding a piece of paper flat between your palms and someone trying to pull the paper out. You can hold it pretty tight. Instead of palms, try just between all 5 fingertips fanned out (er, 4-6 fingers for some folks out there); still a decent grip, but you've eliminated contact area from the palms. Now do a palm and just one finger. The paper flops over and can be pulled from your grip very easily. Your palm adds very little to clamping strength, literally reduced to the contact area of your fingertip, and basically the equivalent of holding it with just two finger tips. This scenario represents a bolt-through scenario. Notably, many of the surfaces on the truck are irregular as you expand across multiple attachment points, so you can only gain so much actual contact area. I'd guesstimate my brackets have added about 1/2 sq ft in contact area, and are currently using 9 attachment points per bracket (I can increase these further if I were to weld my brackets to the OE recovery hooks).2 points
-
So this had me thinking about what was there as well. Couldn't remember for the life of me and it wasn't that long ago so I dug through some old photos and found these pics of my rear hooks before I got my tow bar. Now I just need to remember where I put them2 points
-
Can you recover from those points? Yes, but gently and only in mild recovery situations due to loss of traction. Stuck in mud, snow, sand or anything like that while using an OEM tow point can cause failure of the flimsy layered sheet metal that the nuts are welded to. In my opinion, I wouldn't use ANYTHING OEM for recovery except a rear mounted hitch with a recovery ring. I was recovered via those points and the driver side mounts torqued forward. It was a snatch style grab by a Suzuki Samurai with about 8ft of lead on a bubba rope and soft shackels when I was buried up to my bumper in snow.2 points
-
Thank you! Yeah I've been wanting to make a thread about my rig for a long time and if it took me this long to post one picture, standby for the "slow" thread to come along ?2 points
-
Man @RainGoat, I wish I was getting 15 mpg. I took my lawnmower can with me over the weekend (it's such a POS, too) and got somewhat close to needing it. But then again, I was pushing my tank to the distance, noting that my idiot light comes on with about 5 gallons left (but presumably less). Aussies have had two extended fuel tank options that I'm aware of. One is the Long Ranger, which was a 95L (25gal) that installed where the undermount spare tire is. Not sure if ARB partnered with or acquired LR, but that's what ARB sells. The other was from Brown Davis, which was a 125L (33gal) tank replacement. My buddy was looking to import some years ago, and they were not cheap ($1K sounds about right), all things considered. After thinking about my own refueling in needs, I really like the idea of a small aux cell where the spare tire was. I might mock up some dimensions and request a quote from Boyd Welding (http://www.boydwelding.com/) who seem to have the process down, though I'd expect a custom job to be around $500-$600. Some time ago, I saw a rather clever roof-rack setup that was comprised of a marine-grade under-seat fuel tank and an external fuel pump; I'll have to find my bookmark for it. After spending maybe 10 minutes trying to refill my tank with the unused fuel, and a sore thumb holding some stupid EPA-compliant spout open, a gravity- or pump-assisted system seems like the way to go.2 points
-
While I share Inyourface1650's enthusiasm to some degree, mjotrainbrain is correct. Per the Owner's Manual, only the RH/pass side is "rated" for towing, while the LH is for tie-down use only. Now, at least on my truck, both left and right tow points are almost identical in shape and mounting (same number of bolts per side), so I don't know why one side would be inherently weaker than the other, though I think I've seen some older models have 4 bolts on the RH side and only 3 on the LH (mine is 3 per side). I think both points would be fine for static pulls (winch, tow strap), but I'd be cautious about using dynamic pulls (kinetic, snatch, recovery straps, etc.) on them. The hooks themselves are fine. The radiator crossmember is boxed in to resist pushing/impact (though, I'll disagree on the part about the area taking the bumper load...the bumper brackets are flimsy and designed to collapse, and are mounted to a flimsy area well above the tow points), but it's the nuts welded to thin sheet metal that are weakest links. Ask @TowndawgR50; they can shift on a recovery pull. "Recovery" can refer to static and dynamic pulls. There's obviously some situational awareness for recovery efforts, but personally I'd limit their usage to only slow static pulls.2 points
-
esto es en pinamar argentina, mi r50 y mitsubishi nativa de mi amigo2 points
-
I don't think there is a random picture thread yet. Every other forum I'm on has one of these... No particular reason or theme, just share what you got. I'll kick it off with some of mine from today:1 point
-
When it’s ealry morning and I start my 94’ it doesn’t start that well, I have to give it gas for it to start and hold the gas just a little for about 3-4 seconds before it starts idling by itself, any ideas what I could be? I got a new battery right before summer and it has never done this before, only happens when it’s completely cold and hasn’t ran in about 4 hours or so.1 point
-
Yeah there's very little room between the lower bar and rails. Hopefully soon I'll have a solution to fix this problem.1 point
-
It looks really nice in person too! Really, his whole truck looks great. One drawback is that this eliminates reflectors on the rear of the truck. I’ve advocated putting red reflective tape on the vertical surface of the lateral arms of the OEM hitch to compensate.1 point
-
Finally! Yeah its nice having the stock reflectors as a reference point to cut out. If they didn't have them I would've wired them to the rack Sent from my SM-G960U using Tapatalk1 point
-
Wow. Thanks guys. Those extended range tanks are cool, but for the money I guess I'll just toss a plastic can on the roof. I can buy a lot of those for 1k! In the XJ it's just a matter of bending the vent tube upward - takes time but little money. I haven't relocated my spare yet so I don't have the space either.1 point
-
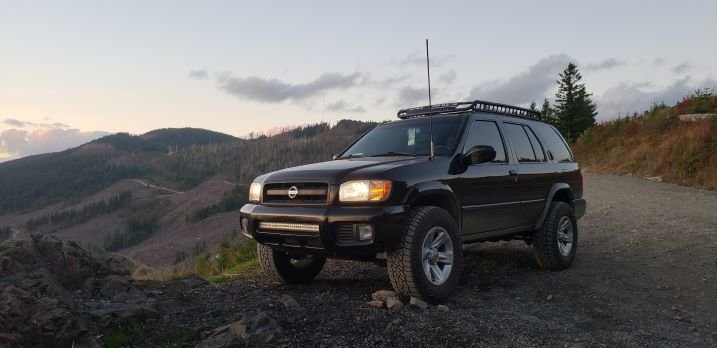
He also has done a really nice rack attachment (his is my template) & an innovative installation of LED reverse lights in the rear bumper reflector slots. It’s a VERY nice looking truck! I’ve been on him to do some write ups as those last two projects were really nice. Nice rig control at Tahuya as well. FINALLY on NPORA!1 point
-
Ha Ha! Yeah, they can go sometime before replacement. My last one was pre-inspection too. Clearly I’ve outed myself as che...I mean frugal. (My best friend says I’m “value oriented”)1 point
-
That's right, I remember now!1 point
-
I have done some serious double line pulls with those things. I was in mud though and if you’re jammed on a rock or something you might end up breaking them. Also winching and someone jerking on a strap at 15mph are two different things and those things would definitely not hold up to the latter. The points at the back can take some serious force as well. I got stuck in a bottomless mud/sand pit with my spare jammed up against a ledge and a gigantic John Deer tractor that was literally 5 times bigger than my car pulled me out with one of those tow points. It did mangle it badly and we had to beat the hook back out but it didn’t break anything... hmmm... as I’m typing this I am reminded that my car doesn’t sit right when looking from behind... maybe it did break or bend something. Sent from my iPhone using Tapatalk1 point
-
You sir are correct! Yeah I'm on instagram more and that's where I'm posting my "thread", it's theblackpathfinder on IG1 point
-
The more I look at it, the more I'm convinced you're on IG. If you are, what's your username? I bet I follow you and just don't remember. Gosh I love black R50's...your post sent me on a Craigslist cruise haha.1 point
-
Thanks man! Will do, I'll upload them to the TotM thread.1 point
-
That's a seriously good looking rig! If you've got a good sunset pic feel free to add that to the October 2018 Truck of the Month thread, it'll be open for 10 more days. Really like the details like CB antenna placement, light bar placement, and low roof rack. Looks real slick.1 point
-
Gotcha, mine started popping codes in the 50-60k range. I was very busy at the time the 1st code popped, so I let it go for a bit. Shortly before the next emissions inspection, I scanned it again and had 2 codes, so I ponied up and bought/replaced all 4. Knock wood, not a single o2 code since! I'm completely sure I just thoroughly jinxed myself...1 point
-
There’s a reason I’m only doing a bumper that’s a collaboration between@hawairish &@TownDawgR50.1 point
-
For what it’s worth Dan, you are bringing alot of original thought & good questions to the forum. You’re definitely pushing me & making me learn & think about things!1 point
-
https://www.arb.com.au/nissan-pathfinder-r50-1999-2005/fuel-tanks-storage/ Can't find a price on it.1 point
-
Technically only one of them (don't remember which) is rated as a tow point, but even so I wouldn't use them unless absolutely necessary. Not worth tweaking the vehicle if you don't have to. If you're burried to the rockers in mud I wouldn't even think about it, but if you're just slipping on a slick hill and need a winch up it would probably hold.1 point
-
I had another paragraph but stupid Tapatalk has failed to save it twice, I’m out! Ah, don’t use the less than symbol....1 point
-
Mostly its been progressive failure: 2017@104K Driver/Front 2016@98K Pass/Rear 2012@71K Pass/Rear 2011@62K Driver/Rear Only the Passenger Rear has been replaced twice, the other 3 are just the originals finally going out. A buddy of mine who works at Nissan’s R&D in AZ told me part of the problem is that the O2 sensors need to wait to turn on a bit after the engine is started. This allows any moisture to be evaporated before they turn on & thereby decreases failure rates. He said there was a TSB that fixed it but my local dealer wanted me to pay $125 to flash it. I bought 3 O2 sensors on a liquidation sale for less than $45. Given it only takes me about 15” to change them out this seemed the economical choice. One has lasted 7yrs/44K & one only 4yrs/27K. The Passenger Front OEM still going strong at 16yrs/106K. Now that I’ve committed myself to this truck for another decade I’ll probably look for something better on the next replacement (unless I get a screaming deal again).1 point
-
If it is just the cable you need, there are some at 1991 Parking brake cable on Rock Auto. for less that $151 point
-
I think my Lockright works great. Check the vid. You will see me go up a trail with my locker and a jeep without one go behind me. Its way cheaper than a air locker and works just as good. Like you have probably found, it can be noisey and a little unpredictable at times, but I love it.1 point

.thumb.jpg.3351162271e2c1bf86fe7c0c7e657df0.jpg)