Leaderboard
Popular Content
Showing content with the highest reputation on 04/26/2019 in all areas
-
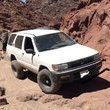
Took a 99% amazing trip to Afton Canyon, the Mojave Lava Tubes, Kelso Dunes, and the Calico Hills. Mostly wonderful, exploring the Mojave Road and other trails nearby. Did bite off a bit more than I could chew doing the water crossing at Afton (P0130 and P01325 codes came right up), and may have overdid it on the clutch trying a slightly too difficult section of road in Calico. Looks like I have some more work to do on Hermon!6 points
-
Suuuuuuure ? Glad to hear it's still going well!2 points
-
Do more research. My AC coils have never and will never bind up my cv axles under any conditions, where as my spacers would have. A strut spacer means you’re lifting on top of your strut, which means your strut assembly is now pushed down, as opposed to a spring lift which lifts inside of the travel limited by the strut (hence experiencing top out with a coil lift but not with a spacer lift). You will never bind a shaft with a coil lift, period. It simply isn’t possible, the halfshaft is always operating within its designed travel. Just ask @XPLORx4. His 18 years on AC coils going throughout Moab and whatnot can attest to that lift. To the people who have busted multiple CV’s on spacers, @TowndawgR50 and @system_f can attest to that. As far as the SFD goes, understand an SFD is usually run with a 2” lift in conjunction with it (4” body lift with 2” suspension lift with SFD). If you just do an SFD with no spring lift your ground clearance doesn’t change at all in the front, except by half of your increase in tire size. A 6” SFD on 33” tires has .5” more ground clearance than a properly set up 2” lift on 32’s that can tuck tires correctly. And honestly, if you’re serious about your rig you’ll find more and more reasons to go with a spring lift. It improves handling and load capacity, which is important for taking turns on a lifted vehicle. It also helps give your suspension more downward force in increasing articulation and keeping traction.2 points
-
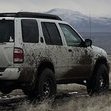
Just checking in with an update after the most recent suspension work. I’ve put about 500 miles on it with the sfd, custom front coils, and limiting straps and I’m still very happy with how it all worked out. Other than the struts topping out, I love the way it rides with the new front suspension set up, and the limiting straps worked out perfect to take care of the top out. I haven’t had a single issue with top out since installing the straps. At the risk of jinxing myself..I’m going to say I’m done messing with the pathy for a while and am just going to drive it, lol. Sent from my iPhone using Tapatalk2 points
-
Yes both lifts via coils and spacers change the angle of the axle to some degree and thus accelerate wear on boots and such. With the spacer lifts and depending on which size you get they physically move the strut down however many inch spacer you put up front. So at full droop when offroading the strut will drop farther down because the spacer pushes it down that much and that's how some people break and bind CV axles. With the coil lift at full droop itll stay the same as stock because the strut is still in it normal operating range and isn't being pushed down by a physical spacer, the only thing that prevents it from dropping too far is the maximum travel of the strut. I'm running a 1inch spacer with OME HD coils and dont have issues with binding or blowing up a CV, the only problem I have is CV boot wear. Not trying to start an argument or anything as theres tons of information out there with different styles of lifts and testimonies I'm just adding my 2 cents into the pot. Sent from my SM-G960U using Tapatalk1 point
-
Alright, we’ll try this one last time. After that someone else is gonna back me up or you can figure this out for yourself. If you already happen to have spacers on top of your struts and put blocks on your subframe, yes, that will change you suspension geometry back to spec. However, an SFD refers to the whole 9 yards- angled strut spacers, extended steering, and subframe blocks, etc. it’s almost impossible to put in a 2” SFD to compliment those spacers for the 2” lift. But, doing an actual SFD (all the blocks and spacers) at once, which is really the only way to do it, will not change any of your suspension. Your strut will be pushed down 4”, but your entire front subframe will be pushed down 4” so that your CV axle doesn’t blow up immediately, and sits exactly the way it did before the SFD. As for springs vs spacers, you need to understand how a MacPherson strut system works, or at the very least be willing to believe the testimonials of all the people with spacers who experience binding and even blowing up CV’s. It appears you’ve decided not to research very extensively, and not surprisingly no one else has been willing to weigh in on basic lift kit questions, because they’ve already been answered a thousand times. Sorry for trying to be helpful.1 point
-
Hard to believe, but this story has developed a "chapter 2". Call it "fate", "dumb luck" or "divine" intervention (if you believe in that kinda thing) but the tow truck driver (Ramone) from pic-n-pull turned out to be a pathfinder enthusiast like me. He has 2 mid 90's wd21 4 doors and could not believe I was going to scrap mine, he said it was the nicest 2dr he had ever seen (I thought maybe he was going to offer to buy it from me). I told him my long winded "sad tale of woe" regarding my project. He told me he had a cousin (Victor) that had been parting out his rolled '02 xterra for the past year and was getting ready to scrap what was left (I assume he got the insurance payoff from it). What he had left of it was... the body shell, frame and ironically... the engine block, complete with pistons and crank (300k miles on it). He said if I gave him $75.00 to cancel the tow (I was having second thoughts anyway) he would talk to his cousin for me. I figured what the hell, so I did and gave Ramone my #. Long story even longer, two weeks later and several attempts at getting together with Victor, I now have a replacement vg33 block as well as my beloved '87 2 dr.. Victor sold me the block complete with pistons, rods and crank for $50.00 bucks (it even turns over) and 2 cases of Modelo beer! I am still finding this hard to believe, this kinda thing does not usually happen to me! Hopefully this will turn my luck around for the better and I will get this project done after all! ?1 point
-
I’m on 9449’s as is @02_Pathy. We both love them. While you’re in there changing out springs, we would both recommend extending brake lines, bump stops, and diff breather so you can run some nice long bilsteins.1 point
-
well documented instructions on how to install basically any rear spring/spacer. This is what I followed and is similar to what you said. Refer to page 7 for all known springs and resulting lift heights (thread won’t embed, search Land Rover rear lift spring install)1 point
-
The landrover 2" lift springs are great, finally put mine in last weekend. Easiest way is to unbolt the cross arm that bolts to the panhard bracket, remove lower rear sway link bolts, pull the clip for the rear brake line and unbolt the brake line from the rear axel and get a big jack and wood blocks and jack the hell out of the rear on the spare tire or hitch it you have one. I was able to put my springs in by hand, no spring compressor.1 point
-
I don’t have any pictures currently but I’ll get some as soon as I can. Really, I just used 2x2 inch square tube and cut them to 6” lengths, measured the bolt spacing for the transmission mount and crossmember mounts, and used a drill press to do the drilling (the bolts are rather large). Unfortunately I didn’t document this, but it’s easily obtainable with a caliper/micrometer. You’ll need to make sure you get your math correct for lengthening the steering linkage. Most information available is for the 4” SFD, so calculate accordingly with simple trigonometry. Unless the angles of the strut spacers are corrected, be prepared for excessive camber without proper suspension geometry. Make sure you unbolt the power steering lines from the subframe before moving it down, so that you can reposition them and drill new holes to bolt onto later, otherwise you’ll have a fun mess to clean up. You probably already know. But the engine must remain in its factory position, so 6” spacers will be needed to support the engine. I STRONGLY advise swapping the engine and transmission mounts while you’re in there, since they’ll be exposed and easily accessible.1 point
-
So 15 years later...I bought my 95 xe for 700 cash with 167k miles..couple dings and needing every bushing replaced but I think I stole it..1 point
-
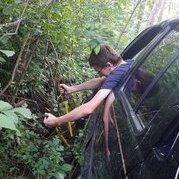
I had to do the exact same thing with some swivels and tape to change my passenger side front o2 sensor1 point
-
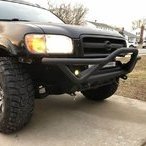
Finally finished mine, from Coastal. I think it’s a fantastic build. It’s very heavy but very sturdy. There ARE some flaws in the design that they don’t account for, such as the dinky little power steering line that runs across the front of the frame, so that was a huge pain to bend and move out of the way... resulting in some crushed fins on my condenser, but oh well, more reason to install an aftermarket cooler eventually. I really took my time welding the kit, made sure it was solid throughout, but I also have a pretty decent set of welding machines at work. It’s not going to be easy with a smaller welder, so be prepared to either have a decent one at your expense, or someone that can weld it. The total time it took me to bevel the edges, tack it together, weld, grind, stitch-weld the inside, etch, prime, and paint was a little over 36 hours, and I was definitely taking my time. All in all, it’s a fantastic kit, the piece quality was actually great, and the metal was very clean and ready to weld, minus the edges that all had to be beveled. For the price and availability, I strongly recommend their service.1 point