- Sign In Changes: You now need to sign in using the email address associated with your account, combined with your current password. Using your display name and password is no longer supported.
- If you are currently trying to register, are not receiving the validation email, and are using an Outlook, Hotmail or Yahoo domain email address, please change your email address to something other than those (or temporary email providers). These domains are known to have problems delivering emails from the community.
Leaderboard


Popular Content
Showing content with the highest reputation on 07/19/2020 in all areas
-
3 points
-
Hi all: I have take the engine apart on my pathy to add the loctite to the power valve screws to avoid them getting sucked into the engine. A HUGE thank-you to my buddy Steve - without his experience from working on his Maxima and his help, I'd likely still have my finger stuck in a swirl valve.... A BIG - thank-you to all who posted about this issue to alert those of us not in the know.... Note to Mods: I /IMG tagged my pics from photobucket. If someone wants to upload and modify my post for posterity, cool. Can't guarantee my photobucket account forever of course... Details '02 Pathy LE 111,000km (~69,000 miles) Gaskets (4) ordered from dealer 16175-4w000 (throttle body) 14033-4w000 (right side, between upper and lower intake plenum also called 14010A*) 14033-4w010 (left side, between upper and lower intake plenum also called 14010AA*) 14033-4w00A replaces 14032-4 (between lower intake plenum and intake manifold also called 14040E*) * (part numbers as shown on exploded view in the print-out given to me by dealership, dunno why they don't match the p/n on the packages... all gaskets fit perfect.) These cost me approx $72 CAN as the Nissan dealer cut me some slack on the tax. The last gasket is the most expensive, almost $50. If you were going to leave the lower intake plenum on the engine to do this job, you would not need this gasket. I personally think it worth while to remove the lower plenum, makes life easier, only 4 screws hold it on, no dropped screws inside the engine.. up to you though. Some people think that these gaskets can be re-used and you do not need new ones at all - probably true, but with my luck, I decided not to do it twice for $70 and got new ones. The following is my rough account of how I did the job, not every step is in here, but should give an overview. If you are a real noob to auto mechanics, this may be more involved than you want to try. Much harder than an oil change. Not nearly as hard as changing a transmission or even a clutch though. If an oil change is a 1 out of 10, and an engine rebuild is a 10 out of 10, this job is a 4 in my opinion. Quick Notes: Left and Right - refer to the side of the vehicle, so when I say left, I mean from the driver's perspective - just to be clear. I did not cut any factory tie straps!! They unclip from underneath if you squeeze the tabs together and then you can pop them back in later. Disconnect battery negative cable!!! This protects electronics. Remove plastic engine cover (2 nuts and a screw). Look in awe at all the bloody wires and hoses. Remove the *mounting bracket* for the accelerator cable and what I guess is the cable from the cruise to that go to the throttle body. I did not remove the the lock nuts at the cable end, just the mounting bracket (2 screws). Unclip the the cables from the plastic clips at the front of the engine. There should now be enough slack in the cable to move them toward the throttle body - the cable ends slide to the side out of the half round throttle body mounting points. Then flip the cable assy upside down and backward toward the battery - DO NOT kink these! Remove the brake vacuum line from the rear centre of the upper intake plenum. Remove the hose leading away from the evap valve on the upper intake plenum near the throttle body. Then remove the air intake hose. There is one mounting screw on the resonator box down low (in the following pic, the mounting point is visible just below and to the side of the master cylinder) to remove, plus 2 band clamps and a couple of hoses. This thing will be hard to get out, you will need to remove the hose from the throttle body end first and the twist and contort it out - watch the plastic box underneath doesn't get hung up stuff (it will). I did not remove the airbox. This would make life easier I bet, but I felt I could get by without the extra step. Then remove the hoses around the power valve vacuum actuator at the front left of the upper intake plenum. There are two brackets on the right side, rear of the upper intake, that are bolted to the lower intake (one has the mounting screw for the plastic cover). That one should be loosened and pulled back. They both need to come loose, so might as well do em both now. Unclip the two tie straps for the evap control valve @ back of throttle body. Disconnect two connectors at throttle body (throttle position switch and idle air control valve, brown is on top, but I think there is only one way to reconnect). I did not disconnect the coolant lines to the throttle body. I removed the 4 mounting bolts (hex key on a socket extension works best). and used some wire tied it off out of the way to the dip stick. Using the reverse of the torque tightening sequence from your manual, remove the 13 fasteners from the upper intake plenum, and them remove it. Carefull, it could get hung up on stuff. Put the bolts in a card a number them as they are different lengths and need to go back in the same spot! There are only 4 fasteners holding the lower intake in place - or so it would seem! There is secretly a hidden bracket on the right side back, between the firewall and the lower plenum. The right most bolt will require a short 12mm wrench to get at it. This was the hardest fastener to deal with. Then the the 4 main fastners can be removed in reverse tightening sequence order. Will continue in a reply post.....1 point
-
1 point
-
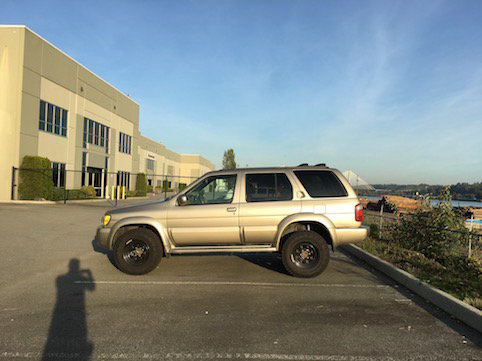
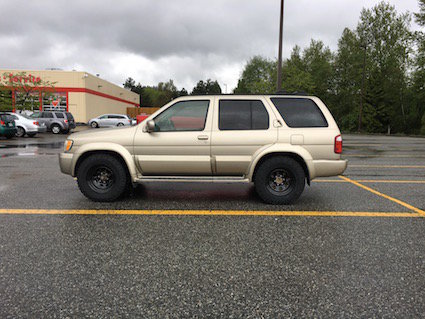
Hey everyone, RustyQ and I are newbes on the forum. We just wanted to thank you for the amazing information and share the result of our recent lift based on the recommendations on here. Front: OME HD springs, KYB strut, Moog strut mount(financial decision, no issues yet) Rear: NRC 9447 springs, Bilstein 5125 shocks Wheel: 245/75 R16 Duratracs on 16x7 steelies measurements from the ground to the top of wheel arch (inches) Before After front L 31 1/2 32 3/4 front R 31 7/8 33 rear L 32 1/2 35 3/4 rear R 32 3/4 36 1/2 max front 1 1/4 max rear 3 3/4 Before After
 1 point
 -
Congratulations on acquiring such a well built & pretty truck. Also, really sorry to hear about that failure but you certainly know the repair was worthwhile even if a PITA. You are going to be right where I am headed with my truck (not a terrible surprise given I’m consulting heavily with@hawairish &@TowndawgR50 for guidance). Fantastically, you are about to definitively answer a question I’ve had.@TowndawgR50 has been VERY happy with his LR NRC9448s & Bilstein 5165s. So much so that last weekend he convinced me to go with the 5165s over the 5100s or 5125s. He, however, runs a 6” lift, whereas I’m looking at a 3-4” SFD. My research in the next week or so was to figure out the right part# for the 5165 for my rig. Let me know how that one (25-261400) works out because, if it fits & functions properly, I’m ordering mine as soon as I have confirmation from the two of you. Awesome timing & thanks for posting!1 point
-
Same with the SuperPro bushings I bought from them. Just came in plastic bags. Agreed, I've been pleased with their durability, even after the years of use. My take offs are still in the garage for a rainy day, I guess. AFAIK, the $167 price for any OME springs is pretty normal. The other thing is that OME marketed them for 15mm (0.59") of lift, but many have noted more...closer to 1.5"-2", and it totally depends on what all you're loaded up with. Straight from OME catalogs:1 point