- Sign In Changes: You now need to sign in using the email address associated with your account, combined with your current password. Using your display name and password is no longer supported.
- If you are currently trying to register, are not receiving the validation email, and are using an Outlook, Hotmail or Yahoo domain email address, please change your email address to something other than those (or temporary email providers). These domains are known to have problems delivering emails from the community.
Leaderboard




Popular Content
Showing content with the highest reputation on 01/13/2019 in all areas
-
I got to do a little riding on back roads tonight. The light bar is pretty awesome. I do think I need to modify my mounting brackets because there is a lot of vibration. I'll address that later. In the meantime an update on the performance. Here is a shot of the OEM low beams: This is the OEM high beams: This is the high OEM beams and the yellow lights from the LED bar: This is the OEM High beams and the white lights from the OEM bar: This is OME high lights, the yellow and white lights from the LED bar:4 points
-
So here’s a followup on the issue: This was a user-induced issue, as I modified the PCV system slightly when changing my intake for a snorkel setup. I put a small breather filter on the PCV breather inlet, instead of reconnecting it to the intake. By doing so, crankcase pressure and gasses caused oil to buildup in that filter until it was barely breathing and clogged. The engine only had one area it could vent crankcase pressure, which was the PCV. With the PCV constantly blasting pressure into the intake manifold, oil could be picked up at that velocity, spitting oil into the intake manifold. If you look at the lower plenum, before the manifold collector on the VQ, the PCV releases pressure and gasses through a tube right above the intake valves for cylinder 4 and 6. Noticing a small trickle of oil draining into cylinder 4, that would explain a lot. The oil would get into that cylinder and take a moment to burn off when starting the engine, causing the misfire. That would also explain why cylinder 4 was the only culprit. By fixing the PCV intake so that it is connected to the air intake, as originally designed by Nissan, all the small oil seepage around the engine has stopped, the intake doesn’t have oil in it, and it seems happier altogether. The misfire still persisted after doing this fix, until I changed the spark plug for cylinder 4, which would make sense if it was burning the oil off in that cylinder. Lesson learned? The PCV system is important and designed the way it is for a reason. Don’t mess with it. If you suddenly have a misfire upon starting, and it points to cylinder 4, check your PCV intake for blockages, and replace the $2 PCV valve. For just a few hours and a couple dollars, it saves a bit of headache.3 points
-
Ive looked into this as well. @hawairish and I had discussed options a while back but since Im converting my rear brakes to discs its getting deleted anyways. I cant say for sure but I feel like my lift has negatively effected my rear braking performance due to the LSV not being in the correct position. I mostly notice it durring long downhill descents off road, with the front brakes taking the brunt of the work and the rear not even locking up under moments heavy braking where the front does.3 points
-
This response is exactly why I look forward to aftermarket products from@hawairish &@TowndawgR50. It’s the experience of doing it coupled with the attention to detail & the willingness to rework a problem until it’s done right.3 points
-
These threads leave some questions unanswered, but may contain information handy to anybody who plans to dig into this further.2 points
-
I can definitely run some tests as soon as I can, to see what sort of impact the valve has, especially with a lift. My take on it, while some things are always questionable, the engineers put it on there for a reason, not just for extra accessories. If tests are conclusive that the valve does indeed enhance rear braking with a lift, I can’t imagine it’ll be hard to make a writeup on a bracket that could fix this. I could probably design and fabricate one in a day.2 points
-
It's doable, but 2" W material would be better. For reference, this is what my current spacers look like: It's constructed of a piece of 2.5" sq. tube x 2.5" H x .250" wall, with 5.5" L x 2.5" W x .25" pads to make a 3" spacer (the height is irrelevant for this discussion, though; the 2.5" W base is what matters here). You could easily just use a 2.5" x 2.5" x 5.5" tube to replicate this like other spacers, normally 2" W x 4" H x 6" L for some of the traditional spacers. I did 5.5" L spacers to avoid having to notch anything for the passenger side where the brake lines come down (the metal guard shown in the pic). Here are the gotchas: 1. A 2.5" wide spacer is just a tad too wide. On the rear subframe, the width is perfect relative to the chassis. But, the unseen lower edge of the spacer actually sits atop a weld on the subframe, like so: For the rear spacers, you could obviously offset the holes on the spacer to get around that, but the spacer wouldn't sit flush. Also, if you do a simple tube approach, you have the radius edges to your advantage to some degree, but it may still be wide. 2. The front spacer is a little similar, but you can't offset the holes because of the lip on the chassis: Although this fits flat, it does barely contact similar weld on the subframe, it doesn't give much wiggle room for installation. The radius edge of the tube would help here. 3. A 2.5" sq. tube, presumably .250" if hitch steel, only leaves 2" of tool space inside the tube for tightening hardware. It's doable, but just be prepared to make a lot of small motions to get the upper hardware tightened. And if you orient the lower bolts tip-down (which you should), be sure to put those bolts in sometime before sandwiching things together, otherwise you might not have the clearance to insert the bolt or upper nut. That all said, eventually I will go to spacers with a 2"W base to get around those issues, or possibly convert these by welding on a 2"W x .25"H plate to the bottom of each spacer to clear the subframe welds (resulting in a 3.25" spacer).2 points
-
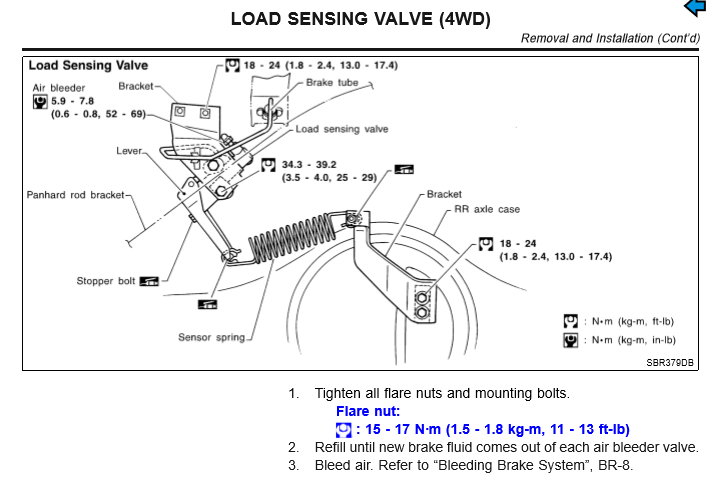
Hey everyone! A while ago, I was checking up on my rear axle's gear oil, and I started looking more closely at the strange device attached to the rear axle carrier. The one coming from under the body, attached to the axle by a spring. After a few minutes of scrolling through the factory service manual, I found that it's the load sensing valve. Essentially, the design of this valve makes it so that the vehicle can detect when there is a lot of weight in the trunk of the vehicle, or you're pulling a trailer, as the spring attached to the axle relaxes tension and the lever on the valve pushes upward, changing the valve position. This, in theory, allows the vehicle to distribute a little more braking power to the rear brakes. However, this only really applies if your axle is still the same distance from the body as it was when it was stock... Mine being 7" taller than stock in the rear, I can imagine that isn't going to do anything anymore, with how stretched the spring is. My question is, how important is the operation of this valve? I have temporarily secured it so that it remains pressed in all of the time, to try and see if I can get more smooth braking in the rear, but I don't assume that it does much in the longrun. I added a picture from the FSM of the device and its operation.
 1 point
 -
I've posted a link somewhere in a couple of the transmission threads with the guys over in Australia working on a programmable TCU to improve shift functionality. The transgo and the superior shift kits firms up the shifts by redirecting fluid and increasing spring pressure.1 point
-
Following! Sent from my iPhone using Tapatalk1 point
-
Hmmm, very interesting insights. It is these little things that often get overlooked & can have real impact on drivability & safety. Regardless of what we choose to do with them, better to understand the consequences than not. Sway bar deletes, CV angles, driveshaft lengths & missing links come to mind. I am very interested in having the group puzzle this out more.[mention=37543]TowndawgR50[/mention] observations definitely trouble me a little.@QuasarDecimari seems to have a fix & possibly something that should be recommended on all lifted R50s. I’d like to hear more of our knowledgeable members chime in!1 point
-
Wow, that’s a lot of light. You’ve done a good job with aiming & the bars output angles look tight enough that I only really see hood reflection in that last picture.1 point
-
That’s exactly what I was thinking when I figured out what the valve was for. I knew by lifting it, that valve became obsolete. Not a bad idea. I have it fastened right now at max, and I remember when I did that and went for a drive afterwards, I could tell a slight difference. My front bumper didnt nosedive as bad and braking just felt smoother, like it wasnt going to launch me out of the windshield. I could always conduct some tests with braking times and how level the vehicle stays when braking, if anyone is curious enough.1 point
-
Gonna try to use the stock location on the axle, i'll post some pics as soon as I get them setup. Looking like they'll go up onto the rail.1 point
-
The service manual has a table with front/rear brake pressures with the truck loaded and unloaded. The adjustment procedure has you hook up pressure gauges on the front and rear brake circuits and check the bias loaded/unloaded. Adjustment looks like a really vague process, with the allowable range for loaded/unloaded overlapping each other. The WD21 and the 2WD R50 don't even have LSVs, they just have a fixed prop valve in the master cylinder. I'd expect an LSV without its linkage to act the same as the fixed prop. Provided the rears don't lock up first, it's probably fine. Might be interesting to do some hard braking tests to see if you can tell the difference between the LSV at its maximum and minimum settings.1 point
-
I've bought quite a few parts from Rockauto, but it takes a little screwing around to make the shipping make sense. Amazon's got free shipping, RA's got cheaper parts prices, so which one I buy from usually depends on how much I'm buying at once and whether RA's got it in the same warehouse (they combine shipping if the parts are shipped from the same location). There's also a Rockauto discount code thread on here somewhere. If you want OEM stuff, there are a few dealers online you can check (including Courtesy Parts and factorynissanparts). OEM Surplus has some odds and ends you might not find elsewhere, though I haven't bought anything there myself.1 point
-
I love that combination too. Mr Cox 96R50-97JR501 point
-
On my 98 Pathy my cruise became inop when using LED'S. Put halogen back in worked again. Of course the LEDs that I was using I purchased offline and they were cheap LEDs so that could play a part I'm sure. Mr Cox 96R50-97JR501 point
-
Every single bulb in my car is LED and my cruise still works fine. Maybe just you newer guys have that "feature." Also everywhere I looked said the license plate bulbs are the same type as the front marker lights but they're not. They use the same base as all 3 of the lights on the taillight, 1156. Just make sure you find an LED shallow enough to actual fit back in.1 point