CDN_S4 Posted August 19, 2015 Author Share Posted August 19, 2015 I wouldn't drive it with that 2nd bolt in. Put whatever you can on it, even if a smaller dia. bolt...you need to sandwich it as best as possible. BTW, yours looks relatively bolt-on. My experience installing one this morning was far from it...I was extremely pissed at it. I'm writing up a product review now...maybe you can validate your experience on the write-up when done? Neat canopy! Will the lift gate put some stress on it when opened though? Yeah figured. I'll have to drill that second hole out. It wasn't as bolt on as it looks. As you can see my drop bracket is pretty rusted, so instead of grinding it down to allow the KRYPTON bracket to sit right I just smashed it with a hammer from below and squished it together lol. Went on like a charm after. The trail shade is whatever you want it to be. The first time I test fitted it I had the trunk open and used it to support the awning. This is also the idea behind it for me as I want to have this as the cover/,connection from my truck to my tent. It's all in where you stake it in. It could also go anywhere else on my roof rack. Sent from my iPhone using Tapatalk Link to comment Share on other sites More sharing options...
hawairish Posted August 19, 2015 Share Posted August 19, 2015 Yeah, I'm certain you had to take the BFH approach. I can seen your pic that because of all the rust, that's why you didn't have to cut anything either. Your truck must've known that eventually you'd get the bracket. Link to comment Share on other sites More sharing options...
CDN_S4 Posted August 19, 2015 Author Share Posted August 19, 2015 Lol yeah there isn't much a BFH, some ignorance and some brute force can't fix lol. As you can see in that pic, the Kr bracket took a good beating too as it needed some convincing. On another note, I figured out the spacer problem. Can't use the stock lug nuts, can't use 21 socket. It only works with the opened ended supplied nuts and a 19. I still need to get some more open ended 21 nuts to finish the setup before I can drive it. We'll see how it feels tomorrow. Hoping it won't shake. Sent from my iPhone using Tapatalk Link to comment Share on other sites More sharing options...
hawairish Posted August 19, 2015 Share Posted August 19, 2015 Funny you had to even use the BFH...must've been a lot of rust swelling?? Maybe the next mod is some media blasting and POR? So for the spacers, I have a concern...are you saying that you can use the open-ended lugnuts because they take a 19mm socket, which is a smaller diameter socket than a 21mm? That just means that the socket won't interfere with the holes, but there's no way the lug nuts are seating properly in the hole at all faces if they weren't doing that before. And unless all 6 nuts are exactly at the same depth, then the spacer for sure won't be centered. Did you ever get ahold of Steven? Link to comment Share on other sites More sharing options...
CDN_S4 Posted August 19, 2015 Author Share Posted August 19, 2015 Yeah Steven told me to use their nuts. With the 19mm socket it was no problem to tighten all 6 bolts and they all seem centered. It was the 21mm that was a snug fit for the hole that didn't allow enough wiggle room for the lug centric system to work as it had no wiggle room. Steven said there is nothing wrong with the spacers. After tonight's install I will say only that they fit. How well they are centered, we will find out tomorrow. Seems ok from the naked eye's perspective. Sent from my iPhone using Tapatalk Link to comment Share on other sites More sharing options...
hawairish Posted August 19, 2015 Share Posted August 19, 2015 Well, keep us posted then. I can understand a 21mm socket not fitting, but the fact that it comes in contact with the hole in one spot vs. simply not fitting...clear indicator to me that something isn't centered. But, as long as the nuts appear fully seated (as best as you can see, of course) and the spacer looks centered on the wheel hub centers, then that's a good sign. Link to comment Share on other sites More sharing options...
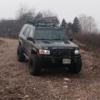
CDN_S4 Posted August 19, 2015 Author Share Posted August 19, 2015 Just test drove it and it seems fine. Maybe a tiny bit more vibration in the wheel but I need an alignment anyway. Question for you hawairish, do you get any sounds from your SFD spacers when off-roading? I seem to get a lot of popping and creaking sounds coming from my front end over bumps. Nothing seems to be coming lose but it doesn't sound very confidence instilling. I also removed my sway bar, and now with the suspension and wheel setup complete, here is a quick flex on a stump: And a rather bad shot of my new widened stance. Sent from my iPhone using Tapatalk 2 Link to comment Share on other sites More sharing options...
hawairish Posted August 19, 2015 Share Posted August 19, 2015 Honestly, I've not heard any noises that I can associate with the SFD spacers. I developed a slight creak/pop at full turn after upping to 3" strut spacers, but I believe I know why...the bolt-hole bore on my spacers is too tight for the bolts (1/2" drill for 1/2" bolt, previously 1/2" drill for 12mm bolt). The fit was very snug (I had to mallet the spacers onto the strut mounts), but had the purpose of gripping the bolts while I tightened them to the strut tower. I think it's too snug and I get the creak under heavy twist. We installed the 3" SFD on my buddy's truck over the weekend, and this time I bored out the strut spacer holes just a tad over 1/2", and we didn't have any noises whatsoever. The notable difference between mine and KrF's is that my front spacers butt up against the sides of the subframe because they're 2.5" wide instead of 2" wide. Very tight fit. Because of the radius edge on the 2" tube that KrF uses, there's only about 1.5" wide of flat mating surface, but I have a full inch more, too. Both of those differences will greatly reduce any shift that might occur. We also torqued what we could to 90-100 ft-lbs. For what we could put a torque wrench on (the upper/OE hardware), we made sure it was tighter than what we could feel by torquing the lower hardware. Link to comment Share on other sites More sharing options...
96Pathfinder4x4 Posted August 19, 2015 Share Posted August 19, 2015 I don't notice a difference in noise either. Your rig is looking good! Have you had the spare tire setup drag yet? I used to keep my D ring hitch on all the time....til I was trying to climb a rocky hill. I thought that I was bottoming out the rear axle. My buddy yelled for me to stop... I pulled the D ring hitch out and I went right up. Your setup sits farther back then my hitch. Link to comment Share on other sites More sharing options...
CDN_S4 Posted August 20, 2015 Author Share Posted August 20, 2015 Yeah I've had it dig up some dirt on the last trail. But steel is harder than dirt, so no biggie. Although it really takes a crazy angle to hit it as the carrier doesn't stick out much and most sists above the hitch. Sent from my iPhone using Tapatalk Link to comment Share on other sites More sharing options...
CDN_S4 Posted August 24, 2015 Author Share Posted August 24, 2015 Ordered the trail gear rock sliders from rugged rocks today. Can't wait! Custom takes too long and couldn't beat the price. Sent from my iPhone using Tapatalk Link to comment Share on other sites More sharing options...
CDN_S4 Posted August 25, 2015 Author Share Posted August 25, 2015 Working on the spare carrier. It's coming along nicely Sent from my iPhone using Tapatalk 3 Link to comment Share on other sites More sharing options...
CDN_S4 Posted August 25, 2015 Author Share Posted August 25, 2015 Sent from my iPhone using Tapatalk 2 Link to comment Share on other sites More sharing options...
CDN_S4 Posted August 25, 2015 Author Share Posted August 25, 2015 Sent from my iPhone using Tapatalk 4 Link to comment Share on other sites More sharing options...
CDN_S4 Posted August 25, 2015 Author Share Posted August 25, 2015 And some custom armour to round off the edges, protect the windshield washer fluid tank and finish off the look. Next will be cutting the fenders higher as I don't like the Swiss cheese look too much. Sent from my iPhone using Tapatalk 2 Link to comment Share on other sites More sharing options...
96Pathfinder4x4 Posted August 25, 2015 Share Posted August 25, 2015 Doing this all yourself? Wish I had a plasma cutter and a brake. ...and a bender. Link to comment Share on other sites More sharing options...
hawairish Posted August 26, 2015 Share Posted August 26, 2015 Dude, the changes on the carrier look great! Looks awesome tucked up high like that and the re-arranged carriers. Anxious to see how the sliders turn out...that's Colin doing the work, right? Link to comment Share on other sites More sharing options...
CDN_S4 Posted August 26, 2015 Author Share Posted August 26, 2015 Thanks man, yeah that's Colin. It was a lot of fun to redesign it. I had an idea of what I wanted and then we got started and went from there, making changes, seeing future Hi-Lift mount locations, and made a spot for a large ammo can right behind the tire. Only thing we didn't take into consideration was opening the trunk with jerries mounted as that doesn't work lol. I would have to remove the right jerry to open the trunk. But I can access via the glass so it's not that bad. Besides I only drive with jerries when the situation requires it, which is just on wheeling trips. This is something I can live with. But if I were to do it again, I think I would move the entire A frame over to the passenger side and put not jerries back to back on the driver side. Maybe a future mod lol. Sent from my iPhone using Tapatalk 1 Link to comment Share on other sites More sharing options...
01Pathmaker Posted August 26, 2015 Share Posted August 26, 2015 Wait, you're not swiss! Those are appropriately placed Canadian speed holes! Seriously though, very nice work you've got going on, this is one sweet pathfinder. Link to comment Share on other sites More sharing options...
hawairish Posted August 26, 2015 Share Posted August 26, 2015 Only thing we didn't take into consideration was opening the trunk with jerries mounted as that doesn't work lol. I would have to remove the right jerry to open the trunk. Haha, that's funny, but glad it won't be an everyday annoyance. I can imagine something like being easy to overlook! Link to comment Share on other sites More sharing options...
CDN_S4 Posted August 26, 2015 Author Share Posted August 26, 2015 Built a super simple mounting bracket for my handheld backup CB, which is also my source for NOAA weather alerts. I used to just have it randomly floating around the truck and it has always bothered me. I like having a dismountable means of communication with me that doesn't depend on cell phone signals. Sent from my iPhone using Tapatalk Link to comment Share on other sites More sharing options...
hawairish Posted August 26, 2015 Share Posted August 26, 2015 Excellent. I did something like that for my iPhone using a belt holster an old bracket from my Jeep; same spot. I need to start thinking about a CB install at some point. Gearing for GONE...CB required. Been reading up on it here and there, just need to find a really compact unit that meets my install requirements. Been eye-balling the Cobra 75 WX ST, but all the compact ones I really like are from AUS websites. Link to comment Share on other sites More sharing options...
CDN_S4 Posted August 26, 2015 Author Share Posted August 26, 2015 Excellent. I did something like that for my iPhone using a belt holster an old bracket from my Jeep; same spot. I need to start thinking about a CB install at some point. Gearing for GONE...CB required. Been reading up on it here and there, just need to find a really compact unit that meets my install requirements. Been eye-balling the Cobra 75 WX ST, but all the compact ones I really like are from AUS websites. Yeah that's a pretty popular one for the simplest install as it just requires an antenna mount. I like my dash mount, but I wish I had paid a bit more and gotten the NOAA option and customizable backlighting. But like I said, I like the dismountable option to maintain comms with the vehicle so in the end, having 2 is pretty good. Always good to have a backup too. Link to comment Share on other sites More sharing options...
CDN_S4 Posted August 27, 2015 Author Share Posted August 27, 2015 Trimmed the fenders some more to cut out the cancer. But I don't really like the look of it. I liked them better before. Might end up getting new fenders after all. Sent from my iPhone using Tapatalk 1 Link to comment Share on other sites More sharing options...
hawairish Posted August 28, 2015 Share Posted August 28, 2015 Like a bad haircut the day before Prom... Just kidding. Doesn't look terrible, but maybe it is time to re-think the fenders. I actually like those lines in general..similar to the new Tacomas. Which gets me thinking that maybe with some patience and a sharp blade, you can make OE or aftermarket flares from something else fit. Perhaps a 4Runner would be a better starting point because of the rear doors, but something without a cutout for the gas door. Just an idea. What you really need is a hand riveter, a pile of rivets, tin snips, some thin steel sheets, and some sealant. Patch those holes, then lather in POR-15. Ain't gotta be pretty. Otherwise, I'll start a poll thread about what rust-related nicknames we can come up for your truck. 1 Link to comment Share on other sites More sharing options...
Recommended Posts
Create an account or sign in to comment
You need to be a member in order to leave a comment
Create an account
Sign up for a new account in our community. It's easy!
Register a new accountSign in
Already have an account? Sign in here.
Sign In Now