- Sign In Changes: You now need to sign in using the email address associated with your account, combined with your current password. Using your display name and password is no longer supported.
- If you are currently trying to register, are not receiving the validation email, and are using an Outlook, Hotmail or Yahoo domain email address, please change your email address to something other than those (or temporary email providers). These domains are known to have problems delivering emails from the community.


Bax03SE
-
Posts
376 -
Joined
-
Last visited
-
Days Won
36
Content Type
Profiles
Forums
Calendar
Everything posted by Bax03SE
-
Sent from my iPhone using Tapatalk
-
I decided I really liked how the pvc coolant tank came out, so I copied that over to my washer fluid tank.
-
The Pathfinder emblem is in the wrong spot?
-
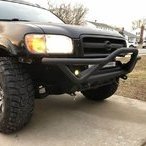
Wide open wheel wells! I wired up some LED driving lights to the factory fog light wiring, and also put my light bar back into the new bumper. Sent from my iPhone using Tapatalk
-
I sealed off the air intake hole in the fender, and opened up the front of the filter box so it now breathes air from the front of the box. With the original air intake hole in the fender sealed up it can’t kick up water from the wheel well into the filter box. The only way water is getting into the intake now is if I’m in water up to the bottom of the headlights, which I have no intentions of ever doing. Sent from my iPhone using Tapatalk
-
I decided to build my new coolant overflow tank out of PVC pipe. And it fits down in next to the air filter box. I had to move the hood open sensor over to make room for the coolant tank. It doesn’t line up with the hood anymore to compress the switch when the hood closes, so I just zip tied the switch down so it doesn’t always think the hood is open. Sent from my iPhone using Tapatalk
-
Alright, well this turned into a bigger project today than planned! At first I was going to use some aluminum diamond plate to cover/protect the low hanging washer fluid and coolant over flow tanks, as well as the low hanging part of the air intake assembly. After messing with it for a while, I decided to change course and completely remove it all! This meant building my own reservoirs and modifying the air intake setup. This old Tide bottle is living a new life as my washer fluid reservoir. By turning the battery sideways I made room for the new washer tank. The battery fits pretty easily that way. I did have to lengthen the negative cable to reach the terminal. Also painted the Tide bottle black so it blends in. Sent from my iPhone using Tapatalk
-
It’s still a work in progress, but I do plan to do something to cover up the lower ends of the fenders a bit and tie it together visually.
-
This is where I left it for the night while the paint dries. I’ve got a few more details to figure out in the morning, and should hopefully get it finished up. Sent from my iPhone using Tapatalk
-
The main bumper frame fits almost perfectly over the R50 frame horns with just a little tweaking, so I used that as a starting point by welding the bumper to those frame horns. I then got to work on fabricating brackets to tie the bumper in to the factory bumper mounts and the tow hook mounts. Sent from my iPhone using Tapatalk
-
I finally got started this week on a front bumper project I’ve been planning for a while. As I’m sure you all know, there’s not much out there for aftermarket bumper options. After doing a lot of research on the various measurements of stuff made for other platforms, I decided to pull the trigger on trying a rock crawler tube bumper for a TJ Wrangler. I picked this up for $235 from Amazon. First thing was to get all the old stuff off and out of the way. I rerouted the lines to my transmission cooler and moved the mounting location up a bit. The way I had it set up before it would have left the lines a bit exposed without the oem bumper cover. Sent from my iPhone using Tapatalk
-
4WD Light Blinking When Put into 4wd????
Bax03SE replied to joshrichard's topic in 96-2004 R50 Pathfinders
Nice! -
LR springs still up for grabs if anyone wants them.
-
Yeah it’s an expensive little bugger for what it is! If you can find a few in salvage yards it’s worth a try. I know how annoying it can be when that switch isn’t working. Mine had gotten so bad it could have been considered a theft deterrent. I could only get it to work if I followed a ritual of tapping the brakes a few times and pulling back hard on the shifter before pushing the button on the shifter. It really got to me one day at work so I pulled off the trim and decided to bypass it almost as an F you to that stupid little switch, lol. If I ever sell it I’ll probably replace the solenoid as I wouldn’t want to be liable or hurt anyone who accidentally moved it out of park without having their foot on the brake.
-
It sounds like a lot typing it out, but I just did it like this earlier this week and had the springs swapped out and everything all back together in less than an hour. Of course it helps that I’ve had the rear end apart a few times now, lol. So I know exactly where and how everything goes together, and also bolt sizes and what not so there’s no digging for tools to slow me down. I’ll also add that when your going back in with heavy duty springs it becomes a lot harder to compress them, so it makes dropping the rear axle to get them in and out more necessary.
-
Looking good! Keep us posted on the progress. For getting the rear springs out, if you ever have to do it again it can be done without spring compressors. I figured this out the hard way after going through a few different lift set ups. Lift the whole back of the truck up with a floor jack under the pumpkin. Then put a jack stand under the frame, I use the lower trailing arm mounting points for stand placement. With the body on the stands, take off both rear wheels, disconnect the shocks and sway bar links, unbolt the rear brake line distribution block from the top of the axle, and then you can use the jack under the pumpkin to raise and lower the rear end to get the springs in and out. It will drop enough this way that you can pull the springs out without compressing them. Just go slow and watch the rear brake lines to be sure they’re not getting overextended. I hate fighting with spring compressors and find it much easier this way.
-
The Nissan part number is 34950-6w002. At least that is the correct part for my 2003, not sure if it is any different from year to year but I don’t think so. Here’s an image from an online supplier. Sent from my iPhone using Tapatalk
-
Completely understand, I’d probably err on that side as well if was anybody but me driving it, just figured I’d mention it.
-
It’s entirely up to you, but what I did is just bypass the solenoid. If you pull the plastic console trim up, you’ll see the solenoid assembly and the little lever that blocks the shifter from moving. I just lifted the lever up and super glued a plastic spacer under it so it is always disengaged. Sorry I didn’t take any pictures but it’s pretty easy. You still have to push the button to move the shifter so it’s not like it can be bumped out of gear, it just lets you move it without hitting the brakes.
-
Here’s my variation on the missing link. I enlarged the unused holes already on the inside edges of the controlling arm brackets and bolted it on that way instead of putting it under the control arm bolt itself. This was really just because it is what easily worked with what I happened to have on hand. I’m in the camp of people who felt like I could tell a noticeable difference. I was actually a bit surprised. It’s such a cheap and simple mod it doesn’t make sense not to do it in my opinion. Sent from my iPhone using Tapatalk
-
Moog springs and spacers are gone. LR springs pending.
-
Looks awesome! I need to track down one of those tire carriers.
-
I need to make some room in my garage, and I’d rather see this stuff go to a good home and maybe pass on a little good cheer to the R50 community while I’m at it! This is free to the whoever speaks up first. If you’re local to Northern Delaware we can arrange pick up. Otherwise you just need to cover shipping. Item 1: one pair of Moog oem replacement rear coil springs. Stock ride height and load rating. They were used less than 10k miles so they’re basically new. Item 2: Land Rover coil springs part number NRC9448 with ONE COIL CUT off. These are HD rated at 225lb spring rate and are good for heavier loads or towing, and will provide about 3 inches of lift over stock springs. These are also only slightly used and have no issues, I just changed my set up a little after running these for about a year. Last item: one pair of aluminum 2.5 inch rear lift spacers. They’re a little scratched up, but otherwise perfect...not that there is really anything to wear out! If anyone is interested in anything or has a any questions let me know! Sent from my iPhone using Tapatalk
-
I made one small change to my rear suspension set up today. I switched out the original LR 9448 (installed with one coil cut) springs for the 9449’s. I think the ride height is perfect for what I want now. The 9449 is just a tad taller than the 9448 was with the top coil cut, but still shorter than the 9448 would be uncut...so basically the Goldilocks of lift for me, lol. I didn’t bother taking any pics because there really wasn’t anything new to see. I will say I’ve gotten really good at swapping rear springs, I had the whole thing done in maybe an hour tops! Didn’t even feel like I was trying to rush. Sent from my iPhone using Tapatalk
-
Lol, stay tuned!
