- Sign In Changes: You now need to sign in using the email address associated with your account, combined with your current password. Using your display name and password is no longer supported.
- If you are currently trying to register, are not receiving the validation email, and are using an Outlook, Hotmail or Yahoo domain email address, please change your email address to something other than those (or temporary email providers). These domains are known to have problems delivering emails from the community.


Bax03SE
-
Posts
376 -
Joined
-
Last visited
-
Days Won
36
Content Type
Profiles
Forums
Calendar
Everything posted by Bax03SE
-
PathyDude's R50 Projects (03 SE 4x4)
Bax03SE replied to PathyDude17's topic in 96-2004 R50 Pathfinders
There are different spring rates and lengths available, but it’s not quite that easy because the stock front springs on the R50 are tapered. They are a larger diameter at the bottom than at the top, which really limits the use of universal springs because most universal springs are equal diameter top to bottom. That’s how I decided I could get a spring that would fit the upper mount, and use an adapter at the bottom to open up my spring options. Since I already knew I needed an adapter, I figured it made sense to make it adjustable at the same time. -
PathyDude's R50 Projects (03 SE 4x4)
Bax03SE replied to PathyDude17's topic in 96-2004 R50 Pathfinders
I’m actually in the middle of an experiment right now for my front springs. I’ve been scouring websites that supply custom parts for race cars because they have a ton of options for people who are building their own suspension components. I settled on a spring with a 250 lb rate and a free height of 13 inches. 250 puts it in between the OME and AC coils which is what I’m looking for. I chose the 13 inch spring height ( 3 inches shorter than the OME hd) because I’m pairing them with an adjustable height spring spacer (similar to the way a coil over sleeve works) that I plan to adapt to the lower spring perch on the strut. If it all comes together as planned the adjustable lower perch will let me dial in my front ride height exactly where I want it. Total cost so far is $145 for the springs and spacers. Hopefully I’ll get time to work on it next weekend and I’ll update with results then. -
Hawairish and TowndawgR50 are teaming up!
Bax03SE replied to hawairish's topic in 96-2004 R50 Pathfinders
Thanks. I don’t want to thread jack this, but I’ll say I checked out the Facebook page a little and came the conclusion it really wasn’t for me...no offense at all to anyone who likes and uses it. Regarding SFD, I feel confident that anything Towndawg and Hawairish put out would be safe and well engineered so I’ll probably hold off for that for now.- 155 replies
-
- 4
-

-

-
- sfd
- trailing arms
- (and 3 more)
-
I don’t know how it varies from year to year, but on my 03 there isn’t a breather tube on top of the diff, just a stubby breather cap/fitting with no tube. Also there is more than enough slack in my brake lines that they don’t pull too tight even at full droop. This is with LR 9449 springs and extended shocks for an F250. If you have a later model R50 it seems you can go pretty high in the back without needing to mess with the brake lines.
-
Hawairish and TowndawgR50 are teaming up!
Bax03SE replied to hawairish's topic in 96-2004 R50 Pathfinders
Thanks for the info!- 155 replies
-
- 1
-
-
- sfd
- trailing arms
- (and 3 more)
-
Hawairish and TowndawgR50 are teaming up!
Bax03SE replied to hawairish's topic in 96-2004 R50 Pathfinders
Any updates? I’m sure you guys are busy, just throwing it out there that I’m interested in a SFD ASAP. I need to bring the front end up to match the rear, but I’m maxed out on CV angle so can’t do anything else without a drop. I’ve thought about building my own but sometimes it’s nice to let someone else do the work ?. -
Everything gone!
-
I do still have the 9448 set. With the bike rack and stuff I think you would like the extra load capacity. The set I have had one coil cut so they give 3 inches of lift with no weight in the back. I used them towing a trailer with about 200 lb tongue weight and it would drop about an inch with the trailer hooked up. If you want to check shipping let me know, they’d be shipping from zip code 19720 and the box weighs about 15 lbs if that helps calculate. Sent from my iPhone using Tapatalk
-
No drive line issues at all. You may want to consider longer shocks but that’s true with stock springs and spacers as well. You likely won’t notice it on street driving, but if you take it off road you the shock will top out and limit your downward travel. Now that I think of it, you said the sound got better but is still there after installing new springs and spacers? Is it possible you’re hearing the shock bottom out over bumps? When I had spacers with stock shocks, sometimes when going over small bumps or small curbs I could hear/feel the shock bottoming out with a small clunk. I’m running f250 shocks now.
-
They are only side specific when mounted in the original Land Rover. The drivetrain in the Defender 90 is a little offset, so Land Rover compensated by putting .5 inch different spring heights on each side. For the R50 order two of the same spring. Either the 9446 or 9447 would be good. I know Micah is running the 9447’s with a small lift in the front and has been happy with the combination. Install the springs by themselves without a spacer. Also the color stripes is just how they label the springs to easily identify which model number they are.
-
I was referring more to how new stock springs would hold up, since he mentioned he already replaced them with a new set so he’s not dealing with high mileage sagging springs. So if he’s still getting the sound over slow speed bumps with only 100 pounds in the back it seems unlikely to be the springs actually bottoming out. I still agree with the benefits of better springs, I just dont want to advise throwing another set of springs at it without being confident the rest of the rear suspension is all in good shape first. I’d hate to see him spend time and money on springs only to find the sound is still there coming from another component.
-
No, those are stock replacements so you have the right springs. Like I said, check everything else to see what else might be going on.
-
Glad they made it!
-
Stock springs are soft, but they still shouldn’t be bottoming out over speed bumps unless you’ve got several hundred pounds of weight in the back. Before messing with the springs I’d investigate everything else in the rear suspension. Get under there and start pulling/shaking everything you can get your hands on to see if anything is loose. Check both upper and lower trailing arms, the sway bar end links, and even the spare tire to make sure it’s nice and snug. I suspect the sound you’re hearing is something else that is loose or worn out and not the actual springs bottoming out.
-
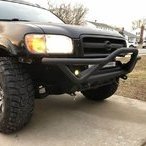
Yikes, that’s a lot scarier looking than mine was for sure. Can you get any more pictures of the whole support and especially the frame ends by the tow hooks? If there is still solid metal on either end to weld to then it is still pretty easily fixable. If not, you could be looking at a bigger job. Also have you looked up in the front wheel wells by the strut mounts for rust?
-
Zip ties might be your best friend for pulling the fender liner forward toward the new bumper line. I think you’ll find a few strategically placed black zip ties could be the easiest and most effective solution.
-
Sent from my iPhone using Tapatalk
-
Now your ready to build the tank. Cut out an 8 inch long section of PVC. And drill two holes toward the bottom for the pumps. Make sure the holes are at least an inch and a half up from the bottom to allow room to put the bottom cap on the pipe. I used a stepped drill bit to make the holes. Go slow and check the fitment of the pump grommets to make sure you don’t make the holes too big. The holes need to be just big enough for the grommets to push through tightly to get a good seal. With the holes drilled you can insert the pumps, put the black cap on the bottom of the pipe under the pumps, and the red test cap on top. The test cap easily unscrews by hand to fill the tank. Once assembled, hook the wires and tubes back up to the pumps, (refer to the pictures you took earlier), and set the tank in place next to the battery. I used a piece of scrap metal bent to fit to make a bracket to hold the tank securely in place. One end of the bracket bolts to an existing bolt hole in the core support, and the other end I bolted to the tank with a nut and rubber washer on the inside of the tank so it won’t leak around the bolt hole. That should do it, add some washer fluid and enjoy! Sent from my iPhone using Tapatalk
-
If it’s not already out, the first order of business is to remove the factory washer tank. You need the remove the plastic inner fender liner first, then the tank itself is held in by 4 10mm bolts. The two pumps just push into rubber grommets at the bottom of the tank, they can be pulled out by hand. Before removing the pumps and unhooking the tubes and wires, take a couple pictures of how everything hooks up. Then pull the plugs and tubing from the two pumps and set the pumps aside for later. Once the tank is out, the tubes and wiring can be pulled up into the engine compartment through the space behind the headlight. This will have them in the corner of the engine bay next to the battery, which is exactly where you want them. Next up is to disconnect the battery terminals, remove the battery hold down bracket, and turn the battery side ways. The hold down bracket won’t line up in the new position, so I discarded that and used a couple of long hose clamps to wrap around the battery and hold it tight. There are holes in the shelf the battery sits on, so you can snake the clamps around the battery and through the hole, then tighten the clamp to hold the battery firmly in place. I used a 4awg starter to switch cable to lengthen the negative terminal. Pull the bolt out of the stock ground wire terminal, feed the bolt through the eyelet on one end of the extension wire, and bolt it back up tight. Cut the eyelet off of the other end of the wire, and strip back about an inch of insulation. Then clamp it into a new terminal end. I used a brass terminal. The battery in its new home will look like this. Sent from my iPhone using Tapatalk
-
Someone suggested I share some details on the PVC washer fluid tank I built to relocate the tank for my bumper build. For supplies, you’ll need: at least an 8 inch section of 4 inch PVC pipe, one 4 inch cap, one 4 inch removable test plug, and about 12 inches of cable to extend the negative battery cable. Sent from my iPhone using Tapatalk
-
I’ll post some how to steps soon. It was actually really easy, and about $25 in supplies from Home Depot. Plus about $13 at Autozone for the cable and terminal to extend the negative battery cable.
-
Lol, just a little. The Tide jug was a spur of the moment what the hell do I have laying around kind of decision. Then I decided maybe I should make something that might actually hold up more than a few days!
-
Sent from my iPhone using Tapatalk
-
PathyDude's R50 Projects (03 SE 4x4)
Bax03SE replied to PathyDude17's topic in 96-2004 R50 Pathfinders
I love the progress, it looks great. I also like the contrast with the addition of the black accents! -
And finally have it out of the garage! Sent from my iPhone using Tapatalk