- Sign In Changes: You now need to sign in using the email address associated with your account, combined with your current password. Using your display name and password is no longer supported.
- If you are currently trying to register, are not receiving the validation email, and are using an Outlook, Hotmail or Yahoo domain email address, please change your email address to something other than those (or temporary email providers). These domains are known to have problems delivering emails from the community.

stalker
-
Posts
550 -
Joined
-
Last visited
-
Days Won
4
Content Type
Profiles
Forums
Calendar
Everything posted by stalker
-
Try sending a PM to Grandpa x..? I'm pretty sure he is on that user name now
-
Turned out great.!
-
87 twin turbo sas 1 inch lift...
stalker replied to AK9849cy's topic in Solid Axle Swaps, Hardcore Custom Fab
yea i was thinking to just go cut out the Rodeo set up...probably do that this weekend...ill hit you up if i run into any issue...thanks -
87 twin turbo sas 1 inch lift...
stalker replied to AK9849cy's topic in Solid Axle Swaps, Hardcore Custom Fab
thank you... off topic...how did you hook up your Parking brake cables for the Rodeo swap..? -
87 twin turbo sas 1 inch lift...
stalker replied to AK9849cy's topic in Solid Axle Swaps, Hardcore Custom Fab
Looks freakin sweet...when will those be available.? -
new hubs its like night and day comparing the old and new hubs. time to install the new hubs Now slide in the new hub (nice that the hubs are all one piece) Install the new snap ring provided with the new hubs make sure the ring is completely inside the grove in the hub Install the new cap now test the new ones out...test by locking in the hub and spinning the wheel forward which turned the axle, turn dial back to free and test its release by spinning in reverse If everything locks in and out then you are finished.! Total process will take 30 min tops...scale from 1-10 on difficulty is 3
-
So my driver’s side hub was not locking in correctly and they were cheapo's anyways...so I purchased a new set of Warn hubs. I decided to do a little write up on it. To get things stared I blocked the rear tires then jacked up the front end. (you don't have to jack up the truck to do this job, I did it so i could turn the tires while checking to see how the new hubs work) Here are the old beat down plastic hubs. The cap is held in by 6 allen bolts that you need to remove. Now you need to remove the snap ring located inside the hub Next remove all the internal parts of the manual hub (gears, washer, and the spring) and wipe out and clean the inside of the hub removal is complete...
-
installed Warn Premium hubs...my other ones were junk I also took some measurements to fit my spare on the stock tire carrier...need to think of a different idea for the spare, its hangs too low so I am thinking about moving the mount up until I build my bumper... and I got my windshield washer fluid to spray again...
-
sounds like all the tire info was answered for you...tell us more about this part bud..
-
don't jack it up on the mount...
-
thanks guys, I am taking the Sub and amp out...it takes up too much room
-
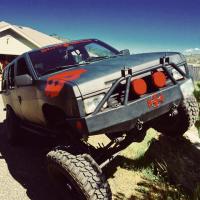
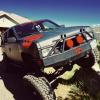
My AC lift is all done. Sitting pretty on 33"s.
stalker replied to snow4me's topic in 96-2004 R50 Pathfinders
Sweet looking ride for sure..!! -
Time to save some money...on my list. drill press, chop saw, tube bender, and DOM tubing
-

-
-
cool cool. I wanted one but changed my mind. The no bar between the doors bothered me. They look tough but a cage is meant to protect my ass and anyone else riding with me. I don't trust an exo with that if it doesn't have that bar. Plus they don't look right without the door bar. In a cage that bar is the heart of the structure. Without it that area becomes weak and could easily crush down on top of you in a roll over. Thought about doing a hoop inside that connected to an exo ca...
-
-
Replaced all the belts (power steering, AC, and alternator) Also built a storage area in the back cargo spot to bolt my box full of tools and also my amp and sub...my winch also locks into the rear as well so It won't slid around anymore.!
-
I got a Gopro hero3 silver...!!! Just downloaded the software upgrade and the app on my iPhone...this thing is sweet...you can control the whole camera from your phone inside the cab while it is mounted outside the truck somewhere.!!
-
Kinda makes me wonder...
stalker replied to stalker's topic in Solid Axle Swaps, Hardcore Custom Fab
finished up the Y pipe.. you can see where my front drive shaft was rubbing on the section of flex pipe i put in there temporally -
Kinda makes me wonder...
stalker replied to stalker's topic in Solid Axle Swaps, Hardcore Custom Fab
so i got the front drive shaft installed and now im needing to re-route the Y pipe so it will clear when flexing...does anyone have any pictures or ideas for the re-routing.? thanks -
freakin sweet..
-
87 twin turbo sas 1 inch lift...
stalker replied to AK9849cy's topic in Solid Axle Swaps, Hardcore Custom Fab
looks really good...i always like the little projects you toss together...keep it up -
Kinda makes me wonder...
stalker replied to stalker's topic in Solid Axle Swaps, Hardcore Custom Fab
-
Sorry...I had a 33" on there and never had that issue...I did noticed it would wobble a little when I was a curtain speeds
-
Did you have the spare balanced before you put it on the carrier.?
-
I've seen his but wasn't sure about the middle support between the front and rear doors
-
The roof will basically look like a spiders web...
-
Anyone have any pictures of theirs they have built.? I have been toying around with the idea for awhile now and I wanted to see some designs and options for our WD21's This is what I was thinking of doing... Of course it won't be yellow... What else could I do to the rear for more support while still being able to use the back hatch and window...
