- Sign In Changes: You now need to sign in using the email address associated with your account, combined with your current password. Using your display name and password is no longer supported.
- If you are currently trying to register, are not receiving the validation email, and are using an Outlook, Hotmail or Yahoo domain email address, please change your email address to something other than those (or temporary email providers). These domains are known to have problems delivering emails from the community.
Leaderboard


Popular Content
Showing content with the highest reputation on 08/05/2023 in all areas
-
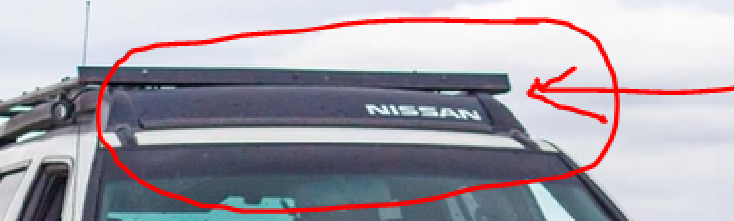
Hi All, I really like the retro feeling that this nissan wind spoiler with badging gives this R50. Does anyone know what parts I could order from Nissan to mimic this look on my own 2002 R50 LE rig? Thanks in advance Dave
 1 point
 -
Nice! Sent from my iPhone using Tapatalk1 point
-
Love the headlights Sent from my iPhone using Tapatalk1 point
-
Been a little while so I'll provide a quick update. I ended up bending that driver side lower exhaust manifold heat shield down and then out for better access. I decided on some JB Weld Heat Weld Epoxy. Seemed to do the trick at first and initially I thought I had completely fixed the rattling noise. Couple days later the noise was back but in a less obvious way and in even more limited circumstances (it may have never completely gone away in the first place). I then decided to take another look at that passenger side engine mount heat shield and figured out a way to secure it with a hose clamp underneath against the actual engine mount itself. No more rattling on that heat shield when knocking it with my hand. Days later I heard the rattle again destroying my confidence that I could ever make this rig reliable again. Eventually I took another look at the manifold heat shield repair and what to you know the JB Weld had failed allowing play again. The plan now is to just use a metal ziptie around the manifold and heat-shielding, hopefully that works. Side note; I'm curious if wrapping a hose clamp around the upper heat shield plate of the engine mount and the lower base of the engine mount would transmit more vibrations because since doing it I cant tell if I notice vibrations at 50mph and 70mph more now. I already know my driveshaft u-joints need some love (replaced my front-shaft u-joints myself but the shaft still obviously vibrates; should have gone with a fully rebuild shaft).1 point
-
Yes! I'll probably do a more in-depth post in my build thread when I can but these are headlight buckets that a guy in Australia designed & 3d printed, and allow you to swap in LED sealed beam style 5x7 lights. There are cheaper options for the 5x7 lights themselves, but I went with a set of Morimoto LED's.1 point
-
5w30, 15w40, and 30SAE all perform about the same with 5w30 allowing for more cold start clatter. I went on Bobistheoilguy and asked why I have so much more noise with 10w30 and I was told that a 10w30 oil blend can actually have a thinner base with additives that cause the blend to perform to 10w30 specs. Apparently manufacturers can say whatever they want to on the bottle as long as it performs a certain way in a lab.. At the end of the day I dont actually know what the heck is going on with the oils.. All I know is my engine sounds awful with 10w30 but purrs with 5w30, 15w40, and 30SAE. Also I chipped out my pre-cats the last time I had the engine out. Stinks to high heaven every morning, hah! Gear pumps are positive displacement so if the internals of the pump are worn then a thicker oil will actually produce higher flow and pressures at run temps. The thicker the oil I use the less clatter I hear, even on cold starts. I think the only real drawback to using higher viscosity oil is a reduction in power. Since the pump is positive displacement, if there is a restriction to flow, whether its higher viscosity oil or a blocked path of flow, the whole engine will be slowed down. PD pumps (pumping non-compressible fluid) will not slip, they will bog whatever motor is turning them or they will explode, or they will cause something down the line to explode, usually a hose. However when you start getting into worn PD pumps things can get weird. I think the weirdness of worn gear pumps is what I am dealing with, in combo with the weirdness of oil blend shenanigans.1 point
-
Hi, this is my pathfinder! You need an 02-04 SE roof rack off of another R50. It will bolt onto your roof just fine, you'll have to remove everything that's currently on top of your 02 LE. For the white Nissan Lettering, that was a little more custom. All of those fairings come with raised black lettering, I just put some white plasti-dip on mine to help it stand out. Paint would probably work better. I would go looking for the roof rack in a junkyard, I doubt nissan still sells this. Ebay also might be able to help.1 point
-
Beauty shot from camping this morning with the clouds below and Mt St Helens above. @zakzackzachary Should recognize this spot!1 point
-
1 point
-
It's not every day that engine bay Plinko turns out to be a good thing! I haven't used muffler tape or Exhaust Weld, but I'd be surprised if they held up for long that close to the engine/catalyst. The manufacturers likely list a maximum temperature, which you could compare with an IR gun to see if there's any hope. Metal zip ties are a thing, again I haven't tried them, but I've heard they're good. Depending on how the shield is constructed, how buried in the engine bay it is, and how it's failed, you might be able to weld or rivet the pieces back together. Personally, I would still reach for the baling wire. Hopefully whatever you reach for is successful in silencing the fat lady.1 point
-
LOL, the computer's too old to replace the CV axles? I didn't mean to write a novel, but, well, here's the novel. It's been a while since I did my CVs, so hopefully some of this is right. Like I said before, you'll need a 12mm 12-point. Make sure it's impact rated. Use an impact if you can. If you have to use hand tools, put the transfer in low range 4x, with the other front wheel on the ground, to stop the axle from turning when you go to loosen the bolts. You'll need a 6mm Allen (and possibly a torch) to get the hubs off, and some snap ring pliers to get the snap ring off the CV. (Technically you're supposed to measure the endplay of the axle in the hub and select a snap ring of appropriate thickness to dial it in. I didn't bother, and I don't imagine most people do. The instructions and specs are in the service manual if you want to do it properly.) Wouldn't be a bad idea to replace the inner hub seals (seals against the CV to protect the front wheel bearing) while you're in there. You may need to unbolt the shock for access to the CV bolts, though this may not be needed if you're taking the whole knuckle off anyway. The ball joints unbolt from the arms, but you'll need pullers to get them out of the knuckles. I think I used a puller of this style, but a pickle fork would probably do the job. I picked up one of these for tie rod ends and it's great. Shouldn't need anything special for the sway bar links, but I remember screwing around with a jack or a ratchet strap or something trying to get the second side close enough to get the nut started. You may need some wiggle room for those, so get one side started, then get the other side started before tightening anything down. If the old ones are stubborn, it may be quicker to break or cut them out, assuming the kit comes with new hardware. Do you have a torque wrench? I wouldn't bother with it on the sway bar links, but it's a good idea for suspension work in general. I shoot for the low end of spec on castle nuts, then tighten more as needed to get the cotter pin hole to line up. Otherwise, shoot for the middle. IIRC the axle bolts don't have a torque spec in the manual, so I did mine to German spec with the impact. If you're rebooting, there's a special plier for putting the boot clamps on, though I think I brute-forced it with normal pliers. You'll also need a vise to hold the axles, and a big punch (preferably brass). And some gloves. And a lot of paper towels. You'll need an alignment after replacing steering/suspension components. I aligned mine myself because I wouldn't trust the guys at the Les Schwab to put training wheels on a bicycle. I checked camber with a digital angle finder and a piece of flat steel laid across the rim (while parked on flat ground, obviously). I haven't found an easy way to check caster yet, and didn't have room to adjust it anyway. Both are adjusted by adding or removing shims behind the upper control arm spindles. You may not need to mess with these if you're not changing the ride height. You can get the toe somewhere close by measuring the existing tie rod assembly, then adjusting the new assembly to the same length before installing it, but it'll still need adjustment afterwards. My go-to method for setting toe uses a tape measure and two lengths of angle iron (bedframe). With the truck parked on flat ground, not on a jack, set the angle iron on jackstands, tight against the front wheel sidewalls so it's parallel with the wheels. The usual method is to measure in front of the wheels, then behind, and the difference is your toe. I measure in front, and then the tires' diameter in front of that, because there isn't a truck in the way. Either way, I try to get the front measurement 1/16-1/8" shorter than the back. Adjust to where it looks about right, drive it around the block to let it settle in, then re-check and readjust as needed. You'll probably end up doing this several times before you're happy with it. If you're only replacing one tie rod end, start by adjusting only that one side. If the alignment was good beforehand, and the other work you did didn't change the geometry enough to matter, then you should be able to get the toe right and the steering wheel straight by adjusting just that one side. Make sure you've got a good set of jackstands, and use them. I slide a wheel under the truck as well, so if it falls off the stands, it has something other than me to land on. Do one side at a time so you can check the other side if you forget how something goes together. If the new joints have zerks, grease them. And clean out out the wheel arches before you get in there so you're not constantly showered in dirt while you're working. Provided nothing fights you--no broken bolts, nothing seized, no surprises--a couple of days should be easily doable. But have a plan B in case something does fight you or a part doesn't fit like it should. Speaking of parts not fitting--the tie rod ends aren't all the same for these. The taper size changed for some reason in '92. Probably July of '92. Check the date on the sticker in your doorjamb before ordering parts. I got burned on that once, and still have a '92 knuckle in the corner that I had 90% installed before discovering that my tie rod end was too big for it. Also make sure you get the correct thread--inner and outer TREs are threaded opposite where they go into the adjuster, and there's no guarantee the existing assembly is installed the right way around. There is a difference in the CV axles in four-cylinder vs V6 trucks, but they bolt up the same and take the same boots--I know because I have one of each on mine. Just don't get the early (two-door) 27-spline axles, those won't work with your 28-spline hubs.1 point