MrEviLDeD Posted February 27, 2014 Share Posted February 27, 2014 Since failing the out of province inspection and of course ranting like a fool (thanks guys for keeping me focused appreciate it) and the fact that I have 10 days to correct the problems (if I can, already down 2 days)... I decided to keep a running log of the repairs required to pass and tick them off as they are repaired. This way I keep all my questions and such to one forum post opposed to the countless I am about to embark upon asking . Also this will serve to keep me on track as it is hard to get motivated to fix some of these things in -18c weather. On the street no doubt. Link to comment Share on other sites More sharing options...
SpecialWarr Posted February 27, 2014 Share Posted February 27, 2014 We'll try to keep you focused and motivated!! Link to comment Share on other sites More sharing options...
MrEviLDeD Posted February 27, 2014 Author Share Posted February 27, 2014 (edited) Day 0 of 10 (Post Inspection Failure) Daylight Running Lamps - Status: Needs Repair Battery Hold Down - Status: Needs Replacement Left/Right CV Boots Torn - Status: Needs Replacement Rear Bumper (Face Plate) - Status: Needs Replacement Wheel Bearings (Front) - Status: Needs Adjustment or Repair Tire Condition (Front Set) - Status: Needs Replacement Oil Leaks (Unsure where, think rear seal) - Status: Needs Repair or Replacement Fuel System (See Notes) - Status: Needs Replacement Notes: I am unable to tell what exactly is wrong with the fuel system. From the front it appears to match my other pathfinder and this is visually inspected down the firewall. I will get under today at some point to take picture and maybe someone else can confirm to me if I have to do anything at all. Either way I will look to see if the lines under the truck aren't the ones that have been converted to rubber otherwise I think he might of failed my fuel system for nothing. Wouldn't let me edit my other post so I posted it as a comment.. Edited February 27, 2014 by MrEviLDeD Link to comment Share on other sites More sharing options...
MrEviLDeD Posted February 27, 2014 Author Share Posted February 27, 2014 Day 1 of 10 Ordered and received two new CV Axle Assemblies. Will not get to putting them in for a few days but they are sitting here ready to go. I have also located as mentioned in a couple other threads a 91, a 93 a 95 and a number of 98's so I am going to scope them out for the rear bumper most likely tomorrow (today). I really hope these come out and go in easy... Link to comment Share on other sites More sharing options...
MrEviLDeD Posted February 27, 2014 Author Share Posted February 27, 2014 Day 2 of 10 Was able to pull the Daylight Running Lamp Module from the other pathfinder. When I disassembled the malfunctioning one at first there was a wire that has eroded and broken loose. Instead of wasting any time I opted to pull the one from the other pathfinder as mentioned as I know it works soldered the wire to the module and plugged it back in. Put the cover shield (which was broken on the one in need of repair) and it works. I suspect the module was shorted out with water and is no longer working. When I plugged it into the old pathfinder and tested it didn't not turn on the daylight running lamps... So this goes on the list of things that need to be done in the restoration of the old pathfinder. Sorry it was cold and dark as I got to pulling the modules late last night so I didn't grab and photos. Current day 2 score: Daylight Running Lamps - Status: FIXED Battery Hold Down - Status: Needs Replacement Left/Right CV Boots Torn - Status: Purchased, Needs Replacement Rear Bumper (Face Plate) - Status: Needs Replacement Wheel Bearings (Front) - Status: Needs Adjustment or Repair Tire Condition (Front Set) - Status: Needs Replacement Oil Leaks (Unsure where, think rear seal) - Status: Needs Repair or Replacement Fuel System (See Previous Notes) - Status: Needs Replacement Link to comment Share on other sites More sharing options...
MrEviLDeD Posted February 27, 2014 Author Share Posted February 27, 2014 (edited) Anyone have any suggestions on how someone like me can test where the oil leaks are coming from? Also a good suggestion for washing the engine in vehicle? Last time I did this I shorted out my alternator and had to get a new one. Is there a dye or something I can get that is cheap that I can use or something? Really not sure what to do here and do not feel specifically going in blindly saying that the rear oil seal needs to be replaced. Maybe it doesn't and the oil is coming from someplace else.. Any suggestions here would be greatly appreciated. Edited February 27, 2014 by MrEviLDeD Link to comment Share on other sites More sharing options...
ejin4499 Posted February 27, 2014 Share Posted February 27, 2014 De-greaser in a spray bottle and a brush. My fave is purple power. Put it in a squirt bottle spray and area scrub it repeat. Don't get it on your paint it will oxidize it. Your valve cover may be leaking on the back of the head and spilling down all over everything else. Also when you do your cv axles just rebuild your front suspension while your there. You have to take almost everything off anyway might as well do new bushings bearings ball joints and tie rods. This would pretty much fix that front end shimmy that I think you were talking about in another post. Good luck. Link to comment Share on other sites More sharing options...
MrEviLDeD Posted February 28, 2014 Author Share Posted February 28, 2014 How do you get good access to the back of the engine block without removing it? Do I remove the tranny and bell housing or something? Link to comment Share on other sites More sharing options...
MrEviLDeD Posted February 28, 2014 Author Share Posted February 28, 2014 Day 2 of 10 Part II Was able to find a good order bumper from a 95. As well picked up a good fuel sending unit and pump assembly. Picked up some other bits like switches to get ready to convert the XE into an SE. Will also pull the front tires from the other pathfinder to match the rears I have already pulled (I was stupid to not have changed them before the inspection to get at least that one silly fail off the list) so I have these just need to get them swapped. Current day 2 Part II score: Daylight Running Lamps - Status: FIXED Battery Hold Down - Status: Needs Replacement Left/Right CV Boots Torn - Status: Purchased, Needs Replacement Rear Bumper (Full Bumper) - Status: Purchased, Needs Replacement Wheel Bearings (Front) - Status: Needs Adjustment or Repair Tire Condition (Front Set) - Status: Acquired, Needs Replacement Oil Leaks (Unsure where, think rear seal) - Status: Needs Repair or Replacement Fuel System (See Previous Notes) - Status: Needs Replacement On a further note. I am going to try to take some good pictures tomorrow of the fuel system in the newer pathfinder. Maybe some of you can tell me what he failed it for. From what I can tell from the pathfinders I was under and around today they all look the same in terms of the fuel lines. I didn't pull any because they look just like the ones I have best I can tell. .So I think the guy just didn't know what he was talking about. Out of 5 pathfinders all ranging from 91 through 95 ALL looked identical as it relates to the fuel lines. Either way there are at least 4 pathfinders I can pull the fuel lines if need be. I just want to know why it was failed... Hears to there being more to see tomorrow. Will also most likely do the tire and bumper swap tomorrow as well to get them checked off the list.. Getting there. Link to comment Share on other sites More sharing options...
ejin4499 Posted February 28, 2014 Share Posted February 28, 2014 How do you get good access to the back of the engine block without removing it? Do I remove the tranny and bell housing or something? long skinny brush and a mirror on a stick. easy cheap Link to comment Share on other sites More sharing options...
Nefarious Posted February 28, 2014 Share Posted February 28, 2014 If they are failing you with a visual oil leak (which is weird for an out of province) I would just clean it really well and add some oil stop leak right before u take it in. It's a big job to pull the trans and replace the rear main seal. If u are up for it go for it , but if its just to pass inspection then a clean/stop leak will be enough to pass u until u can get more time to pull the trans as long as its not a heavy leak. My girlfriend works at great Canadian oil change and their lube techs use Rislon rear main seal treatment. They monitor oil leaks between changes and they all say its the best treatment. It should be enough to get you a pass and then u can worry about it later when u don't have such a deadline. It's not a cure obviously but if its just to pass a stupid inspection then I would just do that. Then u can fix the other problems in the mean time! 1 Link to comment Share on other sites More sharing options...
Precise1 Posted February 28, 2014 Share Posted February 28, 2014 http://www.youtube.com/watch?v=9jK-NcRmVcw Sorry, couldn't help it... B Link to comment Share on other sites More sharing options...
MrEviLDeD Posted February 28, 2014 Author Share Posted February 28, 2014 My girlfriend works at great Canadian oil change and their lube techs use Rislon rear main seal treatment. They monitor oil leaks between changes and they all say its the best treatment. It should be enough to get you a pass and then u can worry about it later when u don't have such a deadline. I will look to see where I can find that. Prolly Napa I imagine or something like PartSource. I have been all over CT;s website and have come up virtually dry. Thank you for the suggestion. I have never seen a drop in the almost 3 weeks I have had her for so I do not think it is a big leak. The problem is I am not sure where it is coming from. I have parotted what the guy told me that I bought it from and he was telling me that it needed to be replace (the rear seal) but that he also was using a seal treatment to get buy. I should have paid closer attention to that detail before going in for the inspection. Kind of like having two perfectly good tires but not putting them on before the inspection. Of course the front tired failed conditioned check right... Learning experience right Link to comment Share on other sites More sharing options...
MrEviLDeD Posted February 28, 2014 Author Share Posted February 28, 2014 Sorry, couldn't help it... B All good here.. I enjoy the encouragement Link to comment Share on other sites More sharing options...
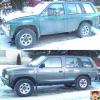
MrEviLDeD Posted February 28, 2014 Author Share Posted February 28, 2014 (edited) Day 3 of 10 Ok was able to get out there and get the bumper swap done. Here are some pictures of the before and after.. The before are all with the bumper off. Kind of forgot I was supposed to take pictures After the swap here is what she looks like. It isn't new but it also is a step forward in terms of progress =) As you can see it needs a little cleaning and protection so it doesn't rust. The rust you see here is very surface. So hope this will make it through inspection. Otherwise the bumper is completely solid. This is a bumper from a 1995 Pathfinder SE-V6 I also was able to swap the front tires around and the wobble or pulsation that used to be there is completely gone. It does pull to the right though so I am hoping once the tires are balanced and an alignment done that will take care of that. Not to mention the new CV Axles (still have to put them in) Current day 3 score: Daylight Running Lamps - Status: FIXED Battery Hold Down - Status: Needs Replacement Left/Right CV Boots Torn - Status: Purchased, Needs Replacement Rear Bumper (Full Bumper) - Status: FIXED Wheel Bearings (Front) - Status: Needs Adjustment or Repair Tire Condition (Front Set) - Status: FIXED Oil Leaks (Unsure where, think rear seal) - Status: Needs Repair or Replacement Fuel System (See Previous Notes) - Status: Needs Replacement It was suggested to clean the engine with a thin brush and a mirror (need to acquire these) with Industrial Purple and a spray bottle. Will try to do that tomorrow (guess weather is pending on this one). It was also suggested to pick up a rear seal conditioner so I will look for that and see if that doesn't help with the oil leak. Here's hoping! Otherwise I will have to order in a seal kit for the back and just get it done. I still haven't been able to get a good solid look at the fuel lines under the pathfinder I will do that today at some point to see finally what is wrong. I still think the fellow just didn't know that Pathfinders have rubber that connect the fuel lines together. Anyhow report on this one to come. I will pick up the battery hold down today and get that installed most likely. May do it tomorrow morning we will see how it goes.. When removing the lug nuts I turned my wrist and it is starting to really really hurt. Have to get this all done though.. I am broke so I will not be able to afford the expense on 4 new tie rod ends and 2 centers, nor do I have enough to get the bushings and replace the ball joints at 60$ a pop for both sides. With that said I wonder if there are any tips that I can recondition them in some manner at least to not fail or be a further failing point with the inspection? Can I pull up the boots and get grease in there. I do not have a grease gun (I should) as up to now I have only needed it on surface applications not to force grease into a ball joint.. I need one of these. Sorry for rambling. Its coming along. Edited February 28, 2014 by MrEviLDeD Link to comment Share on other sites More sharing options...
MrEviLDeD Posted March 1, 2014 Author Share Posted March 1, 2014 Day 3 of 10 Part II Picked up the battery hold down. Might have to drill a hole someplace to make it work.. Also picked up the Industrial purple and a brush. Might just have to tape a paint stick or something to it.. Everywhere is out of the telescopic mirrors. Also not sure where to buy the Rislone Rear Main Seal Conditioner. So still on the hunt for that. Current day 3 part II score: Daylight Running Lamps - Status: FIXED Battery Hold Down - Status: Purchased, Needs Installment Left/Right CV Boots Torn - Status: Purchased, Needs Replacement Rear Bumper (Full Bumper) - Status: FIXED Wheel Bearings (Front) - Status: Needs Adjustment or Repair Tire Condition (Front Set) - Status: FIXED Oil Leaks (Unsure where, think rear seal) - Status: Needs Repair or Replacement Fuel System (See Previous Notes) - Status: Needs Replacement Link to comment Share on other sites More sharing options...
ejin4499 Posted March 1, 2014 Share Posted March 1, 2014 I am broke so I will not be able to afford the expense on 4 new tie rod ends and 2 centers, nor do I have enough to get the bushings and replace the ball joints at 60$ a pop for both sides. With that said I wonder if there are any tips that I can recondition them in some manner at least to not fail or be a further failing point with the inspection? Can I pull up the boots and get grease in there. I do not have a grease gun (I should) as up to now I have only needed it on surface applications not to force grease into a ball joint.. I need one of these. Sorry for rambling. Its coming along. Check that the joints and tie rod ends are tight and don't have any slop in them. If they have any slop in them the shop probably wont be able to align it. Greasing on a regular basis is a must if they have zerk fittings. If they don't have the fittings then putting grease under the boot wont help any cause the grease wont get to the bearing surface. Good luck in that cold weather. :my2cents: Link to comment Share on other sites More sharing options...
kdj Posted March 1, 2014 Share Posted March 1, 2014 What was your old bumper made of? Looks like hardware sceen, newspaper and Bondo. The new one looks much better and one more thing off list! Link to comment Share on other sites More sharing options...
Nefarious Posted March 1, 2014 Share Posted March 1, 2014 (edited) If you are looking for incredibly cheap auto parts online, I think i only paid 10$ per tie rod and 15$ per balljoint from WWW.autopartsway.ca It's a canadian online discount parts website based in surrey, bc. I've had good luck with them in the past but not sure if the parts would arrive in time for the inspectiin, just thought i would throw that one out there for future reference. I also got my wheel bearings there and they ended up being 4-6$ per bearing. lol. Edited March 1, 2014 by Nefarious 2 Link to comment Share on other sites More sharing options...
ahardb0dy Posted March 1, 2014 Share Posted March 1, 2014 Well the battery hold down should be an easy fix at least ! Link to comment Share on other sites More sharing options...
MrEviLDeD Posted March 1, 2014 Author Share Posted March 1, 2014 What was your old bumper made of? Looks like hardware sceen, newspaper and Bondo. The new one looks much better and one more thing off list! I am not sure what the guy did that I bought it from but based on the images of the fuel lines coming in a follow-up post I would not be at all surprised..... He was at least if anything, crafty in terms of keeping the Pathfinder running. If you are looking for incredibly cheap auto parts online, I think i only paid 10$ per tie rod and 15$ per balljoint from WWW.autopartsway.ca It's a canadian online discount parts website based in surrey, bc. I've had good luck with them in the past but not sure if the parts would arrive in time for the inspectiin, just thought i would throw that one out there for future reference. I also got my wheel bearings there and they ended up being 4-6$ per bearing. lol. Thanks for this, I will start combing their site soon as I made a couple posts here. Can I pay for 2 day shipping or something good like that with these ones? The prices sound right and if I can in fact get the front end parts at that price I will do the whole bunch best I can. I would prefer to do it this way however cost and time are my enemy. Well the battery hold down should be an easy fix at least ! I am at a loss for words! Beers on me Link to comment Share on other sites More sharing options...
MrEviLDeD Posted March 1, 2014 Author Share Posted March 1, 2014 Day 4 of 10 (almost mid-point) Ok FINALLY was able to get right under the Pathfinder yesterday before the sun went down. Much better light. Seems the sun had made it a little hard to see just the extent of the fuel line damage. And let me tell you. Not sure if they were torn out wheeling, or if they rusted out but the guy I bought it from cut at LEAST two of the lines and replaced them with rubber. Free hanging rubber I might add as well. There is one steel line but it also looks like it was added, and is not really secured down.. This problem obviously just gotten worse. Now for those that suggest just running my own lines.. I have never done this nor am I specifically comfortable with doing it but I am willing. Just need some background. What tools? Do I need a flaring tool? Will I need a tube bender? What fittings? Do I need self tapping screws? Do I just tap those screws into good metal on the underside? How do I do this so it is "passable?" as I do not feel very qualified... It is looking though that either I run my own lines, I pull the lines from a couple pathfinders in hopes that I find a good set, or I buy new ones and hope I can get them not only cheap enough in Canada but fast enough. Sigh.... Even wasted Rob's time getting a master fuel line diagram to find out the guy I bought it from literally butchered it.. Here are the pictures of the lines. The sun was in my eyes where I park the truck so the black hoses kind of disappeared into the background of the underside. Wish I had seen it or looked harder before I went to the wreckers for the bumper. Anyhow here is the wonderful workmanship. As you can see from these images at some point he just cut into two of the lines after the firewall and replaced them with rubber. I am not sure what the disconnected rubber hose is from or to but it is nice to see it just open to the elements. Slightly different angle of the previous shot. Lots of room under there however once you try to get up in there to see anything it becomes a pain in the a$$. There is no score update as it is way to cold to go out and do anything today. With wind-chill -42c. Hope it warms up soon.. Link to comment Share on other sites More sharing options...
MrEviLDeD Posted March 1, 2014 Author Share Posted March 1, 2014 I really could not get good pictures under the engine and tranny to get any kind of look at the oil. I was able to however get a couple shots of the "wet"ness the inspector spoke to me about. Going to pick up the Rear Main Seal Treatment today (It was at CT, I just blanked out or something) and get to cleaning it soon as I can. Here are the two shots I could take. I so see what he is talking about by being wet. I hope the problem isn't to bad.. I also hope the treatment will fix it so I can get the pass.. This is one of those that will be a nail biter right up to the end. Just a little further back shot of the previous image. You can see the cross member and oil pan. Bad picture I know. Link to comment Share on other sites More sharing options...
adamzan Posted March 1, 2014 Share Posted March 1, 2014 While that is not the most glamorous way to repair the lines, I have done the same thing and had it pass inspection here. The thing I see wrong is they used regular worm gear clamps and not fuel injection clamps. The part up by your exhaust looks stock to me, and that hose that is open is the drain for the A/C evaporator. It's fine. That definitely looks like a rear main seal leak to me. Mine was like that when it was leaking, let me see if i I have a pic. Here you go. This is at the point where the trans was pulled back, and I have an AT, but you get the idea. 1 Link to comment Share on other sites More sharing options...
MrEviLDeD Posted March 2, 2014 Author Share Posted March 2, 2014 While that is not the most glamorous way to repair the lines, I have done the same thing and had it pass inspection here. The thing I see wrong is they used regular worm gear clamps and not fuel injection clamps. The part up by your exhaust looks stock to me, and that hose that is open is the drain for the A/C evaporator. It's fine. That definitely looks like a rear main seal leak to me. Mine was like that when it was leaking, let me see if i I have a pic. Here you go. This is at the point where the trans was pulled back, and I have an AT, but you get the idea. Thanks for the picture I guess it is not allowed here in Alberta. What the mechanic told me was that in AB fuel lines cannot be rubber. With the two lines cut and re-routed(another word he used referring to the fuel system) this automatically fails the inspection. I suspect if I pull the tranny back being a 5Speed I will need re-align the clutch and such as well? Will this come off as a unity similar to your automatic? I will need an alignment tool, I am not sure which will be a larger job, the fuel lines or the rear seal. Link to comment Share on other sites More sharing options...
Recommended Posts
Create an account or sign in to comment
You need to be a member in order to leave a comment
Create an account
Sign up for a new account in our community. It's easy!
Register a new accountSign in
Already have an account? Sign in here.
Sign In Now