- Sign In Changes: You now need to sign in using the email address associated with your account, combined with your current password. Using your display name and password is no longer supported.
- If you are currently trying to register, are not receiving the validation email, and are using an Outlook, Hotmail or Yahoo domain email address, please change your email address to something other than those (or temporary email providers). These domains are known to have problems delivering emails from the community.

TrailChaser
-
Posts
1,073 -
Joined
-
Last visited
Content Type
Profiles
Forums
Calendar
Everything posted by TrailChaser
-
Thanks Simon, It's pretty tight and packed with grease.
-
Here's a few pics of the bearings getting pressed on. Note the 14mm allen wrench I used. My biggest allen wrench at home is 10mm so I just used a 14mm bolt with a nut on it. Worked great in a pinch. :wink: I forgot to mention that I made a sleeve to press the lower bearing on. The unpainted finished hinge. It changed color from the heat of welding on it. It changed color again because I painted it. It's smooth with zero slop now. Thanks for looking.
-
I started working on a new hinge to replace the original design I came up with that never worked as well as I thought it should. I started by turning a 7" piece of 3" mild steel bar stock down to 2.75". Then I turned the base and drilled a 2" deep hole and tapped it with a M16x2.0 tap. Next I took a 1.375" drill and drilled a 3.5" deep hole then started cutting on the inside with a boring bar to get the right ID for the races it sit in. I also had to machine in a lower step since the bearing itself protrudes from the race about 50 thousandths of an inch. The same thing was done to the opposite side after I cut it off. This step was the trickiest. I had to turn the cap with an ID for the main shaft a ring to press the bearing, and I wanted it to be close. Like less than 25 thousandths of an inch gap between the cap and main part that swings. The next step was to drill and tap a hole for a grease zerk. Last but not least I turned the head of the bolt so now it's shorter by half and I added a nice 45deg edge to make it look better. 8) Here's a few pics. The hole was drilled and tapped extra deep so I could use long bolts to press the bearing to the bottom of the shaft. Here are the measurements if anyone else wants to make one.
-
I actually didn't measure, but I could snap a pic and post it up after the sun comes up. I need to find a stock pathy to compare measurements to. Anyone with a stocker want to measure from the ground to the middle of the rear fender lip. I don't have the flares, so I need the measurement from the bend in the sheet metal.
-
I should rephrase that about the cross member. I didn't just cut it, but cut piece out and rewelded beefer steel in the hole.
-
JeffsBroncoGraveyard.com The first three on THIS page will fit perfectly. I just put on the 4-4.5" springs and had to cut one of the crossmembers because the driveshaft was rubbing it. I also had to weld on a drop bracket for the panhard rod.
-
If you're looking for a great aftermarket centerlink check out Hoohaa CL (That's a link to his thread on these boards.)
-
I just ordered and slapped on some 4-4.5" lift coils from Jeffs Bronco Graveyard. The size is perfect and the wire diameter is twice the size as stock. The ride isn't too stiff either; like I was a little afraid it would be. I got them shipped for about $135, and the list price is only $115 and they have different lift sizes. I got the big one with the intention of cutting them down a bit if they were too tall. They definitely beat the JGC coils in the lifting department.
-
Cool, That's a very nice bumper BTW. Simon is one lucky guy. I really like the ends and how they follow the body.
-
What did you guys use for the hinge? I just finished a new WAY overbuilt hinge to replace the one currently on my tire & jerry can carrier. I couldn't find one I like at a decent price. So I spent about 4 hours at the lathe with some 3" bar stock and threw in two one ton wheel bearings to make the ultimate hinge. The one I made originally just isn't nearly as smooth as I'd like. The carrier also drops about a half an inch when it leaves the cradle. This one should glide open and close with ease and stay straight.
-
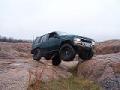
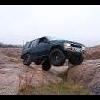
Here's a guy I met on the trails one day and took some pics of his pathy. This has the original engine and 5 speed. Compared to my stock pathy. He was taking it on some crazy trails, and it was very capable of getting thru everything thrown at it.
-
Anyone have opinion on these tires (link/picture) for pathy
TrailChaser replied to NaturaTek's topic in General Forums
I highly recommend the BFG MT's. They are pretty good all around tires. Take it from someone who has completely destroyed the 5 I have been running for the past 3+ years. I could take some pics of the condition they're currently in and most people wouldn't believe they still hold air. Hell, with all the gouges and deep cuts all over the sidewalls I'm amazed they're still holding up. I'll be getting a new set of 5 BFG MT's in the next month or so. I'm planning to run 33 with only a 3in suspension lift. If it can be done, it will be done. I hate the idea of putting a body lift on. -
I'm going to do a little more work on the tools I made to do this job. If anyone needs to use them to do there own Trailing Arm Bushing replacement I'll loan it out for free with a $20 deposit. You are responsible for shipping to receive and return the tools, and your $20 deposit will be returned when the tools are returned. I'll post a pic of the tools after I do some work on them to make them better.
-
Now you have to get the ring off the bushing and press it in the rest of the way. I just put a washer from my grinder on top of the bushing and squeeze it with a good amount of pressure. The bushing will go most of the way into the ring. Now you just have to pop the ring up off the bushing by prying under the lip of it with a flathead screwdriver. Then to finish you just press in the crush sleeve.(Which is the easy part)
-
You can see in the pic that the shoulders of the bushing is much bigger than the ID of the sleeve. Here's the tapered ring I made to squeeze the bushing into the sleeve without damaging it. The top is the same size as the OD of the bushings shoulder, and the ID is the same as the ID of the sleeve on the trailing arm. With a little pressure from a C-clamp and the guide I made last weekend the bushing pops right in with no hesitation.
-
Last weekend I started a trailing arm bushing replacement job on my 95 pathy. At first I thought it would be a simple job and since I have a good bench vice and a couple of C-clamps I didn't think I'd have any problems... I was dead wrong. I had no problem getting the arm off the pathy, and also didn't have any problems getting the old stock bushings out. I ran into major problems when it came to getting the new bushings into the sleeve. The shoulders of the new bushings are alot bigger than the sleeve they have to pass thru. The bushings have a slight taper so I just figured that with enough pressure it would have to pop thru the sleeve. I was wrong. First off the new bushing will pop out from the side as soon as you apply pressure . Once I had the stock bushings destroyed from pressing them out I had to finish the job in order to drive my truck to work the next day. First thing I tried was to make a C shaped sleeve with a top welded on that would guide the bushing into the sleeve on the trailing arm and prevent it from popping out under pressure. It worked, but didn't solve all my problems. It's almost impossible to get the bushing to evenly go into the sleeve even with the guide keeping it from moving side to side. So what ended up happening was the bushing went in uneven and ended up cutting a big part of the shoulder. I ended up cutting that bushing in half and putting it in from the sides to make it go quicker without completely destroying the bushings. I didn't like cutting it in half, and since I had only done the drivers side I opted to wait till the next weekend to do the passenger side after I machined something at work to make the job ALOT easier. Here's the end result of my little tapered ring. Take off the Trailing Arm. Press out the stock bushings.(I made up a little tool for this out if 2.5x2.5" square tubing) Next is cleanup time. I found that the best way to clean the old rubber out is to heat up a junky knife(it won't hold an edge after this) to red hot and cut the leftover rubber out smooth as butter. Burning the rubber out will also work, but it makes alot more smoke and takes about 5 times longer. After it's cleaned up smear grease all over the inside of the sleeve and bushing.
-
If there are long/steep hills to go down during the trip I'd say don't try it. It's a very unnerving feeling to have the trailer trying to pass you up when the brakes are working. It'll make you look like a drunk driver. If they fail on a hill were you have to ride the brake to keep under the limit your trucks brakes won't be far behind. I've smoked the brakes on an 18wheeler a couple of times when I had a crap truck with no jake-brake, and it was very much scary as hell. I stopped at the bottom of the mountain and went for a 2 hour hike to let the brakes/drums cool and let my nerves settle.(Thank God I'm not still truckin) It's nice that it has brakes, those make all the difference when/if they're working right. I wouldn't put my life in the trailer brakes hands tho. Good luck with it either way.
-
That sounds more like it. I did my swap from auto to manual and I would love to get a rebuild kit for the new to me tranny. If you do it, PLEASE do a write-up for the how to section.(w/lots of pics.)
-
I learn something new everyday. Rob, we missed you at Hot Springs. I still have that front skid too.
-
I just found something that seemed similar to PathFinder, so I went with TrailChaser. I've only ever seen one other person use the name and he drives a jeep if I'm correct.
-
I was thinking the same thing while I was watching it the other day. Well, I was thinking... Some people are so smart, but at the same time so stupid. Book smarts will get you a long way, but without common sense you won't last long once you're there.
-
Seems like a great idea. People who are looking for pathy parts can also come here for the tech aspect then stay for all the good times. I talk to pathy owners from time to time who have no clue this site exist.
-
Good call. It was low on brake fluid. I feel like a newby. Now comes the fun part. Finding the leak or changing brake pads.
-
I'll check that out. The brakes don't feel any different than they've always been. Is there any other connection or sensor for an ABS system on the 95 pathies that don't have ABS? (I'm pretty sure I don't have ABS, I've locked up the brakes a few times and they just lock up.)
-
The ABS and Brake light just started coming on when I make a hard right turn, and they go off when I hit a bump or turn left. I checked the connection on the 3rd member and it looks good. Anyone have any suggestions?