- Sign In Changes: You now need to sign in using the email address associated with your account, combined with your current password. Using your display name and password is no longer supported.
- If you are currently trying to register, are not receiving the validation email, and are using an Outlook, Hotmail or Yahoo domain email address, please change your email address to something other than those (or temporary email providers). These domains are known to have problems delivering emails from the community.

Manifesto
-
Posts
232 -
Joined
-
Last visited
-
Days Won
2
Content Type
Profiles
Forums
Calendar
Everything posted by Manifesto
-
LOL Redpath xD well if you're mounting it where I mounted my CB you're right, the vinyl dash definitely won't hold it I drilled deep with some 3x 3" coarse thread self-tapping screws straight through the vents at random angles and they're holding pretty solid XD that's if you don't mind putting a bunch of holes in your truck ALSO, if you can pull your vent covers out, you'll be able to put the wires through ALOT cleaner than I did via another hole in the top dash under or behind the unit... my vent cover kept cracking every time I touched it so I left it alone.... as for power soruce, headlight dimmer WOULD be the best, but I just spliced into my cigarette lighter
-
also I discovered when my buddy was fixing his header leak on his 84' Dodge the other day there's some high temp copper silicone that is AWESOME instead of a regular gasket -- he replaced the gasket and it STILL leaked, so he globbed on some high temp copper silicone (good for 378F) bolted it up good n tight, wiped off the excess and it worked beautifully as for drilling those studs with it all in the truck - a 90 degree air drill works pretty good for that may be able to rent one free at you local auto parts store pulling the heads is definitely a bigger pain... I've had mine off for over a month and... I kinda forget where all the wires go >_<
-
lol, I have about 3-4"s of play... I blame my super worn out centre link and big heavy tires for wearing everything out I found a good CL in the junk yard last weekend think I'm going to pull that and send it off to be Hooha'ed any contact info for Redhead? I might look into pulling this steering box from the JY too and ship it out O.O
-
wow, nice build!!!
-
Side step bars = the step things haha it's ok, it's why we're here
-
wow, that frame rot is REALLY bad I don't think I'd drive it like that... O.o
-
Oh geez, Nice video!! I was just about to start a new thread on this, guess I'll just add to this one. I replaced all my studs the other day while I had the head off. Here's how I went about it, as I'm too cheap to buy a real extractor. If you've got a body lift, or even just rip off the wheels and tear out the inner fender lining, you should have enough room to do this without pulling the motor out/apart (sorry in advance for poor cell phone pics) First thing- I used a center punch to put a dent in the middle of the stud to stop my drill pit from walking Next- drilled a 7/64" diameter hole (I used Cobalt bits from Mac Tools) first using the smallest bit in the set, followed by a slightly larger and then finally the 7/64" bit The factory bolts are soft, but you'll still want to step up in sizes As shavings built up around the hole, I used a small magnet and a blow gun to clear them The hole should look something like this, and doesn't need to be much more than an 1/8 ~ 1/4 inch deep Next, I hammered in a T15 Torx socket until the 'teeth' were completely buried in the broken stud a screwdriver style with a set of vice grips on the handle or even a Robertson will work too. I prefer the torx as there are more points of contact with the stud Once that bad boy is buried good n deep, use a ratchet or any other available means to twist until it's out Once all the broken studs are out, be sure to have a good supply of M8 grade 8 studs to go back in so you don't have this problem again Crappy factory studs left, Awesome grade 8 studs right Grade 8 will always be blackish in color Then just clean up your manifold or header to a mirror finish (if installing new, they should already be clean and ready) and bolt it on. If reusing the stock collector, now would be a good time to replace studs with grade 8 M10 studs. I had to use a TON of penetrating lube and a good set of vice grips to get the factory ones out Then just throw on your new gaskets, bolt it up, and good to go I re-tapped all the holes before installing the new studs. Not really a necessity, but it makes life a whole lot easier when installing the new studs. Tap and Die sets can usually be rented for free at your local auto parts store. I know this is actually a WHOLE lot harder when it's all still in the truck and you have no body lift but... least there's some pictures to give you all a basic idea of how to get it done
-
I'm DEFINITELY going to undercoat when I'm done... errr... are you talking about the sidestep bars, like the rails you have on your truck? rocker panels are part of the actual body, under the door seals that curves around down to the floor pan, to remove them requires a lot of cutting... not to have rockers leaves bare metal body WIDE OPEN to rust from the inside. As well, rockers provide structural strength and rigidity. You want your rockers lol. side step bars are bolted on under the rockers (really easy to remove) and just end up getting beat up on the trails, they do come in handy for protecting your rocker panels though an alternative to side step bars, are rock sliders, which kinda look like side step bars but usually don't stick out far enough to really be a great step, are usually welded to the frame and they're a whole lot beefier hope that helped clear things up =)
-
My exhaust is 2 1/4" off the factory 'y' pipe, the cat has been deleted and feeds into a $40 Napa muffler with a turn down before the rear axle sounds pretty good to me perhaps not as deep as a Flowmaster, but the larger, shorter pipes makes it throatier, especially without the cat, and it's quiet enough as a daily driver and the whole setup was pretty cheap >_> MIND YOU, at this moment, some of the welds broke during some crazy wheeling and the muffler is just barrrrrly hanging on... and my truck kinda sounds like a diesel right now... and scares little children when i bury the gas pedal... SO, even more important than the parts you buy make sure you go to a GOOD exhaust shop. Might end up paying a few extra bucks for the labour (not a big difference though) but definitely worth it so it doesn't all fall apart on you >_>
-
nah, it's all a matter of opinion I like my steaks medium rare, while my mom likes hers well done I say her steak is burnt she says its perfect ATF that looks like used diesel oil is fine if it tastes good to you personally, I like the stuff that looks like cherry kool-aid I think your truck would like it better too anyway, BACK ON TOPIC I once had an R50 (a 2000 Pathfinder SE) ... it died... my WD21 seems way more solid, even with the rust XD for $5000 I'm sure you could find a newer style in good condition with more power and more luxuries for the family that's nicer to drive on roads but if you plan on abusing it off road at all, the older WD21 is the way to go <--- rock solid trucks
-
The new style R-134 refrigerant can be used in R-12 systems as long as the oil is included with the installation of the new refrigerant. No new seals or any other components should need to be replaced. Your truck’s system should be completely empty of the old R-12, which is supposed to be contained and removed by a certified refrigerant technician. (that's what their big fancy machine is for). You will need a kit composed of an adaptor for the new R134a refrigerant and the hose used to fill the system with. It is always a good idea to have a gauge present to test the pressures with, as you install the R-134 refrigerant. First find out how much refrigerant your system is meant to hold. Once you know this number, you can buy as many cans of refrigerant as you will need to fill the system. The cans are normally 12 oz. which means you will probably need three and one can of oil. If you forget to buy a full size can of oil your compressor will become damaged.
-
Wow Nunya, your truck is gorgeous! lol looks way better in those pics than in your siggy
-
hehe, it would have been held together by hopes and dreams tmoore.
my main priority once I get my motor back together *this weekend hopefully-crosses fingers* will be beefing up that IFS setup as I have no intention of doing a SAS in the next couple years..
I've had a steering stabilizer sitting around for months and my CL is really loose and wore out already lol
-
I got mad at my A/C system and ripped it out of my truck... >_> well the compressor and line's anyway xD I still use the condenser as a rock-guard for my radiator now I have a little more power, slightly better mileage, and there's more space to work under the hood now if you really like your A/C though, Nunya's right. All you need is a retrofit kit and it's pretty simple to install. you can probably pick one up at your local autozone
-
its rusted right through under my rear seats and a hole in the driver floor pan too I'll probably strip my interior and fix all that the same time I do my rockers I can see my rear drive shaft!! >_<
-
its true what I've heard our gauges are prone to failure soon as mine start going, I'm tearing out that stock cluster and going after market XD
-
I'm really liking that idea hmm... did I jack this thread? ahhh well, least it's still on topic your ideas and words of encouragement are well appreciated everyone
-
Yes AT first I thought: "BAH, any truck can have it's rust cut out and fresh panels welded in for it, but it takes a REAL truck to beat the cancer all on it's own" annnd... I thought Nissan would be up to the task turns out, as tough as it is, it's no Mr. T... I've been playing with a MIG welder at work lately tryin to teach myself how to weld without burning through the soft sheet metal but any advice, any forms of magic, "Save Ryan's Pathy From the Cancer" fund raiser donations, or offers to come and fix it for free would be greatly appreciated
-
these threads should get you started about the 350: http://www.nissanpathfinders.net/forum/index.php?showtopic=25441 http://www.nissanpathfinders.net/forum/index.php?showtopic=26401 about the SAS: http://www.nissanpathfinders.net/forum/index.php?showtopic=19183 http://www.nissanpathfinders.net/forum/index.php?showtopic=22801 http://www.nissanpathfinders.net/forum/index.php?showtopic=23970 also-- is your pathy a '92? sould be posting in the '90-'95 WD21 forum, not the 86.5-89 WD21's or even the Solid Axle Swaps, Hardcore Custom Fab http://npora.ipbhost.com//index.php?showforum=60 that's where all my reference threads are from
-
OSR and Tmoore are right, that would be the cheapest way to do it if you can find a donor in good condition (verrry problematic where i live) and with a little work it would all look brand new when it's done However, with the huge lack of rust free pathfinders in my area, I'm planning on cutting mine all out and welding all diamond plate this summer and painting em flat black a little extra money and work, not quite as pretty, but a whole lot tougher you've got a few different options here but good luck on getting it done before it looks as bad as mine XD >_>
-
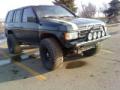
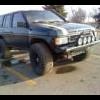
UPDATE! So hopefully I'll be picking up my cylinder head tomorrow =) in the mean time, here's how I've been keeping busy Got a phone call from the local Pick n Pull informing me that they had gotten a realllly good condition '92 Pathfinder SE 4x4 in (it seems really rare for Nissan Trucks to end up there O.o all they had for the longest time was 1 '89 pickup) I was impressed, interior was MINT with 359000km on the clock. It was red though, or else I would have plundered it all >_> I did get first dibs on it though and grabbed some stuff: 'New' connecting rod to make my door work again Installed and working =) some extra ECUs-- in case another one burns out from the deep water 'new' shift knob for transfer case Olddddd Newww Annnnd some really good condition valve cover bolts to throw these pretty bitches back in once the head work is done (top one prepped, ready-ish for paint-- bottom one finished) Next time, I'll get the centre link I started to claim but lacked the tools for complete removal (can't believe I forgot my hammer >_> ) annnd hopefully grab an electric radiator fan out of a 3.8L Taurus for an electric fan swap might even nab a spare tire carrier and mod it for a fuel can holder... gaaaaaah I <3 junk yard ^_^ OH, that pathy had rear disks on the stock axle... would it be worth taking? I have a H233b rear in mine...
-
WHOOPS! I just caught that xD
I wrote that up before I had picked the truck up when I bought it, they're really 33"s *adds 35" tires to wishlist*
They still really do the job though =)
-
 shambles? like... broken? XD that'd be harsh... time to hit the junk yard
 -
or just some really long arms and axles for a really high and wide stance? I'm sure could find some rims off of a HD truck (lots are 6 bolt) so they wouldn't stick out too far while still achieving lift through the long arms reaching further down I see pro baja trucks all the time with IFS setups jacked way up with crazy long arms xD