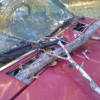
peejay Posted March 9 Share Posted March 9 (edited) Okay all, getting that "no, don't do THAT!!!” feeling, how in the heck do I remove this clutch m/c, it appears it has fused onto the lower stud? Tried beating on it from the inside (rubber mallet, long wooden dowel), no dice. Tried wire brushing and pb blaster, nope. Got some better brushes and kroil on order, trying to avoid heat (MAPP gas) and a cold chisel, if possible. Also, when/if I DO manage to get it free, is the m/c going to "easily" clear the brake booster? Thanks! Edited March 9 by haleauxmauldeaux (reuploaded image) Link to comment Share on other sites More sharing options...
Frenchy Posted March 10 Share Posted March 10 Assuming you do have everything disconnected, I would put the nuts back on(just a few threads) and lightly smack the master cylinder with a dead blow hammer(not to be confused with a rubber mallet)from the top and bottom the best you can. Hopefully that should break it loose enough for it wants to come off and then this will help keep it from flying off 1 Link to comment Share on other sites More sharing options...
peejay Posted March 10 Author Share Posted March 10 Thanks for the tips! I wanted to avoid (if possible) hammering from the top or bottom to reduce the likelihood of deforming the studs. You can't see any "daylight" around the threads of that lower stud, telling me that the threads are fused with the master cylinder. I'm leaning towards carefully use of a cold chisel in the area, maybe a slit in the 3 o'clock position, enough to wedge a screwdriver or something in to free the m/c from the stud. Link to comment Share on other sites More sharing options...
RedPath88 Posted March 10 Share Posted March 10 (edited) Since you have another penetrating oil on order, I'd recommend that between now and then, if you have not already done so, saturate the front AND back (firewall side) of the lower stud with PB Blaster (which has been my decades long, go too.) Now you may need to pull/flex the MC a bit to make space between it and the firewall, for the oil to effectively run down to the lower stud. This may resolve the issue or help until you can acquire and apply the use of a dead blow hammer to it, as Frenchy rightfully suggested. That said, IF all else fails, I absolutely would not be afraid to (carefully) take an angle grinder with a narrow disk to it. Disconnect all lines and protect them. Then drain and suck out all the fluid you can (using a simple baster or fluid vac) and cover every open line to prevent contamination. Keep water and/or a fire extinguisher nearby, just in case. If you don't overheat it (grind in steps, using water as you go to cool the metal in between) or grind into the fluid chamber, then this should not be an issue. Simply trim off the upper MC mounting flange near the top of the center core. And if need be, the forward reservoir (nearer to the reservoir) to allow you to effectively get to the firewall side. Once separated and removed, it should allow you to start rotating the remaining MC mounting flange on its lower axis, back and forth (with penetrating oil) using locking, adjustable pliers, or a similar clamping tool, to break it hopefully free of the stud. Ask me why I know this could work... well, because I've done it before. I just don't recall if it was on the '75 Monarch or '82 Escort... Edited March 10 by RedPath88 Link to comment Share on other sites More sharing options...
peejay Posted March 10 Author Share Posted March 10 NOW I'm on the trolley! Getting the m/c to rotate around the lower stud sounds like the way, it's just going to take me ALOT of gulp, patience to get there. (Forgot to add the disclaimer that this is near the extreme end of shade tree...no air compressor, no AC outlet...so hand tools and at most a cordless rotary tool...wish me luck!) Thanks, will post my "progress"! Link to comment Share on other sites More sharing options...
RedPath88 Posted March 10 Share Posted March 10 (edited) I think you may have missed the part where I said "IF all else fails"... I should have noted sooner that you not going to get much movement out of it, it all depends on the amount of space between the MC and FW opening. Edited March 10 by RedPath88 Link to comment Share on other sites More sharing options...
adamzan Posted March 11 Share Posted March 11 (edited) If you could gently heat up the part of the MC around the stud it should release. Even a plumbing propane torch or MAPP gas would work, if you're careful you won't damage anything. That is what I did when changing my brake MC. Edited March 11 by adamzan 1 Link to comment Share on other sites More sharing options...
FirstGenFreak Posted March 12 Share Posted March 12 23 hours ago, adamzan said: If you could gently heat up the part of the MC around the stud it should release. Even a plumbing propane torch or MAPP gas would work, if you're careful you won't damage anything. That is what I did when changing my brake MC. Even a heatgun may get you over the line. Link to comment Share on other sites More sharing options...
peejay Posted March 12 Author Share Posted March 12 I may try the heat gun! I have a bernzomatic torch/MAPP, but i'm VERY nervous about using it in that confined area (paint on the firewall, discoloring/ harming the stud, anything that may burn/melt on the inside...I've been "burned" once before with that torch on an ATV carb, when patience and penetrant alone probably would've sufficed). The kroil and cold chisel should be here today... Got some cutoff discs, just using that as a last resort... (Toying around with a rotary tool/flex shaft, but even that may be tight). I may need to yank the washer reservoir first (and possibly the brake booster) to get max working room... Link to comment Share on other sites More sharing options...
Slartibartfast Posted March 13 Share Posted March 13 If you've got an old license plate kicking around, you could cut/bend a heat shield to help protect the firewall while you're cutting/beating/torching. Dumb idea, can you hook a ratchet strap to what's left of the master? I'd be tempted to get a little tension on it, then beat on the ears (to break the corrosion), the master itself (back and forth--if you can get it to wiggle, you're making progress), or on the ends of the studs, to see if you can knock them through the master. Might need to use a drift to get in there. Failing that, yeah, heat may work, or you may be able to cut it free. Maybe get that flex shaft in there, drill a hole in the ear that's seized, then split the ear open with the cold chisel? Figures the seized one is the harder one to get to with a tool. Link to comment Share on other sites More sharing options...
peejay Posted March 13 Author Share Posted March 13 Well, the heat gun in "stock" form didn't work. Have since ordered the cone accessories to better concentrate/direct the heat, coupled with the Kroil that also arrived. (Currently using a wood block to keep the heat away from the wiper reservoir area). Have been trying with the ratchet strap, (not using the ratchet feature), just my "brute strength" to yank on it, the m/c will move SLIGHTLY, but really only from the top stud, towards the left front tire, can't get it to move towards the right front tire at all. If the heat won't get it, and dremel contraption is gonna be cumbersome, gonna protect/give some clearance to the stud threads (rubber hose, old credit card, etc) and try and chisel the ear and bend whatever gap I can make. Will try and post pics when I hit pay dirt! (Oh, thanks for chiming in, Slart, you helped me make sense of the EGR solenoid circuit many moons ago!) 1 Link to comment Share on other sites More sharing options...
peejay Posted March 15 Author Share Posted March 15 Update...the M/C is STILL on there, but slowly "chipping away" at it: - heat gun with concentrator nozzle didn't work...addition of kroil didn't work, either - had to remove the washer reservoir* and charcoal canister to make more room for the 12" chisel, still a tight fit *was unable to fully remove the washer reservoir...any tips on disconnecting the hoses? seems nissan wants me to break the nibs on the reservoir - the rotary tool was able to make a SMALL "nick" in the ear...ordered the right angle attachment to see if i can get a better angle, may couple that with the flex shaft - this is annoying... Link to comment Share on other sites More sharing options...
Frenchy Posted March 15 Share Posted March 15 I would keep soaking it in oil and giving it a bunch of heat. You would be amazed on how much that'll work when you're applying both quite often for this kind of thing Link to comment Share on other sites More sharing options...
Slartibartfast Posted March 15 Share Posted March 15 Old hoses tend to be stuck on there pretty good. I put a little silicone spray or WD40 on them and try and twist them, see if I can get a pick under them, stuff like that. Worst case, vacuum hose is cheaper than washer fluid pumps--just cut the line and peel what's left off the pump afterwards. If the hoses aren't super short already, you may have enough slack to just push them back on without replacing anything. IIRC the pumps will piddle fluid once the lines are off, so drain the res first if you haven't already. More heat, more oil, and more beating should shift it eventually. I would reach for a little butane torch rather than the heat gun, get a little more concentrated heat on the problem, with less risk to surrounding components than the plumbing torch. I had a look at how the clutch blanking plate is bolted to mine (slushbox), and it looks like the studs just slide in from the driver's footwell. Replacing the studs would not be my first choice, but if the stud gives up before the corrosion does, or you get sick of fighting with it and decide to drill it out, you may not be entirely screwed--assuming the clutch master bolts on the same way that the blanking plate does. Link to comment Share on other sites More sharing options...
peejay Posted March 16 Author Share Posted March 16 Okay, Slart, you've given me more options to consider! (I probably should mention that I like buying (cheap) tools!) - I put penetrant (just liquid wrench) on the hoses, nada...may step up to pb blaster, then kroil, and/or use the picks to get some wiggle room, as you suggested. - got the bright idea to maybe try an oscillating tool, with the blade turned 90 degrees...while it does fit in the space, it is a TIGHT fit, not sure it would do much good, even if I had unfettered access - the dremel right angle attachment came, but doesn't fit the chicago electric rotary tool i've been itching to replace, so picked up one from hyper tough and the dremel attachment fits, so will test that tomorrow - since you mentioned BUTANE, i started looking at those micro torches, found one with an adjustable head, should be here tomorrow (also saw the dremel pencil one, too, but that looks more for soldering, think i may possibly need a flame instead of an "iron" type heat transfer) - may use a mirror to see if the studs are the same whether AT/MT, knocking it out from the front could be an option more to come! Link to comment Share on other sites More sharing options...
peejay Posted March 19 Author Share Posted March 19 (edited) SUCCESS, ladies and gents! Long story short, I think hammering on the m/c is what did it... The extended version, I used a conical grinding bit on the rotary tool, to dig enough of a groove to get some blows in with the chisel. (Never got close enough to the threads to make a "seam" there). Was getting frustrated at it still not coming loose, turned my attention back to hammering on the m/c from the inside, peeked my head back around and saw that there was more clearance now at the top stud! Then gave it a yank, and voila! Thanks again for all your help and suggested approaches! Edited March 19 by peejay typo; insert picture 1 Link to comment Share on other sites More sharing options...
adamzan Posted March 19 Share Posted March 19 Glad you got it sorted. Aluminum to steel usually has these results after 30 years haha. 1 Link to comment Share on other sites More sharing options...
peejay Posted March 27 Author Share Posted March 27 (got the m/c installed, then attempted to use the mityvac to "bench" bleed it, wasted a lot of fluid doing that, then wasted a lot of fluid trying to reconnect the line that didn't want to thread in easily!) raise your hand if you knew that the master cylinder WASN'T the problem??? (gonna bleed the damper next, while waiting on the just-ordered slave cylinder to arrive) Link to comment Share on other sites More sharing options...
Frenchy Posted March 28 Share Posted March 28 I will make this easy for you and tell you to get a Speed Bleeder for the Slave Cylinder. The NAPA part number to use is 675-1572. This particular bleeder has a check ball that will close with no pressure and open with pressure when cracked open. Make sure you have a a clear hose and a bucket of sorts for fluid collection. Do that and you will be set. Link to comment Share on other sites More sharing options...
peejay Posted March 28 Author Share Posted March 28 You know, I bought some of those for the brakes several years ago, never got around to installing them, no telling where they are now. Guess I get to try them on the clutch, thanks for the part number, looks like my local NAPA has 'em in stock! (Would this be beneficial on the damper, too?) Link to comment Share on other sites More sharing options...
Frenchy Posted March 28 Share Posted March 28 Do not bother with the damper. Put it on the slave and all will work out Link to comment Share on other sites More sharing options...
peejay Posted March 28 Author Share Posted March 28 9 hours ago, Frenchy said: Do not bother with the damper. Put it on the slave and all will work out Ok, I'll be patient, slave cylinder and speed bleeder should be here this weekend! Link to comment Share on other sites More sharing options...
Slartibartfast Posted March 29 Share Posted March 29 At least you know you won't have to do the master again for a while! Hopefully the slave doesn't fight as hard. Link to comment Share on other sites More sharing options...
peejay Posted March 30 Author Share Posted March 30 On 3/29/2024 at 4:46 AM, Slartibartfast said: At least you know you won't have to do the master again for a while! Hopefully the slave doesn't fight as hard. Exactly! Lessons learned from letting this thing sit for 3 years. Link to comment Share on other sites More sharing options...
peejay Posted April 6 Author Share Posted April 6 Nissan REALLY wants me to do a powertrain swap! Update: Went to put the operating cylinder in, had everything ready so I would lose as little fluid as possible... Got the banjo bolt off, the lower washer off, pulled the bolt up, and BAM! The upper washer was stuck to the bolt!!! ARRRRRGGHHH!!! Rather than remove the bolt and lose fluid in order to assess/remove the washer, I decided "Eh, I'll just order a new banjo bolt". WRONG...guess what is included in the DISCONTINUED list??? So I started with 97-up Frontiers, thinking the parts "should" interchange, well, they do (same part number) which means...DISCONTINUED! 2002-up Frontiers have a different part number, which is available (for now!). Also looked up the banjo for a '94 300ZX (my thinking, same engine/trans, SURELY that bolt has to be the same/similar/good enough to work?) So I ordered two new crush washers (had 2 new ones, but they look suspect), and early and late production '94 Z banjo bolts. Ordered the release cylinder for the Z, too, so when I take the Pathfinder bolt out, I can see if it fits in the Z cylinder. Stay tuned! Link to comment Share on other sites More sharing options...
Recommended Posts
Create an account or sign in to comment
You need to be a member in order to leave a comment
Create an account
Sign up for a new account in our community. It's easy!
Register a new accountSign in
Already have an account? Sign in here.
Sign In Now