- Sign In Changes: You now need to sign in using the email address associated with your account, combined with your current password. Using your display name and password is no longer supported.
- If you are currently trying to register, are not receiving the validation email, and are using an Outlook, Hotmail or Yahoo domain email address, please change your email address to something other than those (or temporary email providers). These domains are known to have problems delivering emails from the community.

02_Pathy
-
Posts
201 -
Joined
-
Last visited
-
Days Won
40
Content Type
Profiles
Forums
Calendar
Everything posted by 02_Pathy
-
Whereabouts are you going to mount the shocks to?
-
Yeah I have the stock spare underneath but I'm currently running "32s" so I would like a spare to be the same size compared to the stock 29 inch. Also I would like the swing gate to have a Jerry can on it as well like@TowndawgR50 rig Sent from my SM-G960U using Tapatalk
-
I snagged one today at a junkyard for $19 bucks, I couldn't pass that one up. Now time to clean it on up Sent from my SM-G960U using Tapatalk
-

Light bar and "Raptor/4Runner" running lights
02_Pathy replied to 02_Pathy's topic in 96-2004 R50 Pathfinders
I just used a generic rocker switch off Amazon from a long time ago but here's a link to all of the different types of rocker switches. https://www.amazon.com/s/ref=nb_sb_noss_2?url=search-alias%3Dautomotive&field-keywords=rocker+switch&rh=n%3A15684181%2Ck%3Arocker+switch -
Finally had some free time so I just drove on some forest roads, and I low key like the moon dust grey [emoji23] Sent from my SM-G960U using Tapatalk
-
Light bar and "Raptor/4Runner" running lights
02_Pathy replied to 02_Pathy's topic in 96-2004 R50 Pathfinders
Yeah the actual mounts were different between the 01 and the 02 but they ended up bolting up just fine regardless of the mount shape. I bought my grill off parts geek for about 35 bucks and had to paint match it but it was a real simple task. I just used the auto paint you can pick up at any auto parts store Sent from my SM-G960U using Tapatalk -
Light bar and "Raptor/4Runner" running lights
02_Pathy replied to 02_Pathy's topic in 96-2004 R50 Pathfinders
I would assume the mounting points should be the same, like my LE grill was molded as one and couldn't remove the middle insert. I bought an 01 grill and the mounting points were the same as the 02 LE grill. As long as you have 5 inserts total (1 in the middle and 2 on each side) it should fit Sent from my SM-G960U using Tapatalk -
Light bar and "Raptor/4Runner" running lights
02_Pathy replied to 02_Pathy's topic in 96-2004 R50 Pathfinders
Well I can say that your paint is cleaner than mine [emoji23]. Your rig looks great! Sent from my SM-G960U using Tapatalk -
Light bar and "Raptor/4Runner" running lights
02_Pathy replied to 02_Pathy's topic in 96-2004 R50 Pathfinders
Theres a hole already in the firewall where the clutch would go on a manual. It's right underneath the brake booster, it's a diamond shape plate with 2 nuts holding it in place. Then you just run your wiring through there and into the empty slot with your switch. That empty spot I used for my back up lights Sent from my SM-G960U using Tapatalk -
Light bar and "Raptor/4Runner" running lights
02_Pathy replied to 02_Pathy's topic in 96-2004 R50 Pathfinders
I can take pictures of the light bar from the back later after my finals this week. For the mounting ends they could work but I'm not sure how far they would stick downward as they might be longer than the mounting brackets on the light bar body itself. Sent from my SM-G960U using Tapatalk -
No Sent from my SM-G960U using Tapatalk
-
The link I sent were basically the same design as I'm using right now. I only needed 1 pair for my camber Sent from my SM-G960U using Tapatalk
-
https://www.partsgeek.com/gbproducts/DC/6750-05408384.html?utm_content=DN&utm_term=1996-2004%2C+2013-2014+Nissan+Pathfinder+Alignment+Camber+Kit+AC+Delco+45K18036+Front+96-04%2C+13-14+Nissan+Alignment+Camber+Kit+1997&fp=pp&gbm=a&utm_source=google&utm_medium=ff&utm_campaign=PartsGeek+Google+Base&gclid=EAIaIQobChMI4oKl3q_13gIVjR-tBh2P_wRCEAQYAiABEgIRIPD_BwE&ad=47433949932 Sent from my SM-G960U using Tapatalk
-
Brake Light LED Conversion: Red or White
02_Pathy replied to RainGoat's topic in 96-2004 R50 Pathfinders
I'm using the same color LED bulbs as the lens cover. I have red LED's for brake lights, amber for signals and white for back ups. They are much brighter than the stock bulbs for sure- 5 replies
-
- 1
-

-
- brake lights
- leds
- (and 1 more)
-
I didn't mean to say alt, I tried changing it but I guess it didn't work lol. Try cleaning your MAF sensor and potentially that EVAP leak could cause issues with the computer saying somethings wrong so it's trying to adjust to that
-
When my 02 sensors were bad mine started up just fine besides throwing the check engine light. They're really just for emissions, shouldn't cause your truck to start like that. I'm going to say it's something else
-
Light bar and "Raptor/4Runner" running lights
02_Pathy replied to 02_Pathy's topic in 96-2004 R50 Pathfinders
Yup exactly what I did. Just unbolt the cover plate and feed your wire through. Then cut a small notch in the cover plate for the wire. -
Yup! Sent from my SM-G960U using Tapatalk
-
Yeah rigs like ours are not the norms for lifting as most of them are grocery getters. I bet that shop mainly specializes in the more popular rigs out there like 4runners and jeeps. When I got my lift, I purchased all the parts for it (struts, coils and shocks) and installed most of them myself at home. I just took the struts and coils to a shop and have them assemble the unit and when I got home I just installed them on the rig. For the rear you could get by with flexing the rear axle when the frame is on jack stands and use a floor jack to lower or raise one side of the axle up or down. I also used coil compressors that I rented from an auto parts store. At the time I didn't need camber bolts for my OME lift but after I installed 1 inch spacers front and rear on top of the OME I needed them after that. I didn't get any driveline vibrations with either setup too. As for alignments I never had an issue with it getting aligned besides the castor being out of spec slightly, but that's due to the nature of the lift.
-
Light bar and "Raptor/4Runner" running lights
02_Pathy replied to 02_Pathy's topic in 96-2004 R50 Pathfinders
Yeah this was the best way I could mount them too, we'll just have to wait and see how long they last Sent from my SM-G960U using Tapatalk -
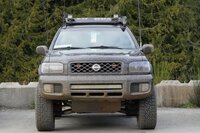
Hello all it’s me again. So I have some free time right now where I thought I would do a quick write up. So I’ll be going over how I installed my light bar into the bumper for a clean look and also without the use of a brush guard or other mounting bar.Then I’ll go over on how I installed amber lights into the grill to mimic what every 4runner does lol. Might as well kill 2 birds with one stone. So with the light bar I used a 30 inch china bar that is spot middle and floods on either side and unfortunately I do not know what brand it is as I got it on Ebay like 2 years ago. But the important part of the bar is how it mounts. Preferably you would need a light bar with a slim adjustable bracket that goes on the body of the light bar compared to the end mounting brackets. Next you need to remove the plastic front bumper cover to trim the “teeth” in the plastic bumper and cut a notch at the end of the plastic bumper as well as expose the steel crash bar. After cutting the “teeth” off and cutting a notch you’ll need to line up the light bar as centered as possible and perfectly perpendicular to the crash bar. I used a sharpie to mark the holes as well as used a straight edge and measuring tape to get it as close as possible. Drilling in the crash bar is not easy and takes some effort but is doable. After mounting the light bar go ahead and turn it on as this is the easiest to adjust the angle of the bar before putting the plastic cover on. After you do that you’re done! It took me several times to put the bumper back on and off to trim the plastic just a little bit at a time and as well as measuring. With this setup you get no hood glare (obviously) and also more of a “stealth” look without the addition of other mounting brackets. The only downside to this is that is removes your front plate bracket which could be a bad thing in your area depending on your front plate laws. I went ahead and just put my plate in windshield and I may relocate it up to the rack potentially. For the amber lights I used Grand General 77650 amber lights off amazon. I also went ahead and bought a 99 to 01 SE grill as I was tired of the LE grill of the pathy. When it arrived it was a silver color so I had to paint it black and I got it close enough with the original black on the truck. Then thanks to@TowndawgR50 and@RainGoat for light placement I then carefully dremeled out the back to cut a notch in so the lights could be more secure as the mesh wasn’t flat. After getting the right depth and width I went ahead and super glued the lights in and as well as zip tied it to the grill as an extra precaution. I then routed the wiring between the mesh so you can’t see it and I just tapped the wiring into the cigarette lighter fuse spot. So when I turn the key the lights come on and serve as my driving lights and as well as giving it more of a unique look. I tried plugging the tap into an empty slot but it didn’t work for some reason but when I put my CB radio tap in the same slot it worked so I don’t know if it needs a switch but I’m just gonna use the cigarette lighter for now. Since I was doing “light” mods I also went ahead and installed some clear corners as well. Also currently waiting for the emblem as Nissan changed it from a stick on to a bolt on but I think USPS lost it but that's another topic. Sent from my SM-G960U using Tapatalk
-
Looks like that's the same rack@TowndawgR50 uses on his rig with conduit clamps Sent from my SM-G960U using Tapatalk
-
Aux. backup lights "frenched" in rear bumper
02_Pathy replied to 02_Pathy's topic in 96-2004 R50 Pathfinders
Yeah of course. I just did a switch because I'm not the best with electrical so I didnt tap into the wiring just to be on the safe side Sent from my SM-G960U using Tapatalk -
Aux. backup lights "frenched" in rear bumper
02_Pathy replied to 02_Pathy's topic in 96-2004 R50 Pathfinders
Yeah you can tap into the stock reverse lights with the pods. Theres other people and forums that have a how to on how to tap into the stock wiring. Sent from my SM-G960U using Tapatalk -
Yeah they're cheap and effective. And they allow flexibility for when the unibody flexes as well while keeping everything secure Sent from my SM-G960U using Tapatalk
