- Sign In Changes: You now need to sign in using the email address associated with your account, combined with your current password. Using your display name and password is no longer supported.
- If you are currently trying to register, are not receiving the validation email, and are using an Outlook, Hotmail or Yahoo domain email address, please change your email address to something other than those (or temporary email providers). These domains are known to have problems delivering emails from the community.

CDN_S4
-
Posts
1,562 -
Joined
-
Last visited
-
Days Won
78
Content Type
Profiles
Forums
Calendar
Everything posted by CDN_S4
-
looks good! Been meaning to do something similar as I find the oem brightness and colour very boring and weak.
-
Spring/Strut install difficulty of DIY
CDN_S4 replied to NovaPath's topic in 96-2004 R50 Pathfinders
What lift are you installing? Spacers or springs? The new struts should come with new bump stops, if not, you should get some depending on the condition of your old ones. Are you replacing the bearings too? -
Spring/Strut install difficulty of DIY
CDN_S4 replied to NovaPath's topic in 96-2004 R50 Pathfinders
I've done this myself too with only hand tools. I did have a manual spring compressor as I replaced the struts. For a self taught bobby wrencher like myself I'd rate the level of difficulty of this DIY a 7/10. Reason being, dealing with compressed springs is kinda scary and a lot of fumbling to get things back in and lined up makes it challenging. -
Anyone interested in a R50 winch bumper?
CDN_S4 replied to projekz's topic in 96-2004 R50 Pathfinders
http://www.jcroffroad.com/product/XJ/XJFV.htmlyeah that bumper is NICE!!! -
Rear Bumper/Tire Swing pics for WD21
CDN_S4 replied to Jacob211's topic in Solid Axle Swaps, Hardcore Custom Fab
http://www.nissanpathfinders.net/forum/topic/38490-cdn-s4-build-thread/page-13 Pretty simple actually...take a look at my build thread for details -
Anyone interested in a R50 winch bumper?
CDN_S4 replied to projekz's topic in 96-2004 R50 Pathfinders
An XJ Smittybilt or OR-FAB will also most likely be the way I'll go with mine and fab it so it will fit when the time comes. The front bumper is the one thing I hate the most about the face lifted R50 -
Way too cold! Mind you compared to the Prairies this is almost T-shirt weather:
-
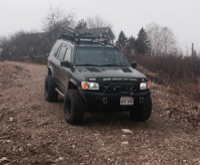
As promised here are aome close ups of the hinge, handle/lock and roof rack:
-
A post like this must be supplemented with pics!!
-
Hey Tim thanks for the compliments The tire carrier is made out of a variety of tubing and parts. My brother in law is a welder / fabricator in the army and made this for me on a weekend. I had just given him a picture of one of the ones you can buy and he fabbed it from that. I was pretty impressed. The hinge is just a big "bolt" same as you use to lock a trailer hitch. I'll take close up pics when I get a chance of all the details. He made a locking mechanism for the entire assembly to sit snug and tight inside the hitch, so there is no rattle. As for the rack, I had to sacrifice a little bit of cargo area for style by doing this, but so worth it IMO especially since I no longer carry the spare on the roof. I pulled the dross bars out from underneath the basket and slid them through the side bars of the basket. Then inverted the brackets that tie the bars to the basket. Now I can use the bars to strap things to and all in all it allowed me to mount my light rails without drilling into my basket. IMO a win win. I'll take more close up pics of that too.
-
Definitely skip the suspension parts and get Fleury's spacers. Best bang for buck hands down! My advice is to get new offset rims for the new tires. Plus the 2" spacers and you have a very nice mini build within the budget.
-
Yeah it's been really cold lately, like -22C, -33 with windchill. Most of the ice was solid all the way. Didn't even crack. But I found one that was deep enough to still have a soupy surprise for me.
-
Do these guards attach only on the bottom or is there a second bolt on location higher up? I'm worried that in a slight frontal fender bender it will damage the entire front instead of just the bumper if it were to "bend" back a bit if it's just attached at the bottom.
-
No I don't try that, didn't actually know that. But good to know! However as I was sitting on ice on one side I don't think any amount of locking would have done anything but dig a deeper hole. Thanks for the tip, will try that out next time I get stuck lol
-
Did this and both spin in the same direction. Does that mean I have factory LSD?
-
Installed rear view camera. It's meant to hang upside down under the trunk lid handle but since I mounted mine on the roof rack it's "upside down". The screen can be flipped but the guide lines always stay so they will just be upside down. They won't be accurate anyways from up there but at least now I can see again since the tire blocks my rear view window almost entirely.
-
Added the review camera that got me stuck lol
-
^^ I will definitely try that. Thanks for the tip. I assume I put it in Neutral?
-
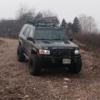
I had to call a buddy to tow me out backwards. I hadn't planned on going wheeling but when I drove by the training area gate I decided to check with the commissionaire to see if the TA was open and if I could get a pass from him without going to Range Control. I had my dad with me and wanted to show him the manoeuvre area as we drove by it on my way to pick up a backup camera for the Pathy that I found on kijiji. Long story short, I wasn't all too well prepared to go out wheelin but luckily did have my tow strap and D-Rings in the truck, which got me out in the end. The top pic with the muddy tires is the one after I got out.
-
-
How much did that swap set you back if you don't mind me asking?
-
Yeah wouldn't have been a problem if the other side wasn't sitting on ice. TbH I don't know what's in it for slip diff, I guess factory whatever that is. But wheels on ice just spun with nothing I grip obviously.
-
Got it stuck. Am stuck as I'm writing this lol. This guy needs a locker!!
-
They make them for all countries, at least all the cool countries
-
