Leaderboard


Popular Content
Showing content with the highest reputation on 05/24/2021 in all areas
-
2 points
-
Thought you guys might be interested in keeping an eye on this low mileage (72k) 2001 Pathy up for auction at no reserve this week on Cars & Bids - .https://carsandbids.com/auctions/KdbeMo19/2001-nissan-pathfinder-le-4x4 I'm definitely interested in seeing what it goes for since the used market (and particularly used 4x4's) is crazy right now.1 point
-
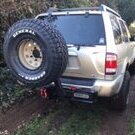
It's in great shape but not amazing. Mine was in better shape with 150k+ miles on it (albeit it's an SE, not an LE). The state of that roof's paint is concerning. It looks to be down to bare metal in some parts:1 point
-
x2 on the OME springs. They are a great spring that sells well for those not wanting more than 2" of lift. I had OME MD rear springs for a long time and paired them with a set of Bilstein's. Fantastic for hauling heavier loads like camp gear and dogs. With the assistance of a set of Airlift spring helpers they handled our 18ft toy hauler superbly. With no load they were well mannered and kept the truck tight on the road without being harsh. Definitely recommend them if you're looking for a heavier duty 2" rear spring. Cant really go wrong with ARB products. Installed with spacers and airlift spring helpers not long after I got the truck:1 point
-
The OME springs are very popular and are a great spring that yields 2”. Ran them for several years, zero complaints. Same is true for the front springs. The ride is superb when paired with their struts and shocks, but they’re on the pricey side. The LRs are a great solution for more lift and load handling, but the OMEs are perfect otherwise.1 point
-
Thanks for Patrick who started this thread, helped a lot. Tore apart my interior to get this to work. https://imgur.com/bfOLv4f My pathfinder doesn't have the rubber grommet or pigtail that normally comes with the tire carrier model. I looked at the FSM and could not find the wire to tap into and believe I don't have the wire or it stops somewhere up the line. Regardless, without the pigtail you can still make the switch work with your gauge. If you look behind the gauge cluster, the #3 wire on M24 harness is the wire for the tire carrier ajar light. You will need to get an LED bulb put in there (I just moved my seat belt warning light since I don't care for it) and ran wire all the way under to the back where the tire carrier switch is. Ground in the tail light harness. Technically you can go to the junkyard and pull a door switch from the driver's side door and use that switch to connect to this light on the gauge. Very simple on/off circuitry. Could do without the light but the tire carrier is pretty heavy I feel like one mistake to forget to close it and you drive away with it open you can do some damage to your truck and/or property around.1 point
-
Thanks guys, glad you like it. Also, I have a few other suggestions for those considering the project: I bought an Astro Pneumatic 1427 blind nut tool (~$40). You can make a basic tool using simple parts and set them manually, but it's a more work and may produce inconsistent results. And you'll be doing a few of them. I have a few other projects that I can use the 1427 for, and it's worked well for me already (also used it on the motor mounts and skid spacer for my SFD). It has mandrels for M6, M8, M10, and M12 coarse thread blind nuts. You can obviously go the Standard route; hardware is cheaper and easier to find. But, I'm a metric guy when I have the choice. Don't buy from Fastenal. Those guys suck. They couldn't even get an order for 10mm washers right, and they kept sending me the wrong blind nuts. Couldn't tell you why I didn't go through McMaster-Carr first. The blind nuts are a little hard to find locally, at least in my case. I went to several local hardware stores, and only one even stocked any blind nuts, but they were too small or stocked in very low quantities. McM-C has them (they're listed as rivet nuts, btw); you'll want 95105A199 (M10) and 95105A191 (M8). These are zinc-plated steel with a low grip-range and large flange...be sure to get these features. These need a 13.5mm or 17/32" drill bit. I had the advantage of being able to remove the lower hinge bracket for mocking up placement and punching marks. Since the hinge brackets don't normally come off, you'll need help holding the carrier in place. To lighten the load a little, I'd remove the part that actually holds the wheel from the carrier's frame. Plan on punching then drilling 1-2 holes first, then mocking up placement again, then punching and drilling 1-2 more holes, then mocking up placement again...until all holes are drilled. The hinge brackets have wiggle room, but if some of your holes aren't exactly where you want them, you'll consume that wiggle room quickly. I recommended starting with the outer holes on the lower mount. Also, I'd complete the holes for the lower mount first...that way you can have it support the carrier for finishing the upper holes. Be mindful of keeping it level when it's in the closed position before drilling too many holes. For cutting the bumper, I have a wannabe Dremel and hand wand. I used painters tape to set lines, and cut-off wheels specifically for plastics to make quick work of things. A utility knife is good for getting the corners, then a flat file to clean things up. Any other questions, feel free to ask. I thought about doing a build thread, but I think this content is best kept here so people are aware of the OE reinforcement.1 point
-
May 2021: No Entries0 points