peejay Posted April 17 Share Posted April 17 (edited) Greetings, all, Before I go through the trouble of replacing the valve cover gaskets, Is there a sure-fire way to KNOW beyond a shadow-of-a-doubt that they are leaking? I've got (some/most of) the tell-tale signs: - smoke coming from the areas between the valve cover gasket/cylinder head mating surface and exhaust manifolds - vehicle had been sitting for about 3 years - i shoulda changed 'em for good measure when i replaced the injectors (aka, the 3-year injector replacement!) i tried poking around with a flashlight in the dark around the suspect areas, and i could never actually see oil on the manifolds (would i ever be able to?), but my gut is telling me go ahead and replace 'em. (edit...should i replace the passenger's side one first, if the smoke stops, proceed with confidence to do the driver's side one? or pull my pants up and do 'em both????) Edited April 17 by peejay Link to comment Share on other sites More sharing options...
adamzan Posted April 17 Share Posted April 17 Stick your finger on the edge of the valve cover just above the exhaust manifolds. If you feel oil or oily residue then you have your answer. also they are 30 year old trucks now, so if they aren't leaking I'd be surprised. 1 Link to comment Share on other sites More sharing options...
level9 Posted April 17 Share Posted April 17 You can put UV dye in the oil, drive it for a bit then check with a blacklight if you must know definitively. If the gasket is bad and you are planning on keeping the car a good long while, you may as well replace both gaskets; however you'd probably want to go ahead and refresh the coolant, vacuum hoses and intake gaskets while you have the intake off if you have not done so already. Probably do the fuel pressure regulator as well. Link to comment Share on other sites More sharing options...
Strato_54 Posted April 18 Share Posted April 18 6 hours ago, adamzan said: Stick your finger on the edge of the valve cover just above the exhaust manifolds. If you feel oil or oily residue then you have your answer. also they are 30 year old trucks now, so if they aren't leaking I'd be surprised. Probably the best method, it will likely go towards the backside of the engine at the bottom corner of the head. Both sides on mine were pouring before the fix. Link to comment Share on other sites More sharing options...
Slartibartfast Posted April 18 Share Posted April 18 Mine were hard and brittle when I took the covers off, and that was mid '10s IIRC. If yours are original, then yeah, I'll bet they're dribbling like an excited puppy. Link to comment Share on other sites More sharing options...
peejay Posted April 19 Author Share Posted April 19 Sorry it's taken me awhile to get back, thanks for the tips! I did (i think) run my finger along the edge/use a mirror and flashlight to try and see what is mostly likely seepage. (I have a UV light...somewhere...tried it to find a similar leak on my frontier, but never saw the "bright green spots", so gave up on it, plus I'm too lazy to look for it again!) I think I'm gonna replace the passenger's side first, see if my approach works before tackling the driver's side. Are these "bulging areas" of any concern? Should the NEW gasket conform and fill in any gaps? (I did replace these MANY moons ago, and the last time I drove this thing 3+ years ago, I don't recall them leaking (it's smoking BAD now), but it has been sitting for 3 years!) 1 Link to comment Share on other sites More sharing options...
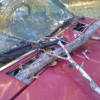
Slartibartfast Posted April 20 Share Posted April 20 Looks like it's just squished a little by those tabs. The top picture looks like the gasket's got a clean/flat spot all through those areas, suggesting that it was making good enough contact with the head. And yeah, IIRC the gaskets I used were pretty soft anyway. Is the gasket cracked in the first pic, near the PCV nipple? Otherwise, it doesn't look that bad. Link to comment Share on other sites More sharing options...
peejay Posted April 20 Author Share Posted April 20 Good eye, slart! Yep, there are slight cracks at various spots along the gasket, normally I wouldn't've thought twice about 'em, but after watching stevexnyc's vids on the subject, it made me go along and actually look for breaks and areas of possible leakage. It looks like I did a crappy job of evenly distributing what I'm guessing is RTV to help hold the gasket in place, this time around I'm gonna clean everything real good and see if the gasket will stay in place without RTV. Ordered some M6x25mm Allen/hex head screws to ditch the Phillips head ones, so got plenty of time to get things in order while I wait for those to arrive. Link to comment Share on other sites More sharing options...
level9 Posted April 20 Share Posted April 20 Be careful and note torque settings in the FSM - it's very low. There's a reason they were simply Philips heads (cams out when too much torque applied). Overtightening can produce leaks. When I did mine I actually attached a Philips bit head to a torque wrench. Not the kind of job you want to do over - especially the driver side. Link to comment Share on other sites More sharing options...
peejay Posted April 20 Author Share Posted April 20 2 hours ago, level9 said: Be careful and note torque settings in the FSM - it's very low. There's a reason they were simply Philips heads (cams out when too much torque applied). Overtightening can produce leaks. When I did mine I actually attached a Philips bit head to a torque wrench. Not the kind of job you want to do over - especially the driver side. Great points! I actually bought a 1/4-inch #3 bit socket just for the task, and yeah, the "bolts" were pretty "loose". I'm just not a fan of screwheads (replaced the injector retainer screws with hex heads). I'll make sure everything has been cleaned thoroughly, go slow, and use a torque wrench. Link to comment Share on other sites More sharing options...
Frenchy Posted April 21 Share Posted April 21 As much as I will agree with not tightening the bolts too much, I prefer to have Allen bolts with the right size spacer. It makes it much easier to tighten to spec and when done with a basic Allen wrench you can do it by hand with no issues. I did that on a VG33E recently and I feel the results were great. Link to comment Share on other sites More sharing options...
Slartibartfast Posted April 21 Share Posted April 21 I hadn't thought about it, but yeah, makes sense they used the Phillips (probably JIS actually) screw heads to prevent overtightening/warping the valve cover. Link to comment Share on other sites More sharing options...
peejay Posted April 21 Author Share Posted April 21 (edited) 14 hours ago, Slartibartfast said: I hadn't thought about it, but yeah, makes sense they used the Phillips (probably JIS actually) screw heads to prevent overtightening/warping the valve cover. Aw, Slart, why'd ya hafta open up the JIS can of worms??? That came up in another discussion, the member there said "usually" there is a dimple on the screwhead indicating it's JIS, I didn't see one, but at any rate, the #3 phillips "seems" to be an ok fit...for now! "One more" question about this, the aftermarket (Fel-Pro) "Washer Assembly" is of a smaller diameter than the OEM "Washer Assembly", and therefore does not entirely fill the OEM "Tray-Rocker Cover" (what I am calling a "cup washer"). Is that cause for concern? (A reviewer of the aftermarket gasket set stated that they did not use the "Tray-Rocker Cover" when using the aftermarket "Washer Assembly", and I don't feel confident in doing that). I would like to find a "cup washer" that fits the aftermarket "Washer Assembly", but probably doesn't exist, and I should probably not worry about it and reuse the OEM "Tray-Rocker Cover", right? Or do you all only use OEM gaskets? At $9 a pop for the "Washer Assembly", methinks no for me! (Edit: Or, why not place a washer (the same size diameter as the new "Washer Assembly") underneath the new "Washer Assembly", if even that is "required"? What is the "advantage" of the OEM cup-style washer?) (Edit #2: Seems like from other discussions (jeeps), that "Tray-Rocker Cover" is to limit torque, maybe the "cup" portion of it (as opposed to a flat washer) is just to speed up alignment on the assembly line/keep the "Washer Assembly" from moving around...I've emailed Fel-Pro to see what they recommend.) Edited April 21 by peejay Link to comment Share on other sites More sharing options...
Slartibartfast Posted April 21 Share Posted April 21 It wasn't my idea to make three flavors of cross-head that look identical but aren't! Given they're not seized and the torque spec is low, standard Phillips should do just fine regardless. I'm sure that's what I used when I did mine. I'd expect that rubber to squish out a bit when you tighten the screw. Even if it doesn't fill the cup entirely, the cup should still be spreading the load about the same. Link to comment Share on other sites More sharing options...
peejay Posted April 21 Author Share Posted April 21 Touché! The JIS thing never even crossed my mind until after removal, like you said, not seized and low torque spec. In hindsight, I'm willing to bet those injector cap screws ARE JIS, they were torqued down, and I wallowed out many of 'em on removal. Will report back with what Fel-Pro says, but leaning towards aftermarket cushion + cup and roll with it, valve covers shouldn't need to come off again unless I decide to change the timing belt, discussion for another day! Link to comment Share on other sites More sharing options...
Slartibartfast Posted April 22 Share Posted April 22 You shouldn't need to pull the covers to do the belt, unless you're doing a cam swap or something. The timing's all outboard. Link to comment Share on other sites More sharing options...
peejay Posted April 22 Author Share Posted April 22 1 hour ago, Slartibartfast said: You shouldn't need to pull the covers to do the belt, unless you're doing a cam swap or something. The timing's all outboard. Excellent! Link to comment Share on other sites More sharing options...
adamzan Posted April 24 Share Posted April 24 I had to redo it on mine because I over tightened and ruined the gasket. It still leaked so an old friend said to just put a light coat of RTV on the gasket, I know you're not supposed to but it doesn't friggin leak anymore. Link to comment Share on other sites More sharing options...
peejay Posted April 24 Author Share Posted April 24 4 hours ago, adamzan said: I had to redo it on mine because I over tightened and ruined the gasket. It still leaked so an old friend said to just put a light coat of RTV on the gasket, I know you're not supposed to but it doesn't friggin leak anymore. I'm going through the hassle of removing the RTV (that I put on previously) right now, won't be doing that again! Link to comment Share on other sites More sharing options...
peejay Posted Saturday at 06:30 PM Author Share Posted Saturday at 06:30 PM (edited) Alright, just about ready to go back on with the gasket, but which side goes toward the cylinder head, flat side or "round" side? Here's a pic the first time I did it, looks like I had the round side toward the cylinder head, but now I'm questioning myself...thanks! (Update) It appears there is only one way the gasket(s) can go on, round side down (toward the cylinder head), who knew! (Y'all did!) Edited Monday at 06:08 PM by peejay Link to comment Share on other sites More sharing options...
peejay Posted Monday at 11:29 PM Author Share Posted Monday at 11:29 PM Well, got the passenger's side valve cover installed, thanks for all you all's help! Ran out of time, so I'll hafta test it tomorrow, if all is well, I'll move on to the driver's side. Special thanks to slart, whom I "questioned", about the grommets expanding to fill the cup washers. How did you all know that they do expand, and I didn't? Well, admittedly, the first time I replaced the gaskets, I did not replace the grommets--I didn't even know they were a replaceable thing! Live and learn! (Oh, I recommend giving the good folks at belmetric a holler for your fastener needs, their customer service was top notch in helping me find the hardware I wanted!) 1 Link to comment Share on other sites More sharing options...
Recommended Posts
Create an account or sign in to comment
You need to be a member in order to leave a comment
Create an account
Sign up for a new account in our community. It's easy!
Register a new accountSign in
Already have an account? Sign in here.
Sign In Now