Rick13 Posted April 25, 2011 Share Posted April 25, 2011 I took about 17 total photos of the install but when I was done and going to upload them I only found my last 2 = sucks. Sorry Andrew (Shift220). I ended up installing the following: *Jeep WJ 4" Lift Coil Springs, 190 lb/in, 16.25" FL, 8 Wraps (TeraFlex) *Ford F-250 ProComp ES9000 (929500) about 29.5" ext and 17.5" comp *WJ Perch Adapter, Bolt-on, Krypton Fab *SS Ext Rear Brake Line, Krypton Fab So I started by prepping all bolts/nuts with a nice dosing of WD-40 the night before and hit them again the next morning. I started the day off about noon by loosening the nuts on each shock (upper/lower mounts). Then I went to disconnect the brake line and found it siezed/rusted in place - took a tremendous amount of force while bracing the line to get it loose. Thunderbolt (David) showed up at my house about that time to watch me in frustration and give me some advice and a helping hand on the driver's side install. This is when I found my upper shock mount bolts had rusted to the metal bushings. That took a good 1 hour to release one side and only about 20 minutes on the other (longer than it should have though!!! Good thing David was there - he ended up being my chauffeur to 3 different stores to get random items needed (e.g. an even bigger BFH, new upper shock mount bolts/nuts...) to finish the install. So here we go with pictures after the install... Stupid rusted shock mount bolts/bushings!!! Here is a replacement bolt/nut and I reused the bushing (after a good cleaning). Pinched the mounts a little so there isn't any slippage/movement: Here is the perch adapter installed. I think of it more as a coil "locater". If I had actually measured the bolt and matched it to a larger drill bit, it would have taken all of about 5 minutes to install. Instead I drilled the hole out with a slightly smaller bit and it took a good 25 minutes to fully install. Even with the PHB unbolted I still had to place the adapter inside of the spring, put the spring in place, and THEN thread the washers/bolt/nut in the perch - a balancing act to say the least: Here it is all put together on the driver side: I'm still toying with the idea of reversing the shock orientation and I have planned on booting them up (just to keep junk out as much as possible). Here is a shot of the extended brake line. I actually admit it is a bit of a piece of art (it was actually pretty to look at Andrew, thanks!!!). It also helps that it is quite a bit longer than the stock one that I had stretched to capacity with my 1.5" of spacers on top of the 2" AC lift for the past 6 months!!! I'll try to get more parking lot pics (I've started to despise those) tomorrow at work, but please don't expect too much. I only got about 1.25" more than my spacers stacked on the 2" AC lift. I'm probably about 4.75" of total lift out back. So it has slight rake from back to front once again (I like that look), but compared to Thunderbolt's custom springs, I hardly have any rake at all. Link to comment Share on other sites More sharing options...
exit34rocker1017 Posted April 25, 2011 Share Posted April 25, 2011 Nice! Looking forward to the pics, I love your truck. Link to comment Share on other sites More sharing options...
new4x4r Posted April 25, 2011 Share Posted April 25, 2011 Is your truck level now? Link to comment Share on other sites More sharing options...
shift220 Posted April 25, 2011 Share Posted April 25, 2011 Looks good! The bolts for those adapters are 1/2" How do you like the ride with the springs? Those pics are good for what I'd like to do with them. Thanks! Link to comment Share on other sites More sharing options...
Rick13 Posted April 26, 2011 Author Share Posted April 26, 2011 So as far as being level, I took out the ole 3 ft level and placed it on my slider. It has a definite rake from back to front, but its only slight. I wanted a bit more so it wouldn't squat so much when I load it up for long camping/wheeling trips, but I'll take it for as little as I spent for the springs. I like the fact that I don't rely on spacers to get it close to level and now it's back to a slight rake and it's all coils now. The ride is absolutely fine - it's not too stiff and I think I'll enjoy the extra flex this summer. Sorry, work is pretty rough right now (I work long hours and most weekends these days), so I only got a couple photos... Link to comment Share on other sites More sharing options...
PaMountianbiker Posted April 26, 2011 Share Posted April 26, 2011 looks Good to me!!! Mine sits a hair lower in the rear doesn't bother me at all. Tons of flex from just coils. Love it Link to comment Share on other sites More sharing options...
XPLORx4 Posted April 26, 2011 Share Posted April 26, 2011 Looks nice! So is there a spring retainer also on the upper mount? Link to comment Share on other sites More sharing options...
Rick13 Posted April 26, 2011 Author Share Posted April 26, 2011 Thanks everyone, guess I'm just a little disappointed with my spring choice (other than price). Negatory on the retainer. The spring sits up with an isolator on top of each. Link to comment Share on other sites More sharing options...
PaMountianbiker Posted April 26, 2011 Share Posted April 26, 2011 (edited) Mine are the 5.5 WJ lift springs and they were cheap too. I think I might have cut a little more off the pig tail than I should have. But I guess second guessing won't get us any where Your rig looks awesome the way it is you should be proud!!! I personally LOVE the Blue I want to see some dirty pics of that beast!!!!! LOL Edited April 26, 2011 by PaMountianbiker Link to comment Share on other sites More sharing options...
Iceman2989 Posted May 27, 2011 Share Posted May 27, 2011 Just curious, would going with the HD coils up front (or AC), and then combining that with a set of 2-3 inch WJ lift coils even out? I would like to save any extra $$ I can, and since the WJ coils are cheaper, think it'd work? I've heard a bunch about people using the 5inch coils in the rear to accompany a SFD, so why wouldnt it work this way too? Also, I've heard over and over again about some 1" spacers for up front. I have no clue where to find them to buy them online! Help please! With the OME HDcoils up front and a spacer I'd be looking at almost 3 inches of lift, plus the 3ish inch WJ lift coils in the rear I think would level out pretty nicely. Just some thoughts I've had. Any insights will be appreciated Link to comment Share on other sites More sharing options...
MY1PATH Posted May 27, 2011 Share Posted May 27, 2011 I'm not seeing that spring adapter on their site. looks like making one would be pretty simple and net me 2 more inches of lift If I ever need to. 1" from new spring location and 1" from leaving the pigtail on the spring I used... Link to comment Share on other sites More sharing options...
Rick13 Posted July 20, 2011 Author Share Posted July 20, 2011 Just curious, would going with the HD coils up front (or AC), and then combining that with a set of 2-3 inch WJ lift coils even out? I would like to save any extra $$ I can, and since the WJ coils are cheaper, think it'd work? I've heard a bunch about people using the 5inch coils in the rear to accompany a SFD, so why wouldnt it work this way too? Also, I've heard over and over again about some 1" spacers for up front. I have no clue where to find them to buy them online! Help please! With the OME HDcoils up front and a spacer I'd be looking at almost 3 inches of lift, plus the 3ish inch WJ lift coils in the rear I think would level out pretty nicely. Just some thoughts I've had. Any insights will be appreciated Sorry, haven't spent much time here in a while... The strut spacers are from NX4 (unless someone else is making them). Yeah, the WJ are a bit cheaper (depending on the supplier/lift) than the AC coils. That might work well with a 2" coil and 1" spacer lift up front. But I'd remember that this much lift will put your CV's at an even more increased angle - may not be an issue, but always something I keep in mind. Link to comment Share on other sites More sharing options...
Rick13 Posted July 20, 2011 Author Share Posted July 20, 2011 I'm not seeing that spring adapter on their site. looks like making one would be pretty simple and net me 2 more inches of lift If I ever need to. 1" from new spring location and 1" from leaving the pigtail on the spring I used... Once again, sorry, haven't been reading posts lately... If you haven't found it yet, adapter is listed at the bottom of the SFD ordering page. Link to comment Share on other sites More sharing options...
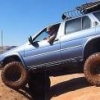
Rick13 Posted July 20, 2011 Author Share Posted July 20, 2011 So, I wanted a bit more lift/rake, so I ordered up a pair of 6.5" WJ rear lift coils from Iron Rocks Off Road. Josh at Iron Rocks was really good to deal with and their order processing/shipping went quickly (less than a week). I took an angle grinder to the upper pig tails and installed (even with coil compressor, removing the bumpstops and lower perch adapter, it took for freaking ever to get them situated). Overall, I really like how it looks. It rides a bit more stiff out back than the TeraFlex coils, but there was almost zero squatting when I loaded it with 250 lbs, and it flexes/compresses quite well on the trail. Some obligatory flex/compression photos: I am dire need of a PHB drop bracket now, but I'm working on that in August. Notice the KR Fab sticker Andrew? Link to comment Share on other sites More sharing options...
Wo0denSp0on Posted July 20, 2011 Share Posted July 20, 2011 Looks good Rick! I just started my SFD this past weekend and I have the front installed waiting on some OEM parts to finish up the front. (Just some much needed maintenance) And I plan to start on installing the WJ 6.5in Coils from IRO this evening but I can see I will definitely need extended brake lines. At least you told me what shock I need to match it up! Ill get some pics up of my build as soon as I get a chance. Took me longer to get started that planned since the Canada Post was on strike...dang canadians..(no offense Shift220) haha The Krypton parts fell into place nicely! Link to comment Share on other sites More sharing options...
DanAK Posted July 21, 2011 Share Posted July 21, 2011 Much better man!!! I am with you all the way, the back should be a little higher than the front. You look just about done the the SFD, whats next on the list? Mine is in the shop right now getting a skid plate made. Link to comment Share on other sites More sharing options...
Rick13 Posted July 21, 2011 Author Share Posted July 21, 2011 Much better man!!! I am with you all the way, the back should be a little higher than the front. You look just about done the the SFD, whats next on the list? Mine is in the shop right now getting a skid plate made. PHB drop bracket is next on my list. Steel has been purchased, just need to measure, cut, and have my friend help weld. After the drop bracket, front/mid skid combination is next on the list - can't tell you how close I've been to my transfer case the last few months... Please post up results of your skid (or PM if you don't want it public). I'm taking some measurements later this month and will be buying some steel soon afterward. Link to comment Share on other sites More sharing options...
PaMountianbiker Posted July 21, 2011 Share Posted July 21, 2011 watch those rear shocks now I get a little rubbing and the one on the passenger side has a little dent from the PHB all that flex has a price Link to comment Share on other sites More sharing options...
01silvapathy Posted July 23, 2011 Share Posted July 23, 2011 Yeah im surprised the driveshaft could take that much lift. Also since you dont have a panhard drop you may want to keep an eye on your tires, when I ran around without one for awhile since the axle was pulled towards the side it started to chew up the inside of my rear tires. Also caused bad tire scrub on my shocks....enough to bring me to a hault at slower speeds. Just some things to watch out for! Link to comment Share on other sites More sharing options...
Jay302 Posted September 27, 2014 Share Posted September 27, 2014 Could you put wj coil springs in the front maybe like a 5 inch one? Link to comment Share on other sites More sharing options...
ferrariowner123 Posted September 27, 2014 Share Posted September 27, 2014 I feel like I just woke up in a hospital and it's been 28 weeks since I can remember anything. There's a door saying, "don't open, dead inside" and behind the chained doors is this zombie thread. 1 Link to comment Share on other sites More sharing options...
01Pathmaker Posted September 27, 2014 Share Posted September 27, 2014 Hahahaha! Only 2 more weeks til the new season starts! Woohoo! No Jay, 2" is the max lift spring compatible with the struts of an r50. Link to comment Share on other sites More sharing options...
Recommended Posts
Create an account or sign in to comment
You need to be a member in order to leave a comment
Create an account
Sign up for a new account in our community. It's easy!
Register a new accountSign in
Already have an account? Sign in here.
Sign In Now