- Sign In Changes: You now need to sign in using the email address associated with your account, combined with your current password. Using your display name and password is no longer supported.
- If you are currently trying to register, are not receiving the validation email, and are using an Outlook, Hotmail or Yahoo domain email address, please change your email address to something other than those (or temporary email providers). These domains are known to have problems delivering emails from the community.


Bax03SE
-
Posts
376 -
Joined
-
Last visited
-
Days Won
36
Content Type
Profiles
Forums
Calendar
Everything posted by Bax03SE
-
Yeah, the car was still locked and it doesnt look like they even made any attempt to actually get inside it and look around. Just broke the window, reached in to grab the bag, then done. I keep logging on to Microsoft to see if it looks like the computer has been powered on but it hasnt. It is offline and the last known location is when I was using it at work earlier in the day.
-
I was at a fund raiser for work last night (raising money for one of our employees with cancer), and came out to find this when heading home. The only damage is the window, and they made off with my briefcase with my laptop in it. I’m kicking myself for leaving it inside, but I was in a hurry and didn’t even think about it. My insurance deductible is $1000, so no point in even going that route. Luckily I have a great boss who offered to reimburse me since I was there for a work event, but it still really sucks! I found a used window at a local salvage yard today and took care of that for $100 bucks so that wasn’t too bad. It took forever to get the glass vacuumed up though, and I’m sure I’ll still be finding random chunks forever. I was pretty proud of myself on the window job, 45 minutes start to finish (not counting glass clean up time). Sent from my iPhone using Tapatalk
-
Has anyone tried one of the manufactured cold air intakes?
Bax03SE replied to colinnwn's topic in 96-2004 R50 Pathfinders
To answer your original question btw, any aftermarket intake like that will give you some increased intake noise (which likely sounds really good on the 3.5), but you wont notice any measurable difference in performance or mpg. I havent run an intake specifically on the pathfinder, but Ive tried many different intake types on a lot of different cars and the result is always the same. The only time Ive seen an intake actually result in real power increase is on turbo cars, but thats because the turbo is able to make better use of the increased air flow. -
Has anyone tried one of the manufactured cold air intakes?
Bax03SE replied to colinnwn's topic in 96-2004 R50 Pathfinders
In that case youd need a 45 degree coupler to replace the upper portion as well. A quick search on siliconeintakes.com showed you can get a 45 degree coupler, 1 foot of aluminum pipe, and a straight coupler for the MAF end all for about $33. You need 2.5 inch diameter for all of it. There is an egr fitting in the upper end by the throttle body so youd need to make a small hole in the 45 elbow to accommodate that fitting. You can get fittings like that at any auto parts store if you look in the custom air intake section. Overall youd have a solid repair for under $50. Thats my suggestion anyway if youre looking for the best repair for the least expense. -
Yeah I fully expect to do some trimming on the rear, just not sure exactly how much until I get the wheels in place. Ill keep it updated with the progress and solution. My flex is limited a bit though because I have airbags in the rear coils for towing, but they also act as bump stops, so it wont flex and tuck as much as one without the air bags.
-
Has anyone tried one of the manufactured cold air intakes?
Bax03SE replied to colinnwn's topic in 96-2004 R50 Pathfinders
Where is it cracked? Mine had some cracks along the corrugated part of the duct but the upper end by the throttle body was still solid. I cut off the cracked portion and replaced it with a section of straight intake pipe and a coupler at the MAF end. See the pic below. The stock piece has some resonators/silencers attached but you can go without those. Sent from my iPhone using Tapatalk -
You shouldnt need to trim too much, but yes you will need to trim to run that wide of a spacer. You can unscrew the bottom of the wheel well liner from the bumper, then push it forward a couple inches and re-secure it with new screws through the bottom of the bumper. With that done just turn the wheel back and forth and look at where it is hitting and just trim a little at a time until youre happy with the clearance. The plastic bumper is easy to trim with a good pair of shears or a utility knife.
-
And one quick pic of the overall truck to see what I’m starting with. Sent from my iPhone using Tapatalk
-
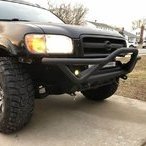
Here’s a few more pics of the drivers side to show where I’m at so far for clearance. Again, this is still with 31’s in place, so I may still need to make a few more adjustments. Ups dropped off the new wheels/tires last night so I’m just waiting to get some time this weekend to mount them up. Also a pic of the light bar I threw in the front in between trimming yesterday. Sent from my iPhone using Tapatalk
-
?? Thanks but I didn’t ask any questions. I’m just trying to help by documenting what I’m doing because a lot of the older threads don’t have working pictures anymore. Plus I’m trying to keep it clean looking. I’ve seen the thread you linked, but if you watch his video it looks like he trimmed his truck blindfolded with a weedwacker, lol, so I’m trying to show how it can be done without looking so hacked up. Sent from my iPhone using Tapatalk
-
Stupid thread title! It looks fine on tapatalk, but added funky symbols on web version. Oh well, you all get the point I’m sure. Sent from my iPhone using Tapatalk
-
For the front of the tire, I pushed the fender liner way forward and secured it with new screws from the bottom of the bumper. I then cut the bottom of the bumper to match the new line of the fender liner. So far the trimming was done with my 31’s still in place, so we’ll see if I need to go any further but it should be a good start. For the rear I’m just concerned with it tucking under full flex. The rear flares have a pretty good size lip that can come off to free up some space, so I expect to at least do that. I’ll wait to see how it lines up with the tires mounted and go from there. Sent from my iPhone using Tapatalk
-
Here’s where I got with trimming in the front. Behind the tire I took off the mudflaps, and a small corner off the bottom of the fender. You can see the cut marked with tape here. With that cut out I was able to pull the fender liner tight against the new edge of the metal, and secured it from the bottom with a self tapping screw. Obviously hit all bare metal with some black spray paint as well. This let me move the whole corner back about 1.5-2 inches while still retaining the fender liner. Sent from my iPhone using Tapatalk
-
Sent from my iPhone using Tapatalk
-
So last year I put in the lift and went to 31’s, and of course have been regretting not going larger ever since! So I’m in the process of getting 33’s (285/75/16 which is approx 33x11.5) to fit. It’s lifted on aluminum spacers, 2.5 inch in back and 2 inch in front, with stock replacement oem springs and struts. I would have used fleurys spacers, but I wasn’t on here much at the time and didn’t even know they existed when I bought my spacers. I’ll get back to it on Saturday, but figured I’d share the progress so far. My goal is for these to fit without any running even on full lock, and not to have things look all hacked up in the process. Here are the rims/tires. I wanted something different than the usual steel wheels, so I picked up these American outlaw alloys in 16x8 with 5” backspacing. I already have 1.5” spacers on the truck so that will give me a final bs of 3.5 to clear the strut. Tires are Kumho road venture MT’s. Sent from my iPhone using Tapatalk
-
Not to hijack the original thread, but that combo would require at least a little trimming even with a lift, and idk if it would work without a lift even with a lot of trimming. The biggest issue is the wheel adapters you’d need to make those 5 lug wheels fit. You can get 6 lug to 5 lug adapters, but they’re all at least 2 inches thick. With 2 inch spacers, 32 inch tires, and no lift there will be a lot of contact at the front and back of the wheel well when turning. Those tires won’t fit with your stock wheels either though because at a little over 32” they will hit your strut. Generally, anything over 31” tall will require either a spacer or a wheel with at least 3.75” backspacing to clear the strut. 245/70/17 would give you another inch over stock tires, and would fit on stock rims/stock height with little to no trimming. Sent from my iPhone using Tapatalk
-
I got mine from eBay seller carpartswholesale. Paid about $55 for the pair and the quality is great, no complaints so far.
-
Close up of hub with spacer Sent from my iPhone using Tapatalk
-
I’m running 1.5 inch spacers. In my case I needed them to clear the mile marker manual hubs because the little lip at the edge of the hub that the cap clips onto was blocking the rim from fitting over the manual hubs. This is only an issue with this particular rim style as far as I know, but it’s another reason to consider spacers depending on your wheel set up. I like how the hub sits flush just inside the hub bore this way. Sent from my iPhone using Tapatalk
-
Well, you learn something new every day! Ive had my 03 for three years and just heard about the window roll down thing in this thread. Tried it out and it does in fact work!
-
Thanks, I’m running airlift 1000 helper bags in the rear coils. I’ve had them a couple months now and I love them. I also carry a small air compressor on board, so it’s really easy to add/remove air as needed depending on the load. I hauled about 1000 pounds of mulch and landscaping bricks in the back of the Pathy last month and was still able to get it nice and level. Sent from my iPhone using Tapatalk
-
Picked up my new trailer the other day. Very happy with how the Pathy handled it. Sent from my iPhone using Tapatalk
-
Looks like you can get a lower quarter section with dog leg pretty reasonably at least. A good body shop can cut and splice that section in pretty easily, but you’ll want to get on it before it gets much worse. Sent from my iPhone using Tapatalk
-
Yeah, seeing the Instagram I agree its beyond patching with a little fiberglass. Still fixable for sure, but to do it right you need to cut and weld in replacement panels like you said.
-
Where is the rust exactly? In the door opening or is it coming out from under the flares? Mine had rust under both rear flares, but luckily it hadnt spread to be visible beyond the flare when I caught it. Since its hidden behind the flares, I just cut out the rusted areas and rebuilt it with fiberglass, then coated everything under the flares with bedliner. I pulled the flares off to check it a year after and it still looked good. Depending on how bad your rust is, fiberglass patching may be something to consider instead of welding. Just a thought.
