- Sign In Changes: You now need to sign in using the email address associated with your account, combined with your current password. Using your display name and password is no longer supported.
- If you are currently trying to register, are not receiving the validation email, and are using an Outlook, Hotmail or Yahoo domain email address, please change your email address to something other than those (or temporary email providers). These domains are known to have problems delivering emails from the community.

CDN_S4
-
Posts
1,562 -
Joined
-
Last visited
-
Days Won
78
Content Type
Profiles
Forums
Calendar
Everything posted by CDN_S4
-
JY?! Are you still talking about the OEM Nissan console? Mine is just an XE so base model. But I found it was wired for most options, even heated seats and fog lights. Also has the temp sensor. Retrofit for an SE or LE console is detailed in a DIY but it entails modifying pins inside connectors and other things that make me cringe. But if I find a good one on a junk yard I'll be grabbing it. Sounds like a good winter DIY.
-
You know it! Next is the rear to get raised higher. Also on the list are rock sliders, something like these hopefully: I've been thinking about hood louvers too for a while to help the air intake a bit with the high temperatures. I plan on swapping the overhead console to a display one. But the install seems pretty tricky. Not a modification but some rust spots need to be addressed. Along with a fresh undercoat. Then a rear bumper with carrier is likely also going to be in the future. But for now I'll just modify my rear hitch carrier. Might swap my blue interior dash LEDs for amber ones, not sure yet. I think Amber is a bit more grown up lol. These are just the things floating around in my head right now.
-
They were on the proper sides, just upside down. Causing the strut to be pushed out instead of in.
-
At this point, I'd like to give a big thank you to Hawaiirish, you have been super helpful throughout this process both on and offline. Kudos and thanks man. I really appreciate it. And I also really appreciate everyone's input and help with with this. It started to feel like a community effort. I definitely wasn't alone in this, so here's a cheers to all of you!
-
Woooohooo!!! Success at last! All done. I even adjusted the camber bolt on the driver side too much that I now have negative camber!! So it's all within proper specs now. What a relief!
-
You make a very good point. I guess the deciding factor is in how you use your vehicle for the majority of the time. Or better even, have a telescopic control arm that can be moved into 2 or 3 positions and locked in place depending on requirements.
-
hahahaha OMG I can't believe I was hung up on the thought that the whole bolt had to come out. My god, it's so simple it's stupid. Thanks for giving my head a shake lol, it's been a crazy long day.
-
If someone has an ingenious solution to getting these top bolts out, that would make my life a million times easier as it would allow me to keep the strut fully assembled. Otherwise I'm gonna have to take it apart and get into the whole spring compressing business again lol
-
Yeah I'll have to augment with ratchet traps as well as its one of the scariest things when they let go. Mine wasn't nearly as bad as Rebellord's but a scare nonetheless.
-
Yes, one of my compressors broke. It went flying away from me and I jumped off my chair lol. It was definitely scary. So I bought a new set of compressors that actually lock onto the coil instead of just claw it. Luckily the other side held up and kept the spring from exploding entirely. Also it was on the strut so the coil itself wasn't gonna go flying. I'll take a pic of it tonight
-
That's too bad. Maybe I'll have to have my own extension bracket built after all. We'll see, it doesn't really seem necessary to extend them but it would look better if the rear wheel was actually cantered in the middle
-
Fleury has longer trailing arms?!? I've been thinking about having my guy fab an extension for them. He said chances are I could find longer ones from another vehicle if I looked hard enough. But if Fleury has some, then heck yes! Thanks
-
Yeah that's what I did, but in order to get the spacer to the strut mount you need to have the strut mount removed from the strut assembly in order to get the bolts in due to the lip that houses the top of the coil. I can't see how I could get this done without a compressor. Also I booked my guy again for Saturday. Plan was for him to fix the strut mounts but since I've already done this (50% at least) we'll do the rear. He will fab up a panhard drop bracket for me as well as cool adapters. I will throw in my air bags and then hopefully be done with this suspension FOREVER!!!
-
Just to get the whole assembly out. And when I did the driver side I actually took off the strut mount. Seemed easier at the time but probably wasn't lol. But compressed struts will go on a whole lot easier than fully extended HD coils. Makes life easier.
-
I'm not so sure about that as it was uneven before the SFD too. But I'm hoping you're right. Maybe just messing around with it all in there will help. I'll need to get a new spring compressor tomorrow as I broke one of the 2 that I was using. Scary stuff!
-
Some progress at last. I took the spacers out and turns out there were indeed upside down. Now I haven't re-assembled everything yet but I'm fairly confident this is what was wrong with them.
-
Kyle, it's not that it's hitting anything it's just not allowing the strut to sit inwards enough for the wheels not to be toed in. Krypton said they were on wrong. But they look exactly like in the pics. But if hawairish's above is correct then that means the angle is supposed point in towards the body, not away from it. Then the strut holes would probably sit directly parallel underneath the holes of the body. Right now they are offset to the side but point at the holes if you were to draw a straight line from an angle. It's really hard to describe. As I'm writing this I realize how much it sucks. Lol But I think the answer is to swap sides make the angle point the other way.
-
If THATS how it's supposed to sit then it's wrong on mine. As mine is like the first pic on the passenger side. They point out. By what I gather from your second pic it should in fact point in to make it straight.
-
That would be one option. The brackets do seem to be parallel. My guy said he will try to refab the spacers to change the angle on them and push the struts closer to the body. I already ordered the WJ coils for the rear. They will go in next weekend. I think the strut spacers should be straight not on an 80• angle. Just like stacking 2x2" spacers together. But what I'm puzzled by is that these angled spacers seem to work for everyone else. I'm pretty sure I'm on not the only one using lift coils in combination with this kit.
-
I don't understand why you have 4 pins there?!
-
When I line my eye up with the bolt holes as if it were the aights of a gun, all 3 holes align. So they are where they should be. I just don't get it. Even with camber bolts it doesn't angle in enough to straighten the wheel out. I'm at a point where I might have to fabricate custom strut brackets that allow a greater range of movement or simply have the bottom hole further out.
-
No situation no change. I stare at them and they seem to be right but must be wrong lol. I tried rotating them but no luck. There is only one way they go on. Distances between screws are not equal. I'm stumped
-
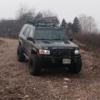
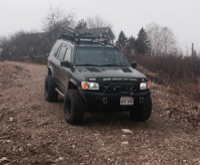
Bushnut are your spacers bolt on or just rings to slide over the studs? Talking of which, does anyone know of hub centric spacers for the R50? My concern with bolt ons is that my extended lugs in the front will protrude beyond the spacer thickness and make it impossible for the wheel to sit flush. I'm not looking for crazy thick just something hub centric to alleviate any vibration issues that may contribute from lug centric wheels. To address some of your concerns. IMO 31's are fine on a 2" lift. 2" really isn't a lot on stock springs. Realistically you get more like 1.75 out of it as it will compress the spring more. Here is a picture or mine with the same 2" lift and 31's 32x11.5 is a nice size, but not drastically different from 31's. I've moved up to 33's but that required a lot of trimming of the fenders before I got the SFD. Tires are expensive so my recommendation would be to wait and save up until you have enough money for rims. Then buy the right size tire on a wider, more offset rim. The look will be a lot better than stock rims. Doing things right the first time around saves money in the end. As for DIY, this is a good vehicle to learn on. Replacement parts aren't too expensive and the junk yards usually have multiple r50's for cheap parts too. Start with the simple stuff to build confidence. Change all your fluids. It will make you feel good lol. Go from there.
-
Thanks motorist! Well it should stay interesting for a little while as I still have lots of big plans
-
Haha I love the fender flares and front bumper on that one. And of course the spare tire carrier. Why oh why Nissan did you ever stop using that!? But those window visors are not my style. I like mine a lot better.