

hawairish
-
Posts
2,684 -
Joined
-
Last visited
-
Days Won
318
Content Type
Profiles
Forums
Calendar
Posts posted by hawairish
-
-
Silly rabbit, frames are for WD21s. (We don't have them on the R50.
 )
)Like Harbinger said, best crawl around and look. My opinion is that if it doesn't look like even the body should be supported on the frame, chances are the body lift won't be any better. But, if you look around each perch, you'll quickly tell the condition.
-
A little update on this...
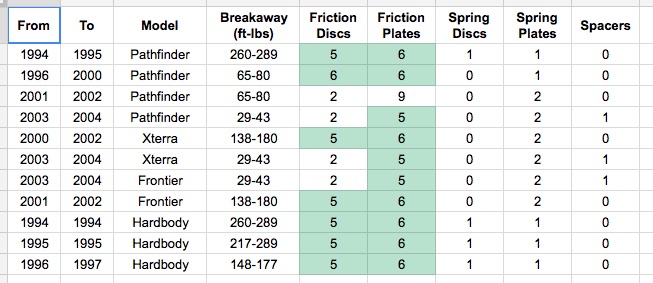
I opted to get a set of the thicker friction plates, and two more normal discs. The spring plate idea was a no-go due to parts availability. Each LSD is ending up with 6 new pieces. After assembling one of them the other week, I got somewhere over 300 ft-lbs, exceeding what I could measure. That basically means I tripled the break-away by adding only .1mm to each stack, despite adding .3mm previously and seeing only about double at that point.

But that didn't seem right, so I broke it back down and swapped in some thinner (and unworn) plates to bring it back down that .1mm...and it went back to around 100 ft-lbs.
Thinking that maybe the first build was a fluke, rebuilt it to that setup. Same thing, except I bent my torque extender, again somewhere over 300 ft-lbs. Thinking maybe it was just that one LSD, I broke down both again, swapped around parts, rebuilt it. Rebuilt my torque extender...bent it again.
The extender isn't much more than a 1/4" thick--yet apparently not thick enough!--steel bar with two holes to fit over the wheel studs, and another wheel stud located further up the bar with a lug nut tightly on it so I can put the torque wrench on it. I need to get some angle iron or channel iron instead of a flat bar.
Supposing I build a better extender and still hit the 300-mark, I may just replace a disc with a plate...that keeps the same thickness but removes 20% of the friction surface.
Also, here is a chart I compiled before I began working on things:
-
I really like the grey and black 2-tone.

Agreed!
-
No problem, glad you got it sorted. Sorry I couldn't reply in between your latter questions, but to answer them for future knowledge:
Yellow is the 12V constant...power is always supplied to the radio to keep radio settings, channels, etc. The radio won't turn on, but uses a tiny amount of power. If your radio settings are lost after you power of the truck, then you don't have a constant 12V wired to it.
Red is the ACC 12V...when the ignition switch is turned to the ACC or ON positions, 12V is sent to the radio. The radio will only turn on when power exists on this wire. The cigarette lighter is probably also on an ACC/ON circuit...again, probably the same circuit as the radio...meaning it also doesn't have power unless the key is turned to ACC or ON. The 5A is the max current draw the line accepts, but not really relevant to discussions here.
The FUSE part is because both the yellow and red wires appear to have in-line fuses, according to the picture. If you gently pry open those black plastic things, there should be a 5A fuse in them. Unlike the ATC/mATC fuses you normally see in vehicles, these are small glass tubes with a thin wire inside and metal end caps. Like any other fuse, any amperage over the rating will cause the wire to burn and open the circuit (to prevent destroying other radio components).
Class dismissed!
-
That's funny, though the stripes on the purple, green, white, and grey wires are just for polarity of the speakers. The speakers will still work fine if those are swapped, but it's not optimal.
In the OP's case, if the Pioneer harness does in fact fit the SSL radio, it puts 12V into the speaker outputs on the radio...an easy not-good. The reason his USB lights up briefly and the pop is probably because the power socket and radio are on the same circuit and the radio is "absorbing" (for lack of a better term) the short through the radio audio output circuitry.
-
From my own experience with installing a new stereo, the original had a proper 'cage' slot which needed to be screwed onto the new one so it would fit properly. The wiring connector wouldn't fit the new one. Lucky the p.o. had fitted screw down type connectors..on each wire. So it was a matter of unscrew wire, put in new wire. 15 minutes later all the original wires were connected to the new adapter. The worse part about the whole thing was the p.o. wrapped everything in like 3 metres of electrical tape and everything was sticky. I really hate electrical tape!
Also a handy tip, the red wire was left blank not inserted into anything because it runs off the battery so everytime you turn the key, the stereo will not automatically turn on. Some people like it that way but I don't want the stereo on auto. Be careful though because not all our Pathys are the same electrical wise but mine was yellow to battery, black to ground and red wire just leave hanging with some tape on the end.
That sounds like a weird setup. I'm not sure I've seen a radio (I've installed maybe 2 dozen of them over the past 15 years) that will even turn on without power to both yellow and red leads, though if anything, the red would have to be connected and you'd just lose your memory settings each time the radio turned off. But not sure that would stop it from turning on automatically.

But if what I'm seeing on the harnesses is correct as far as colors go for the OP, the wires are crossed. But he shouldn't be having any problems if he puts the original radio back in, unless I'm missing some puzzle piece (like an amp in the mix).
-
Cool, that helps significantly.
So, yes, it appears that the DEH245 and SDC26B harnesses are very similar (pics below). I can understand why you might think they'd be compatible. It seems clear to me the popping noise...the power and speaker leads are in different pin positions. Hopefully there's not additional damage to new radio. There should be no problems with the old radio, unless you've damaged the plug in some way and created a short (note that the plug has both square and semi-round "tubes" around each wire...this to prevent mismatching harnesses). But seems like it was a perfect fit?
Anyway, if the harness does indeed fit, the easiest fix is to re-arrange the wires on the truck's harness to match what the new radio expects. They are color coded. Looks like you'd need to remove all the pins. It's pretty simple...you can usually do it with a push-pin or needle and a little patience. There's a little barb on the metal piece that's crimped on the wire and inserted into the harness. You use the push-pin to depress the barb and then you can slide the wire out and re-arrange them.
Otherwise, you'll need to cut off the old harness on the truck and can then match up the colors to the new harness.
If you follow that Pioneer harness back, is it spliced into other wires or do you still have another harness or two?
DEH245:
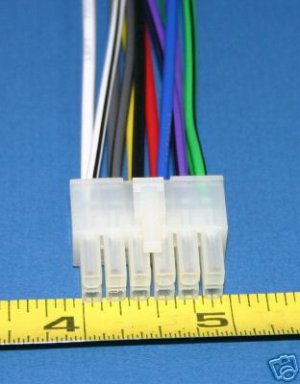
SDC26B:

-
I'd stop plugging things in until you've tracked the problem. Otherwise you'll worsen things, break something else, or start a fire because of an electrical short.

Though, if you can repeat the noise with both radios, I'm less inclined to think it's a fuse.
It'd help a lot to know what stereo you've got, let alone some pictures for reference of the harnesses, wiring, and radio. Maybe even more details about the truck. I don't think we're getting the full picture.
Has the factory wiring been altered?
Do you have any other stereo equipment?
Any other electrical "mods"?
Factory or aftermarket?
Is the original radio OE (doubtful)?
What prompted the radio change?
Was it working before?
What position is the ignition switch in when you're testing?
-
Neither of the stereos are getting power. All I did was pull out the old, looked at the plastic plug and saw that it could fit into the new stereo, so I plugged it in, heard it through the speakers, and my cigarette lighter usb charger lit up (though my keys were out of the ignition).
Idk what wiring adapters are, and I do have a voltmeter, could you send me a link with a good description on what to test for in this scenario?
Unless your "new" radio is from another Nissan before say, 2004, then assuming the plastic plug was probably a really bad assumption. What radio did you get?
I'm guessing that what you heard through the speakers was some noise (i.e., not music), and that the cigarette lighter USB charger lit up only briefly? Again, need more details here.
If plugging the stock radio back in produces nothing, it's almost certainly a fuse. Try checking any fuse labelled interior, radio...I don't have a 92, so I can only guess at this point what fuses exist, and where they are.
Wiring adapters are cheap harnesses that allow you to connect aftermarket radios to the OE wiring harnesses (i.e., the part that plugs into the back of your stock radio) without having to cut/splice anything on the truck. You connect the radio's wiring harness to the wiring adapter, then you plug the wiring adapter to the factory harness. It's all color coded. It would've saved you a ton of headache probably.
If you have a voltmeter, and know how to use it, then a good description shouldn't be necessary...but, basically, set your volt meter to a DC rating to the lowest setting above 12V. Put the red probe on the truck's wire that you suspect should be giving you 12V under a specific condition (i.e., ignition OFF vs ignition ACC/ON). Put the black probe on some exposed (unpainted) metal on the truck. The voltmeter should read around 12V-14V.
-
Some radios have a fuse on the back of them, might want to check there.
What else can you tell us about what might have happen? Are you using wiring adapters? Do you have a voltmeter handy to test power leads?
-
Best bet is to use a Factory Service Manual...they're all posted at NICO...check this link. Then, you can just reference the section and page number if you can't get pics posted (do check out the New Members forum for more info.)
But, the link you're most likely talking about is the shift linkage on the transfer case, located behind cross member the transmission is mounted to, between the transfer case and front driveshaft u-joint. It connects the 4wd shifter to the t-case. I'm assuming you've got a 4wd.
Crawling under my truck, it appears to fit your description. My link is not wobbly at all FWIW.
-
Well, let's table the money discussion for a moment. I have some other questions for you just to be sure we're on the same page, because my kit won't be like KrF in the sense that it doesn't include any means of lifting (like strut spacers).
What's your current lift setup?
-
-
Gotcha. I like the ladder as well...I especially love the Gobi racks. I was planning to get one for the Jeep a few years ago, and it included the ladder. I'd expect the X hatch to be a few inches longer.
Though honestly, those tire steps seem far more practical and economical, and most of the ones I've seen collapse flat-ish. I think there's more need to the sides of the roof rack than there is the rear.
-
If the valve covers leak, you fail state inspection?
Or you failed because the CEL was lit up?
You'd think with the OP's city name of Oil City, they'd cherish a good oil leak. But it would be odd to fail an inspection because of it. In AZ, you fail automatically if the CEL is lit.
-
 1
1
-
-
x2 for Krypton Fabs. I just installed his lift in my truck.
But if you are looking for a 2nd hand SFD, I don't know how you would find one. Perhaps someone about to do a solid axle swap who had already lifted via SFD...
Funny...I just pulled my 2.5" SFD spacers out the other night to put in the 3" spacers I had been working on. So, I have a 2nd-hand set available. (And technically, I have yet another set of 2.5" spacers sitting around, but they lack motor mounts.)
Bigredangry: I've been working on a 3" kit. It's now installed on the truck...just dropped it off for an alignment today to confirm that everything is kosher. I'll post up more details on a new thread probably later today.
-
2
-
-
Any concerns about losing access to your pop-open window, CDN? The X glass is fixed in place.
-
Solid, man!
-
So, you'd probably be right if I was better in my explanation/ my attention to detail. I guess I assumed the wheels were spinning in opposite directions. They do spin the same direction when both are off the ground, hence the LSD.
After reading on this and other forums about a few different folks having similar problems, I decided the LSD was a highly likely culprit. I picked up some LSD additive from AutoZone, drained out ~7oz of fluid in the rear diff, then added the 7oz of additive. This seems to have fixed the issue (and for only $9!!). If it comes back, I'll update the post, but the problem seems to have been solved at this point.
Well, there's that too. But yes, that would've made a good difference in my diagnosis, but I had keyed off the "opposite direction" part and presumed no LSD, since this observation would be pretty easy to make (vs. assuming it was included in a package, of course).
So, seeing as you do in fact have the LSD, turning the steering wheel (and thus making a turn) would cause the outer tire to turn faster and the lack of an additive would induce noise. You wouldn't hear it at higher speeds because you're less likely to be turning. It's all coming together now!
You might've been better off replacing all the fluid with gear oil for LSDs (it includes the additive), just to be sure it got a thorough flush. But glad you got it sorted...before the wifey gave a beatdown, of course.
-
2
-
-
Hope I'm following your diagnoses correctly. Taking another stab...
I think it might be a u-joint, pinion flange, or something else related to the rotation of the rear driveshaft. I'm assuming your tests are with the transmission in neutral, otherwise you wouldn't be able to spin one tire off the ground while the other was stationary.
Am I putting your diagnoses together correctly?
- One tire off the ground rotating, either direction, other tire stationary: driveshaft rotates = noise
- Both tires off the ground rotating at same speed, same direction: driveshaft rotates = noise
- Both tires off the ground rotating at different speeds, same direction: driveshaft rotates a little = noise
- Both tires off the ground rotating at same speed, opposite directions: driveshaft doesn't rotate = no noise
If so, I would disconnect the driveshaft from the rear diff and retry the tests. If the noise subsides, check the u-joints on the driveshaft. You should be able to move them by hand in multiple directions. Any play or jerky spots may be the culprit. May need to grease or replace.
If the noise persists with the driveshaft disconnected, check the pinion flange on the diff...it's the brassy-looking cover behind the driveshaft flange that rotates when the pinion rotates. Sometimes if it's not seated correctly, it rubs against the diff housing. Just takes a mallet and something to gently persuade the flange to adjust a little (piece of wood, punch/drift, pry bar, bolt, etc.) If that's not it, hopefully it's not the pinion bearing.
Couple other notes:
- If your tires spin in opposite directions when both off the ground, you don't have the LSD.
- Suppose I wouldn't rule out the brakes being engaged. You can rotate the adjuster for the shoes if you suspect that. Might also check the handbrake to make sure it's fully disengaged (not just the handle, but the cable tension). Is it easy or difficult to remove the brake drums?
-
Hello neighbor! Well, sort of...just moved out of Phoenix city limits a few months ago. Welcome to NPORA! You'll enjoy this forum far more than the NICO one...which is seemingly full of people who've never once opened their owners manual or the slew of FSMs that are hosted there when they have a problem. If I read another post about someone who can't shift into or out of 4wd there...
Once I get some of my projects wrapped up, I'd like to round up other locals and hit some trails.
-
1
-
-
jjonez: side profile of 31" (LT245/75-16):

This is with 2" spacers and OME springs (1"/1.5") front and rear. Stock 16x7 wheels with .25" wheel spacers.
CDN: Gorilla has a line of hub centric rings (available through Summit, Jegs, etc.), but you can also try justforwheels.com. IIRC our center bore is 100mm. I can confirm that this week. I'd think that if you went with the bolt-on type, your tires would stick out too far...you'd have to go with at least 1.25" to clear your longer studs if you used rear OE studs up front like I did.
-
I had a similar issue on another vehicle...ended up being a loose belt. Wasn't squealing on the pulley as I might've expected, but occasionally stopped turning the PS pump which caused the groans.
-
Woooohooo!!! Success at last! All done. I even adjusted the camber bolt on the driver side too much that I now have negative camber!! So it's all within proper specs now. What a relief!
Much better! Glad it's all sorted!
Body lift on a rusty body.
in 86.5-89 WD21 Pathfinders
Posted
Well alright, I'll concede that much