

Nefarious
-
Posts
1,743 -
Joined
-
Last visited
-
Days Won
19
Content Type
Profiles
Forums
Calendar
Posts posted by Nefarious
-
-
You can plug it if u want. I ran without egr for a while and i didn't notice anything different at all except the truck stinks more when it runs. You may lose a little mpg as well if you don't have it tuned but results seem to vary on that one. I run headers as well though and run the egr now. It's not an overly difficult jo to swap it in.
-
I just go to the junkyard and pull one. Bring a torch with you to heat up the 24 mm (I think) flare nut that holds the tube to the egr and also heat up where the tube threads into the exhaust manifold and then use the 24 mm (I think) to crank it out as well. It takes some torque but it's not too bad of a job.
Does yours have a hole or tear? Why does it need replacing?
-
Well that would look like about 1" that the splines are sticking out in either end of the bar. X2 measure the bars. There's a good chance you have a hard body t bar in one side. It would take a massive impact to bend a pathy lca. They are beast!
-
Just replaced upper and lower ball joints on both sides as well as a bad outer tie rod. Also replaced the rubber upper control arm bushings with poly on one side so far. Never seen bushings that bad.. the UCA had nearly a half inch front to back play when I removed it from the ball joint. The old lady's truck is finally becoming a solid rig after all this work. Checked the other side UCA bushings but they are much more solid so we will save those for another day. Now time to go out for dinner.... i am tired and hungry after all that wrenching! Not bad for 8 hours work.
-
I've never seen a wheel bearing even close to that bad. Brutal.
-
the rear torsion bar anchor should have a "C" clip on it holding it in, you need to remove that before the anchor will come off the bar, also I would put a jack stand under the frame so when you loosen the torsion bar adjusting bolt the truck doesn't come down on top of you.
forgot about the c clip! Thanks harbody
-
Hmm that's good to know... I need to replace the ones in my s13
-
The small orange wire is oil pressure switch. I've seen them disconnected more often than connected on older pathy. Easy fix
 . As for your torsion bars you just need to re index as it's called.
 I would re index both sides if it were me but if you are only sagging on one side you could get away with just doing the one.
The way I do it is this:
First put a sharpie mark on the torsion bar and a corresponding mark on the anchor to show original orientation.
Crack the upper 19 mm nut (on the stack of two that lock down the torsion adjustment bolt) and just twist it back a thread or two until it again lines up with the nut below it.
Then stick the 19 mm wrench over top of both the upper and lower nuts on the back side of the torsion adjustment bolt; this let's you crank on it without ever having the clamp nut come down on the lower nut. Now loosen the torsion adjustment bolt all the way out until it drops out (if your threads are clean you can lube the length of threads and use a ratchet to get started to make sure no threads are galled and then use an impact to spin it out as there are a LOT of threads to crank through with a ratchet).
Once the bolt is out you can tap on the anchor towards the rear of the truck to drop the anchor off the back of the torsion bar. You can then shift the anchors torque arm down away from the vehicle 2 or 3 splines. This will leave the anchor much more room to tension the torsion bars. Use your sharpie marks as reference. Then just slide the adjuster bolt back into the anchor and put the two nuts back on the top and spin it back to tension. You will notice now you have much more adjustment before the anchor bottoms out into the crossmember.
I usually do both sides when I do it just so I know down the road I won't have the same issue again. I eyeball and make sure both anchors are pointing at close to a 45 degree angle between the crossmember and the torque arm before I replace the adjustment bolt.
As long as no threads are seized or galled the whole job only takes about an hour. Although getting each side back to exactly the same height can take a bit more trial and error as you have to load the suspension with movement/braking to settle the torsion bars after you lift the truck off the ground.
I usually jack up the front, make my torsion bar adjustment that I think is adequate, then drop the front end. Fire up the truck and drive forward while hitting the braked a few good times to load the front end. Then check height measurements from a solid reference point on the truck. Then keep repeating this until 1. I have the height I want and 2. The height is the same on both sides.
Once that is all done then you can set the camber with adjustment shims/washers behind the upper control arm and then take it for a toe alignment at the shop. Your pathy will never have rode better!
-
Dude that is bad a**!!! So slick dude.
-
Actually excessive caster is what keeps the vehicle stable and planted at higher speed. Not enough caster will result in twitchy steering and the steering will not return to center. Or in proper terms more "positive caster" will increase steering wheel return and stability at speeds at the expense of increased steering effort and with no effect on tire wear. Too little positive caster will cause the symptoms you described. Just thought I would clear that one up
I run 8.5 degrees of caster in my 240sx for high speed stability and a quick wheel return when tossing the corners
And about the original post B is spot on about the toe assessment. Your front right wheel was heavily out of spec. An alignment was recommended with good reason. Will help save your tires and your fuel!
-
Oh for 2500-2700 you can get a mint one!
-
I'm sure it's nothing like the out east there! We only get snow a few times a year so they definitely exist. Just a matter of the right price
-
Lol they do exist, we found my perfect one and my ladies perfect one so far. If I see any other gems I'll let u know tho! I'm always scanning Craigslist and the like
-
Yeah but it's worth it. My new pathy is 100% rust free frame that still has 99% of its original factory powder coat. Pretty much impossible to find on the west coast here...
-
Just re keyed every lock on my new pathfinder to match the ignition key. Drivers side, pass side, rear hatch AND glove box locks all match the ignition now.
It took me a bit to figure out how to disassemble the glove box lock...there's a tiny pin that's melted into the plastic that has to be removed before the cylinder will slide out! Now I know for next time...
-
You can get an ngk o2 sensor on ebay for about 60$. 250 is way over priced! If you have been having an indication of o2 sensor then I would start there...I've had bad o2 sensors that never threw any codes personally. Keep in mind they really are old technology ecus, sometimes we as owners have to be smarter than the computer running things

-
Just use good brake pads and you will be fine. Airbags in the rear coils I've been told help a lot when you are a little on the portly side (vehicle wise, lol), I will be installing some of those soon for when I load up to go camping.
-
 1
1
-
-
Amon Amarth! ! One of my favorites. Just got a hoodie from them lol. Check out Be'lakor if you like Amon!
-
-
Update: brain fart. Mounting tps backwards was pointless. Works fine forwards. Lol. I'll post some pics of my creation
-
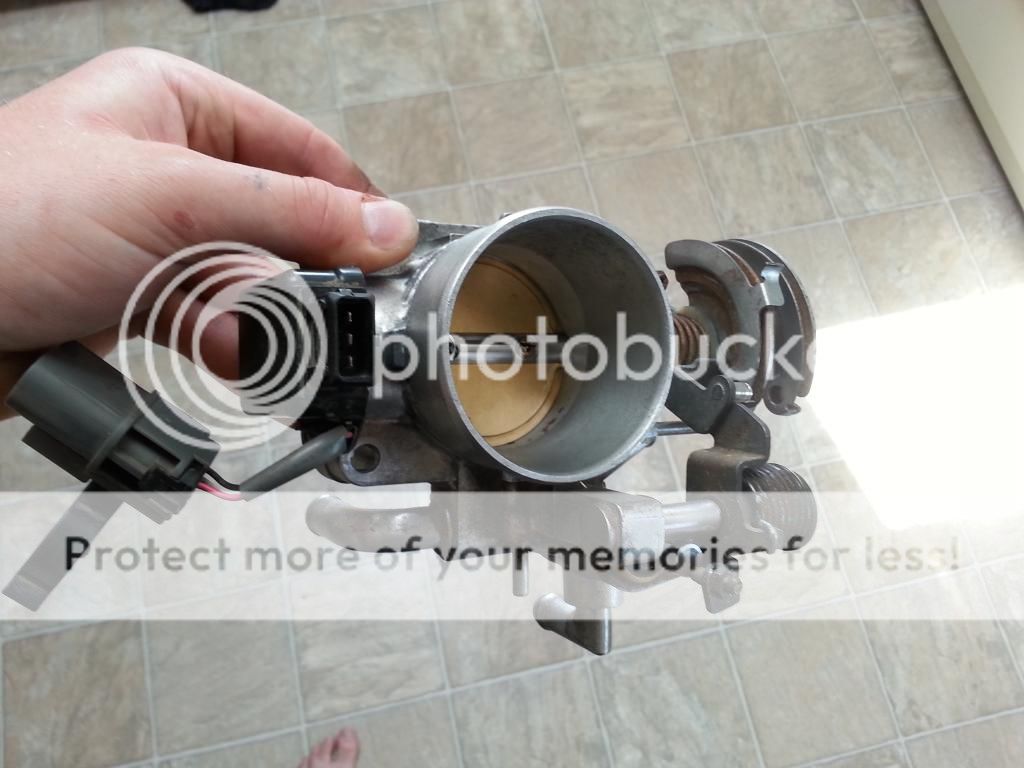
Pulled apart my vg30 throttle body and gutted it for parts. Machined down the vg33 throttle body to accept the vg30 tps sensor. Mounted the vg30 tps backwards to match the throw of the vg30 throttle actuation. Machined the slot of the vg30 throttle shaft slot wider to fit the vg33 throttle plate. I now have a functioning vg33 throttle body with vg30 peripherals. Now just need to figure out the under plenum lines to make this tb work.... almost there! The vg33 throttle plate is so much bigger than the vg30 one, but the inlet outer diameter is the same so the accordion pipe will slip right on. Just a few more things to figure out and I will be running a full vg33 engine including throttle body and intake manifold in my 93!
-
Dude i need to see that thing with wheels on flexing!!! That thing must articulate to a ridiculous level!
-
My old one is the burgundy red colour..but my new one is .... BLACK!
Always wanted a black 4 door w d21.. finally got it and it even has an immaculate frame to boot.
-
Oh right on perfect, yeah a transistor driven to saturation will do just as well for a low current draw like that. Megasquirt sounds cool I want one for the pathfinder. Lol


What did you do to your Pathfinder today?
in The Garage
Posted
A ford Taurus or nissan maxima electric fan, a nissan maxima fan switch and coolant pipe section and a relay and wiring is all you need and it will be just like it came from the nissan factory that way.