- Sign In Changes: You now need to sign in using the email address associated with your account, combined with your current password. Using your display name and password is no longer supported.
- If you are currently trying to register, are not receiving the validation email, and are using an Outlook, Hotmail or Yahoo domain email address, please change your email address to something other than those (or temporary email providers). These domains are known to have problems delivering emails from the community.
Leaderboard



Popular Content
Showing content with the highest reputation on 06/27/2019 in all areas
-
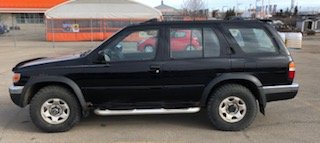
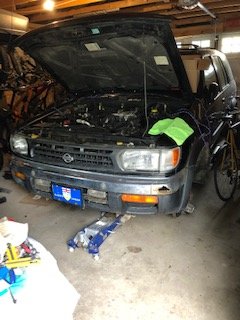
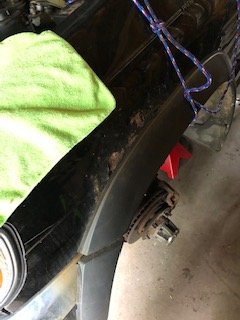
Long story short: my family's had this Pathfinder (1998 5-speed Chilkoot edition, 350k) since new and I learned to drive in it. I've been driving it for the last couple years after I moved back west and recently decided to keep it indefinitely. Can’t find anything I like better! Work done up to this point: Replaced P and D valve cover gaskets — man the driver's side is a pain Replaced distributor due to persistent stalling at idle and eventual stall and refusal to start Parked in the garage at the moment halfway through installing: OME MD front springs KYB Excel-G struts with new strut bearings, insulators, and boots SFCreations 1" front spacer LR 9447 rear springs Bilstein 5100 (33-185552) shocks ProComp Series 51 15x8 wheels (with current 31" Wranglers for now) new ball joints, tie rod ends, sway bar links, lower control arms, trailing arms missing link (as soon as I find something I don't have to buy 10 feet of!) At this point new struts are assembled and old parts are off with exception of right lower control arm. Compressing the OME springs was a little tricky but using a third spring compressor helped I think. Pictures attached are before - lots of wheeling before but sadly no pics - and one of the (tight!) workspace as well as the rust above front fender. Plenty of rust on all four quarter panels, both rockers, hatch, and most worryingly roof adjacent to upper windscreen seal. Only issue so far is with removal of P side lower control arm. Seems like dust and dirt collects above the rear bushing bolts. Removal was exceedingly difficult despite copious PB blaster and on inspection bolts are a little galled; suspect the internal thread is similar so I guess I'll chase the internal threads and dress the bolt and hope the driver's side isn't the same. Anyone have any ideas on how to prevent the same issue on the D side? My major concern was rust and rot underneath. So far everything looks pretty good so next steps will be removing side steps, replacing fenders and rockers and doing something about the rust on the leading edge of the roof. I'd like to find a swing-away spare tire rack as well. Comments always welcome!
 1 point
 -
Absolutely flawless drive after work. No skipping and no jerking. I ran the scantool and saw spikes all over the place... except on the TPS haha. I wonder if my ECU is on the fritz after I took it swimming one of those times.. I may try to grab one at the junk yard next time I go. Edit: woah wait a minute! I see engine load high and throttle position flat as a pancake.1 point
-
Still actually loving the mod. I haven't dealt with my liner so i still rub on that, but ive yet to have a clearance issue off road. I like the look, and it doesnt look trashy at all. I'm surprised how many compliments i get now. Even my mom told me how good it looked last time she saw me, and not like she's a car person.1 point
-
And you wouldn’t need one for a 2x4. I can lift to my hearts content lol1 point
-
I made my sfd out of a 3 ft piece of half of 3/4 inch angle iron from Home Depot. Think it cost me like 9 bucks or something1 point
-
I originally added one piece in and then realized I forgot to keep the u joints in phase, so it was cut and put back together in phase.1 point
-
Yes especially wives and husbands. Nice pair, love the truck!1 point
-
Finally got the rest of the lift In! KYB struts, ac springs, Nrc9447, bilstein 29" shocks. Sent from my SM-A520W using Tapatalk1 point
-
After getting the rear bumper finally ready for finishing, I decided that I was going to put some enamel colors onto the AZ flag and Nissan logos, and then bed lined around things. The enamel process was a bigger PITA than I had planned on (I hate painting), but I think the results turned out well*. (*=great considering my hatred of painting, despite not being pleased with the bedliner color.) I used tintable bed liner from Custom Shop on Amazon. The color is supposed to be Battleship Dark Gray, but I'd argue it is neither dark nor gray. I've complained to a few buddies that I don't like the color, but it does offer some degree of contrast that I was looking for. I still need to spray the sliders, and that will be a couple weeks out given my schedule, but I'll find out if that completes the "look". If I don't like it (and chances are that I won't), I'll probably pull everything back off for some spray paint (ugh) and get it closer to the dark gray I was hoping for. The bedliner product itself I'm pleased with; nice texture, hard, smooth, but provides grip without feeling rough. The Custom Shop stuff is the same as the U-Pol Raptor product. It was a mess spraying on the side of my house...I spent a day building a rack to hang all gear from, plus a few hours converting my HF easy-up canopy into a spray booth. Mostly successful, but I hated every minute of it. The front bumper got sprayed, too, and I finally got around to mounting the IPFs graciously donated to the cause by @Jax99. I have yet to wire them up, though...trying to find a decent switch for the left-hand panels, as the Carling rockers interfere with the dash a little. I thought I'd have some luck with a Toyota-sized aftermarket switch, but will go a different route.1 point
-
Time for an overdue update... A few weeks ago, I finally got around to pulling everything (bumpers, tire carrier, sliders, skids) off the truck for some finishing. For the rear bumper, that meant getting some plate on the bumper, and grinding off the rust "patina", priming, then spraying bedliner on everything. The center piece ended up being the first attempt to cut a piece on the plasma table that was longer than table itself. Did it in two half-passes and it actually turned out well...tiny offset, but fine for this use. Put the finger brake bender to use to get the contours matched, Not shown in the pic is a 1" square tube that runs between the brackets and supports the long flat part. Plate was 1/8". I also added 1/4" brackets to the bumper wings that attach behind the wheel well. I thought about making some sort of notch for Hi-Lift usage, but decided against it. Was pleased with the end result:1 point
-
Had fun I did. Sent from my SM-S737TL using Tapatalk1 point
-
Hey guys- thank you for the questions and comments! As of right now we have had one installment and during that process found the hardware approach needed improvement and we carefully evaluated the installation process. The next vehicle (The Gambler 500 rig or one of our two personal vehicles)should have version 2.0 installed for road&trail tests soon. We have already acquired a domain and hosting for a website but the site is low priority for now. Our main focus is on refining the design of the SFD components and proving they're road & trail worthy1 point
-
Yep Tyler’s right, it’s not a typo. Hence the new post with new measurements. I’ve got 9448’s in the back now, ac’s with a .5” spacer up front. No wheel spacers. My wheels are American racing 16x7 with 4” backspacing I got off a 4Runner. They still sit inside of the fender flares which is awesome so I’m not chucking rocks at my paint which is nice ? I’m not a huge fan of the stanced look with wheel spacers1 point
-
Here is the summary I have to date. (BTW, I have the 9448s as I'm headed towards a 3-4" SFD - not put on yet. I'm pairing them with an ARB OME Heavy Duty Front setup-also not put on yet. I'll post when it's done. I re researched purchase options & LR Direct was still the best. I paid $85 on Fri 10/12 & got them in Eastside Seattle Mon 10/15.) Land Rover Defender 90 Spring Summary http://www.red90.ca/rovers/springinfo.html 5” Inner Diameter NRC9446 +2.5-3” (15Spring Ht) 0.5-1" rake c 2 front spacers 175# Spring Rate LR 90 Defender-Front Driver (0.5" longer than passenger) NRC9447 +2-2.5" (Micah got 4") 175# Spring Rate LR 90 Defender-Front Passenger NRC9448 +4(Perfect c 4"SFD), cut one coil=3" 225# Spring Rate Blue”/Red LR 90 Defender-RearRH 110 & 130 Heavy Duty-Front RH $80 Delivered from UK $84.49($32.92+$51.57) from NRC9449 +2-2.5" (same Height as NRC9447) 225# Spring Rate (heavier Load than NRC9447) 1badqx4 9446: neilca(35"F/36"R c 31"tireMid Fender Ht) 9447: 19pathfinder99, MichaelAndrews, micahfelker(37-37.5" c 31"tire, MD OME Springs, F=HD OME), thehillboys (Bilstein 1525 shocks) LR - 34 1/4" to 38 1/2" settled to 37.5" net 3 1/4" RR-33 3/4" to 38" settled to 37.5" net 3 3/4" Front 35” c Moog OEM Springs, KYB Struts & 1 1/2" spacer LF - 32 1/2" to 35 net 2 1/2" (slightly uneven shop floor) LR- 32" to 35 net 3" Rake 2.5” 9448: hawairish, TowndawgR50, Bax03SE(37"F/38"R c 33"tire Mid Fender Ht-1 coil cut), drewp29 9449: 03Troutfinder (36.5" from 34", same ht as OEM Spring+2”spacer) Order from LRdirect Brands-few reviews on LR forums say Brit Part (c8) springs held up better than OEM Land Rover against sagging Please let me know if there are any corrections that need to be made & take mid fender measurements at wheel center & fender as well as supply your wheel & tire size. Thanks!1 point