- Sign In Changes: You now need to sign in using the email address associated with your account, combined with your current password. Using your display name and password is no longer supported.
- If you are currently trying to register, are not receiving the validation email, and are using an Outlook, Hotmail or Yahoo domain email address, please change your email address to something other than those (or temporary email providers). These domains are known to have problems delivering emails from the community.
Leaderboard



Popular Content
Showing content with the highest reputation on 03/11/2019 in Posts
-
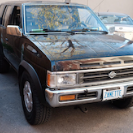
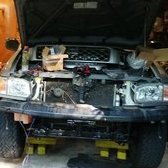
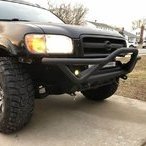
For convenience sake, I'll start putting all of my projects and pertinent pathfinder information in this thread, as well as retroactively putting some of my project in this thread, for starters, here's the car the day we got it. Rebuilt title, a front end wreck had taken out the front bumper cover, nothing else. The covers cheaply painted, but oh well. 151k miles when we bought it (October 2018) Very First thing to get done was a sound system. I swapped my twin 12" subwoofers from the 4runner along with the amp. I added a Kenwood Double Din Stereo, and Rockford Fosgate Component Speakers. I'm not quite an audiophile, but I don't like putting up with stock sound systems on older vehicles. Next thing that happened was the pathfinder got lifted: 2" spacer for 2.5" of lift, 3" spacer in the back. No new moog springs added. Running Boards removed Next: Led Headlights-they're better than cheap halogens, but they took forever to aim properly. Not my smartest or most necessary purchase. @RainGoat was right about the headlights not melting Ice, I had some slush stick to them once while driving. Original thread below. I also Spray tinted my fog light's yellow with Krylon Stained glass spray paint. Also added LED interior lighting. Here's my simple Missing Link-3/4" EMT with the ends crushed, using the existing LCA bolts. Then My Approach Lighting Project- 2 KC Cyclone LED Rock Lights bolted into the old running board holes, and a KC C2 Scene/Area light attached to the bumper. The lights can be all off, or manually on at any time, or set in an auto position that triggers when I'm in reverse or when I open any door, or come on when I unlock with my key fob. Straightforward idea that probably took too long original thread, wiring diagram at the top of post 84 (page 3): Wheels and Tires: 32x11.5r15 Falken Wildpeak AT3w's on 15x8 DX4 Gear Wheels. Love the look of the rims, and the tires more than do their job. Very happy with their performance thus far Manual Hubs: Mile Marker 435's. I broke a stud trying to get them on. That was a fun night I have an ongoing roof rack idea. I know a guy who is about to buy a welder, but if that takes too long maybe I'll just bolt it all together in a ghetto DIY kind of way. Original thread: Added a WD21 Skid Plate for the Transfer case, direct bolt on. Lately I've been messing around with the lack of black on white contrast, so the last week I've been doing some plasti-dipping. I also pulled a honeycomb grill and fuel door off of a black pathfinder. Did the fenders and the body below the doors in black. Still not sure what to do with the tabs under the headlights, I like the black a bit better. I would've kept the original grille, but it was in terrible shape. White on the honeycomb is gonna have to go, and the hood decal if kept needs to be redone in vinyl wrap. The black makes the vehicle look a little tougher and taller, so I was happy with that. White lettering on the fairing is a keeper. That's as far as I've made it so far, I've really appreciated the community and the help I've received thus far. Within the next week I'm hoping to start over on my suspension. OME HD coils and LR 9449's are hopefully in my future, along with finally replacing my shocks. Thanks for taking a look!5 points
-
Sent from my iPhone using Tapatalk4 points
-
Sent from my iPhone using Tapatalk4 points
-
And finally have it out of the garage! Sent from my iPhone using Tapatalk4 points
-
Love that old Path one but I hadn’t seen the QX4 one. So fake though, you’d never let the butler drive it, that’s the chauffeur’s job!3 points
-
And, for good measure, a few pictures of her in action3 points
-
Someone suggested I share some details on the PVC washer fluid tank I built to relocate the tank for my bumper build. For supplies, you’ll need: at least an 8 inch section of 4 inch PVC pipe, one 4 inch cap, one 4 inch removable test plug, and about 12 inches of cable to extend the negative battery cable. Sent from my iPhone using Tapatalk2 points
-
If it’s not already out, the first order of business is to remove the factory washer tank. You need the remove the plastic inner fender liner first, then the tank itself is held in by 4 10mm bolts. The two pumps just push into rubber grommets at the bottom of the tank, they can be pulled out by hand. Before removing the pumps and unhooking the tubes and wires, take a couple pictures of how everything hooks up. Then pull the plugs and tubing from the two pumps and set the pumps aside for later. Once the tank is out, the tubes and wiring can be pulled up into the engine compartment through the space behind the headlight. This will have them in the corner of the engine bay next to the battery, which is exactly where you want them. Next up is to disconnect the battery terminals, remove the battery hold down bracket, and turn the battery side ways. The hold down bracket won’t line up in the new position, so I discarded that and used a couple of long hose clamps to wrap around the battery and hold it tight. There are holes in the shelf the battery sits on, so you can snake the clamps around the battery and through the hole, then tighten the clamp to hold the battery firmly in place. I used a 4awg starter to switch cable to lengthen the negative terminal. Pull the bolt out of the stock ground wire terminal, feed the bolt through the eyelet on one end of the extension wire, and bolt it back up tight. Cut the eyelet off of the other end of the wire, and strip back about an inch of insulation. Then clamp it into a new terminal end. I used a brass terminal. The battery in its new home will look like this. Sent from my iPhone using Tapatalk2 points
-
i would man. its a solid product1 point
-
go with kyb excel shocks and struts. great all around parts. use the spacers if your wanting economical and dont do a ton of extreme offroading. if you need something beefier...theres a couple different spring options available1 point
-
no such thing. only way to lift an r50 is springs or spacers. sfcreation.com sells a great set of hdpe spacers for like 100 bucks that a lot of guys on here use. theyre made by forum member steve fluerys1 point
-
Now your ready to build the tank. Cut out an 8 inch long section of PVC. And drill two holes toward the bottom for the pumps. Make sure the holes are at least an inch and a half up from the bottom to allow room to put the bottom cap on the pipe. I used a stepped drill bit to make the holes. Go slow and check the fitment of the pump grommets to make sure you don’t make the holes too big. The holes need to be just big enough for the grommets to push through tightly to get a good seal. With the holes drilled you can insert the pumps, put the black cap on the bottom of the pipe under the pumps, and the red test cap on top. The test cap easily unscrews by hand to fill the tank. Once assembled, hook the wires and tubes back up to the pumps, (refer to the pictures you took earlier), and set the tank in place next to the battery. I used a piece of scrap metal bent to fit to make a bracket to hold the tank securely in place. One end of the bracket bolts to an existing bolt hole in the core support, and the other end I bolted to the tank with a nut and rubber washer on the inside of the tank so it won’t leak around the bolt hole. That should do it, add some washer fluid and enjoy! Sent from my iPhone using Tapatalk1 point
-
I had a cam move quite a bit when I was trying to take the sprocket off. Wasn't holding the sprocket well enough and it turned a little, then it jumped as one or more of the cam lobes came around to where the springs spun them. Turned it back to where it was supposed to be, put it back together, ran fine. What's "can't right right in the #1 hole" mean? Is it back together and down a cylinder?1 point
-
you cant bent a valve just by having the cam slips while you are repositioning the belt. unless you put it wrong then start the engine then there you go. other than that you should be ok. ive done swapping timing belt on my mine and few times and also have the cam gears slip when i put the timing belt back and engine is fine. you should be good1 point
-
sorry to hear that. i was looking forward to wheel with you around modesto area in LA grange OHV in the future bro1 point
-
Gates is the current oem parts nissan use right now. When i did build my vg34e engine i want everything brand new. Order parts on local nissan dealership and found gates are the parts used by nissan to supply1 point
-
Reset all the timing back to what it should be. You may have gotten lucky. I know several people who've broke timing belts on VG33Es and have had it run fine afterwards. It may not actually be as interference as Nissan says it is. Same with the vg33e xterra.1 point
-
sometimes less is more. That whiteout on the honeycomb was too much1 point
-
I love the progress, it looks great. I also like the contrast with the addition of the black accents!1 point
-
Fits the look really well. Great work man!!1 point
-
That is awesome!! Lol that’s exactly how I treat mine hahaha1 point
-
Those old commercials and that retro review are great! This is my personal favorite:1 point
-
Another one!1 point
-
Also, found this gem a long time ago but just came across it again today. Definitely worth a watch!1 point
-
1/4-20 bolt on the left side of the license plate and self tapping metric sheet metal screw on the right side1 point
-
The Pathfinder emblem is in the wrong spot?1 point
-
Completed a pretty major maintenance milestone on Friday. timing belt water pump passenger camshaft seal crankshaft seal harmonic balancer (crankshaft pulley) thermostat passenger side valve cover gasket (I'd like to do driver's, but there's so much sh*t on top of it... on the to-do list) sparkplugs that hidden little 90* coolant bypass hose, and a few other misc coolant hoses fresh new coolant I basically followed this 1A Auto YouTube video for the timing belt, and referenced another one for the little water pump excursion. There were a couple other misc YouTube videos I referenced for the crank/cam seals. I labeled everything as I took it apart with masking tape/a number, and then wrote down the number and what it went to. That made reassembly at the end brainless and quick. Honestly, the timing belt looks fine. Who knows when it was last replaced, but at least now I know for sure. The sparkplugs were the worst as you'll see below. Started up fine and so far no leaks, seems to be running great! Took me about 10 hours to do all this including maybe 2hrs of parts runs and Googlin' things. Now on to more funsie projects. Everything off including camshaft sprokets and wanter pump- New timing belt and water pump- I've never seen sparkplugs so worn down, all six were like this. Honestly easy to replace, I used tape to hold my extensions together, just that last back sparkplug.....1 point
-
Yeah man I'd love to have even a portion of those cool Japanese accessories. Maybe someday when I've made it big I'll have to import a JDM Pathy with those options and a diesel haha1 point
-
Man this thing is coming along1 point
-
Yesterday, received my repaired ECU, slapped it in, completed the idle relearn, got my baby back on the road! With the fresh tune up, new IACV, repaired computer, new belts, recent tires & brakes, she's running like new again! Next up, suspension overhaul...1 point
-
Sorry guys, been busy. I took the ECM out and there it was, a fried capacitor. Yes the ECM has been repaired before because the company had placed their warranty sticker over the seam of the ECM. So i have ordered a used one that comes with the key and module. Also ordered a new IAC valve1 point
-
I just did some googling and it appears that a well-functioning EGR system actually helps fuel economy. Also, according to the FSM, the computer will detect and throw a code if the EGR temperature sensor doesn't give it what it expects to see. But here is how you could defeat that if you wanted to: Instead of connecting to your EGR Temperature sensor, wire the harness through a relay. One side of the relay goes to a 1000Kohm resistor and will be used to tell the ECM that EGR valve is closed. The other side goes through a 100Kohm resistor and will be used to tell the ECM that the EGR valve is open. Then you need to use the EGR Control signal to switch the relay on and off so the ECM sees an open EGR valve when it has signaled it to open and a closed EGR valve when it has signaled it to be closed. (or find someone that can reprogram your ECM to disable the code)1 point