- Sign In Changes: You now need to sign in using the email address associated with your account, combined with your current password. Using your display name and password is no longer supported.
- If you are currently trying to register, are not receiving the validation email, and are using an Outlook, Hotmail or Yahoo domain email address, please change your email address to something other than those (or temporary email providers). These domains are known to have problems delivering emails from the community.
Leaderboard

(1)_opt.thumb.jpg.035a5eb628baefe0934fbb6e70f9b39e.jpg)

Popular Content
Showing content with the highest reputation on 12/06/2018 in all areas
-
Always wondered why Nissan/Infiniti didn't start putting their signature clocks in the QX4 till the 01 model year. If your like me you took care of that problem and put one in yourself. Here's a guide on how to do just that. Find you a clock, take the front cover off and use it as your template. Once you have your outline marked drill as many holes possible. Once you drill out all you can use a grinding wheel or a dremel tool to finish the rest of the cutting it's that easy. Use silicone to hold the clock in place. Run you a constant 12v source and a ground for clock operation then 2 more wires for your illumination. That's it. If need to find a place to tap in for your illumination I just tap in to your cigarette lighter illumination. So simple folks. #infiniticlock #JRL50 #INFINITIQX4 Mr Cox 96R50-97JR502 points
-
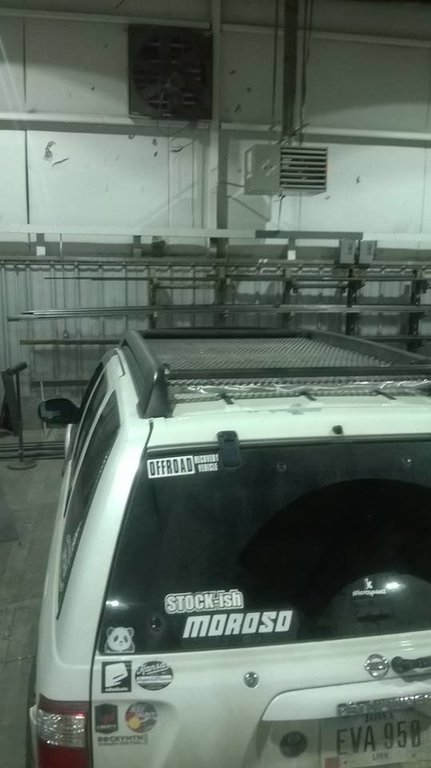
I made one for this style factory roof rack and its been an amazing addition.
 1 point
 -
I used a machanical oil gauge. Ran the oil line through the firewall where the clutch/slave master cylinder would go on the manual r50 into a T fitting I installed where the factory oil sending goes. I removed the oil sending unit and inserted the T fitting in its place. I wanted to use a T fitting that way I could still have the factory oil dumby light. Hook your oil line up to one side and the factory oil sending unit into the other. Walla! Mr Cox 96R50-97JR501 point
-
As far as I know, the R51 has adjustable camber bolts... but then again I was told that maybe only the 2005 has them. I would need others to confirm or not this statement. in Any case, I believe Nissan does sell adjustable camber bolts if you need them. Since It is a fairly new product for me, I do not have enough post sale feedback as to the questions you are asking. Maybe ksar could answer some of them...send him a pm.. I will post more answers as I get them. Cheers. S.1 point
-
Yes, I intend to brace the radiator support, would not be difficult at all.1 point
-
I think much of what I replied to on your original light bar thread applies here to some degree. For this particular thread, I might also make the following suggestions: In regards to wire gauge, start with Power = Volts x Amps, or P=VA. Figure out amp draw first (A = P/V), then you can use a variety of wire gauge charts. Wire gauge, part 2: the length of wire matters, too. BTW, I don't recommend those pod lights for that application: too much amp draw for the application, blinding light, very bulky, heat generation, limited space. At 140W, they'd warrant 10AWG (max 15A) because of the 10A-12A draw (140W/14V = 10A, 140W/12V = 11.7A), exceeding 12AWG (9.3A max), but because they'd need about 20' of wire, you might even consider 8AWG...a bit heavy duty for the application, though. Having installed flush mount lights under my liftgate (see below), there's not much room to work with unless you're willing to cut metal. Unfortunately, there aren't a lot of low profile flush mount LED options out there. The adhesive LEDs aren't aesthetically appealing, but are great functionally. Plan on separating your power needs to front vs. back, if you haven't already. That way, you can run dedicated leads to each area with a thicker gauge wire, then distribute power on thinner gauge wires. This will spare you a lot of headache routing wires. The cheap USB/Voltmeter/Socket combos that you can find everywhere on Amazon and eBay are great, inexpensive ways to add those items anywhere. All they need are two wires (and can be daisy-chained in most scenarios) and a 1-1/8" or 1-1/4" bit. And there are tons of options available. Consider your circuit demands when thinking about relays and switches, as one or both might not be necessary. Generally speaking: You really only need a relay if the max amp draw on the circuit will exceed the max amp rating of the switch, or if you want the circuit to energize in the ACC/ON positions. A switch, of course, is only if you want/need manual control. If worried about draining your battery, you're better off using a relay and ACC/ON lead. Otherwise, a switch doesn't really offer much practicality unless there's some need (including general safety) to disable all or part of the circuit. Having it control a light makes perfect sense, of course. ... I've done a few projects in my truck that might align with what you're wanting. Though only an option if you switch to a single-DIN headunit, I bought a factory radio-delete panel and mounted components to it. Voltmeter, dual USB, and aux audio input pod for the radio. The voltmeter and USB port tap off the factory power socket. From Jax99's air compressor setup, the change pocket by your left knee might make for a suitable place to tuck a USB port and voltmeter there. I'll likely be going back to a double-DIN headunit soon, so those will all get relocated. (And in case you're wondering, I swapped out the pocket under the radio with one from an All-Mode truck, so that affords some additional switch space, for which there are Carling-sized USB bodies that will fit there. The All-Mode switch is wired to control my air compressor and lockers.) This is just a panel kit that came with a switch, voltmeter, socket, and dual USB components. Wired it up for my fridge. The panel cover is on a simple harness coming off a 6-circuit fuse panel. I ran an 8AWG wire from the battery to it. I intend to run all other cargo accessories and exterior lighting through this. Also, I don't know if all R50s have that socket in the lower right of the pic, but I think all the trim panels have the flat spot and socket wiring behind it. You can buy the OE socket, or put any other socket/port/switch there. The wires come through an existing rubber cap. As for liftgate lighting... I really liked these pods, as they're very low profile both above and below the mounting surface, but I wish there was more light output. The lens is also a switch. I ran the wire through the OE grommet/boot in the upper LH corner of the gate and over to the rear cargo light, and that's where they draw their power from (yellow harness). I just drilled out rivets on the cargo lamp, put in my leads, and riveted it back together. This allowed the factory switch to act as the master switch for all three pods, then I could turn each on/off as individually. However, the interior lights will turn off automatically after a few minutes to prevent draining the battery. You must open a door to get the light back on, but for the liftgate, the door switch is integrated into the latch and is not convenient to toggle. So, I added a switch (subtly shown below with an unlit blue ring) that toggles the door switch circuit...sorry for the crappy pic, but it's mounted on the plastic bump on the trim behind the pivot for the wiper.1 point
-
No need to apologize SpecialWarr , keeps a guy sharp not getting spoon fed. Appreciate any efforts to help me try to get this pathy into a state I like a vehicle to be in. Love this forum, I browse through it now for fun. Turns out the speedo head had some cooked pathways on the circuit board. I found a new speedo, put it in and voila, c'est bon.1 point