new4x4r Posted July 14, 2009 Share Posted July 14, 2009 (edited) Sorry about the muddy job site, I couldn't be bothered cleaning it off :-) I just did the one side tonight, too tired to tackle the other. I'll do it tomorrow. Engine bay side... It looks blue/purple because the company I work for needed a sample to try their hard anodizing on. Didn't work so well heres the Drivers side with the spacer, you can't really notice the difference... but I can ;-) it was starting to settle pretty good Edited July 14, 2009 by new4x4r Link to comment Share on other sites More sharing options...
fleurys Posted July 14, 2009 Share Posted July 14, 2009 (edited) good pics....I don't remember...did you have the ac coils also ?? to give an idea of the space around the tire, what's the diameter you got now ? 32 ? 31 ? Edited July 14, 2009 by fleurys Link to comment Share on other sites More sharing options...
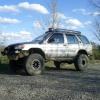
new4x4r Posted July 14, 2009 Author Share Posted July 14, 2009 Yeah AC coils all around. And the Tire is 31"... I'm pretty sure I'll be going 33" when its time for new ones though, I'm so far from rubbing its not funny! Link to comment Share on other sites More sharing options...
fleurys Posted July 14, 2009 Share Posted July 14, 2009 Do you think the front will be higher than the rear when you're done ??? I'm looking also to put 33" with 1 inch spacers..but wondering if I 'll have to put some in the back also... A good picture of the cv angle would great if you could.... Link to comment Share on other sites More sharing options...
new4x4r Posted July 14, 2009 Author Share Posted July 14, 2009 No, its almost perfectly level with the spacers. As for the pics of the CV angle, I can tell you now, its bad :-) my CV boots are F@%KED and the Joints themselves aren't fairing much better. I need to buy a new set, but I have to get the manual hubs first (not from autopartsway.ca though) haha Link to comment Share on other sites More sharing options...
sthrnfat Posted July 14, 2009 Share Posted July 14, 2009 Looks great sitting that high in the travel! Good stuff. Is it topping out alot more often with the spacer? Also - looks like you used your own longer grade 8 bolts. How do you remove the bolts that are fixed in the lower mount? Did you just drive them out? Link to comment Share on other sites More sharing options...
Simon Posted July 14, 2009 Share Posted July 14, 2009 No, its almost perfectly level with the spacers. As for the pics of the CV angle, I can tell you now, its bad :-) my CV boots are F@%KED and the Joints themselves aren't fairing much better. I need to buy a new set, but I have to get the manual hubs first (not from autopartsway.ca though) haha Try nsor.com They're Canadian (West Coast) and I got mine from there, for a decent price, considering exchange and shipping from the US by comparison. That was a couple of years ago though. Link to comment Share on other sites More sharing options...
Daddy Rim Posted July 14, 2009 Share Posted July 14, 2009 Also - looks like you used your own longer grade 8 bolts. How do you remove the bolts that are fixed in the lower mount? Did you just drive them out? He ordered the spacers threaded, meaning that you bolt the spacer to the strut assembly. The splinned press fit studs are pressed out (you can easily use a hammer and larger socket under the head of the stud) and holes enlarged to permit use of the larger G8 fasteners which are included with the kit. Hope they work out well for you new4x4r. Link to comment Share on other sites More sharing options...
new4x4r Posted July 14, 2009 Author Share Posted July 14, 2009 The factory studs on the lower side of the strut mount came out surprisingly easy. I just set them on the vise, tapped them with the hammer and out they came. I thought I was going to have to use the press. As for the Grade 8 bolts, Daddy Rim's came up with that brilliant idear haha. And like he said, the spaceres are threaded, so when you assemble to strut assembly on the bench, they actually hold it all together. Makes lining it up under the truck very simple. Just had to re drill the strut mount holes a bit and BAM you're done. I had more trouble getting the Camber bolt out to remove my strut (don't get me started on my spring compressors) SO FAR, SO GOOD! Link to comment Share on other sites More sharing options...
fleurys Posted July 14, 2009 Share Posted July 14, 2009 (edited) Question like that.... If I get the threaded top spacer, technically I should be able to pop out the old short bracket bolts, install the spacer, screw in the new bolts ...all this without having to disassemble the strut-coil assembly..right ?? **edit**.. mmm I just looked at the picture, and I guess the challenge is removing and installing the bolts because the top plate of the coil retainer is in the way... PLease just confirm... S. Edited July 14, 2009 by fleurys Link to comment Share on other sites More sharing options...
laxman0324 Posted July 14, 2009 Share Posted July 14, 2009 Question like that.... If I get the threaded top spacer, technically I should be able to pop out the old short bracket bolts, install the spacer, screw in the new bolts ...all this without having to disassemble the strut-coil assembly..right ?? **edit**.. mmm I just looked at the picture, and I guess the challenge is removing and installing the bolts because the top plate of the coil retainer is in the way... PLease just confirm... S. Longer bolts mean you need to compress the spring and disassemble the upper strut mount to get the longer bolts through the holes, the upper spring retainer is just barely in the way so you can't fit bolts through without removing it... Link to comment Share on other sites More sharing options...
fleurys Posted July 14, 2009 Share Posted July 14, 2009 How about bolting from the top down....that could work no ?? If we cut the existing bolts (grinder), then start the new ones from the strut tower, screw in the threaded spacer, then put the nut under the upper spring retainer... same force, same strenght, just the bolt head on top instead of under... That would save alot of headaches and time..... I know the last time I had to compress the ac coils, it took a real good spring compressor (garage strenght and even then, the guy worked alot for it to compress enough....) Link to comment Share on other sites More sharing options...
laxman0324 Posted July 14, 2009 Share Posted July 14, 2009 I think some people have done that, I think the main issue was finding a bolt that is long enough to get a nut all the way on but short enough to not rub the coil retainer...I think Chris (02silverpathy) may have done that... Link to comment Share on other sites More sharing options...
new4x4r Posted July 14, 2009 Author Share Posted July 14, 2009 You'll run into just as many problems doing it that way, ie. Hammering out the press in studs, drilling the holes, bolt/Nylon nut length, etc. I only have the Princess Auto Spring compressors, and it really isn't that hard to get the springs down enough to be able to get the strut nut back on. I can take pics of every step I take tonight if you want? I still have to do the passenger side. Just to show you how hard it is. Link to comment Share on other sites More sharing options...
180sx Posted July 14, 2009 Share Posted July 14, 2009 please do! Link to comment Share on other sites More sharing options...
tekazgtr1984 Posted July 14, 2009 Share Posted July 14, 2009 please do! X2. Post pics please. Link to comment Share on other sites More sharing options...
new4x4r Posted July 14, 2009 Author Share Posted July 14, 2009 alllrighty will do! Link to comment Share on other sites More sharing options...
new4x4r Posted July 15, 2009 Author Share Posted July 15, 2009 Ok here goes (second try to post these pics) Heres what I did to get these Spacers installed. First I jacked up the truck, placed it on a jack stand. Then I used to jack to relieve some of the pressure from the strut. I then removed the pinch bolts to release the bottom of the strut, the Sway bar link, abs wire and brake line then i removed the nuts from the strut tower inside the engine bay then I maneuvered the whole assembly out from the wheel well and placed it on the bench, I put the spring comressors on before I removed the nuts from the strut tower to save time... Compress the springs as much as you can before you remove the strut nut Remove the nut from the top of the strut, be careful there may be some tension left over after you have the mount separated from the strut and spring, remove the stud by placing it either on a vise or a socket slightly larger than the stud and hit it with a hammer, it should come out pretty easy Link to comment Share on other sites More sharing options...
new4x4r Posted July 15, 2009 Author Share Posted July 15, 2009 it should look like this when its out then widen the holes with a 33/64 drill bit test fit the 1/2 bolt in the holes Now drill the top half of the mount with the same bit Now drill the strut tower in the engine bay Link to comment Share on other sites More sharing options...
new4x4r Posted July 15, 2009 Author Share Posted July 15, 2009 make sure you test these holes too, its no fun trying to line up the heavy strut assembly and find out theres a burr in the way Now bolt the two halves of the strut mount together Attach the strut spacer to the two halves. Make sure the "Made in Canada" sticker is right side up (Deep threads at the top) if you don't do this the bolt will not pull everything in tight Now the fun part, reassemble the strut ass. I got "the wife" to do her best impression of threading a nut... didn't work out so well. SO I held the strut mount on top of the strut/spring with my body weight and got a couple threads hooked up on the nut. From there I could tighten it down with the ratchet Now release the spring compressors and it should look like this Link to comment Share on other sites More sharing options...
tekazgtr1984 Posted July 15, 2009 Share Posted July 15, 2009 So far so good. Nice work! Were those alts I saw in a few pics? Link to comment Share on other sites More sharing options...
new4x4r Posted July 15, 2009 Author Share Posted July 15, 2009 Now wiggle the entire strut assembly back into position tighten the nuts in the engine bay re-attach the sway bar link, abs wire and brake line, as well as the camber adjustment bolt that you probably didn't break disassembling the strut :-) (someone send me a message where I can get the good adjustment bolts... Fleurys hahaha) everything should look like this when its all finished... only less dirt, maybe. And thats all! Level again Link to comment Share on other sites More sharing options...
Daddy Rim Posted July 15, 2009 Share Posted July 15, 2009 How about bolting from the top down....that could work no ?? If we cut the existing bolts (grinder), then start the new ones from the strut tower, screw in the threaded spacer, then put the nut under the upper spring retainer... same force, same strenght, just the bolt head on top instead of under... That would save alot of headaches and time..... I know the last time I had to compress the ac coils, it took a real good spring compressor (garage strenght and even then, the guy worked alot for it to compress enough....) As was mentioned exact bolt length is a little tricky, and you would need either a weld nut or some magical hand contortions in order to hold the nut under the lower isolator bracket while fastening; it's a pretty damn tight fit on the inside of the strut to the strut tower. The only way I see that working is with weldnuts on the lower isolator bracket. And doing it this way really wouldn't require that the spacer be threaded, it could be simply a clearance hole. With weldnuts, the only variable left would be having proper bolt length. 1/2" x 2-1/4 would most likely work and not hit the upper spring perch. To negate all of this broohaha, I have been supplying new lower isolator brackets with the larger hardware already installed as an additional option. This negates a few of the steps that new4x4r had to go through. Link to comment Share on other sites More sharing options...
new4x4r Posted July 15, 2009 Author Share Posted July 15, 2009 yeah theres all kinds of good stuff around the work bench.. some prototype Wind Gen Rotors, alternators, I think there was a starter from a 1940's Cadillac. haha Link to comment Share on other sites More sharing options...
Daddy Rim Posted July 15, 2009 Share Posted July 15, 2009 And thats all! Level again Great job at posting pics! Your truck looks great! Link to comment Share on other sites More sharing options...
Recommended Posts
Create an account or sign in to comment
You need to be a member in order to leave a comment
Create an account
Sign up for a new account in our community. It's easy!
Register a new accountSign in
Already have an account? Sign in here.
Sign In Now