
PathyGig12
-
Posts
413 -
Joined
-
Last visited
-
Days Won
30
Content Type
Profiles
Forums
Calendar
Everything posted by PathyGig12
-
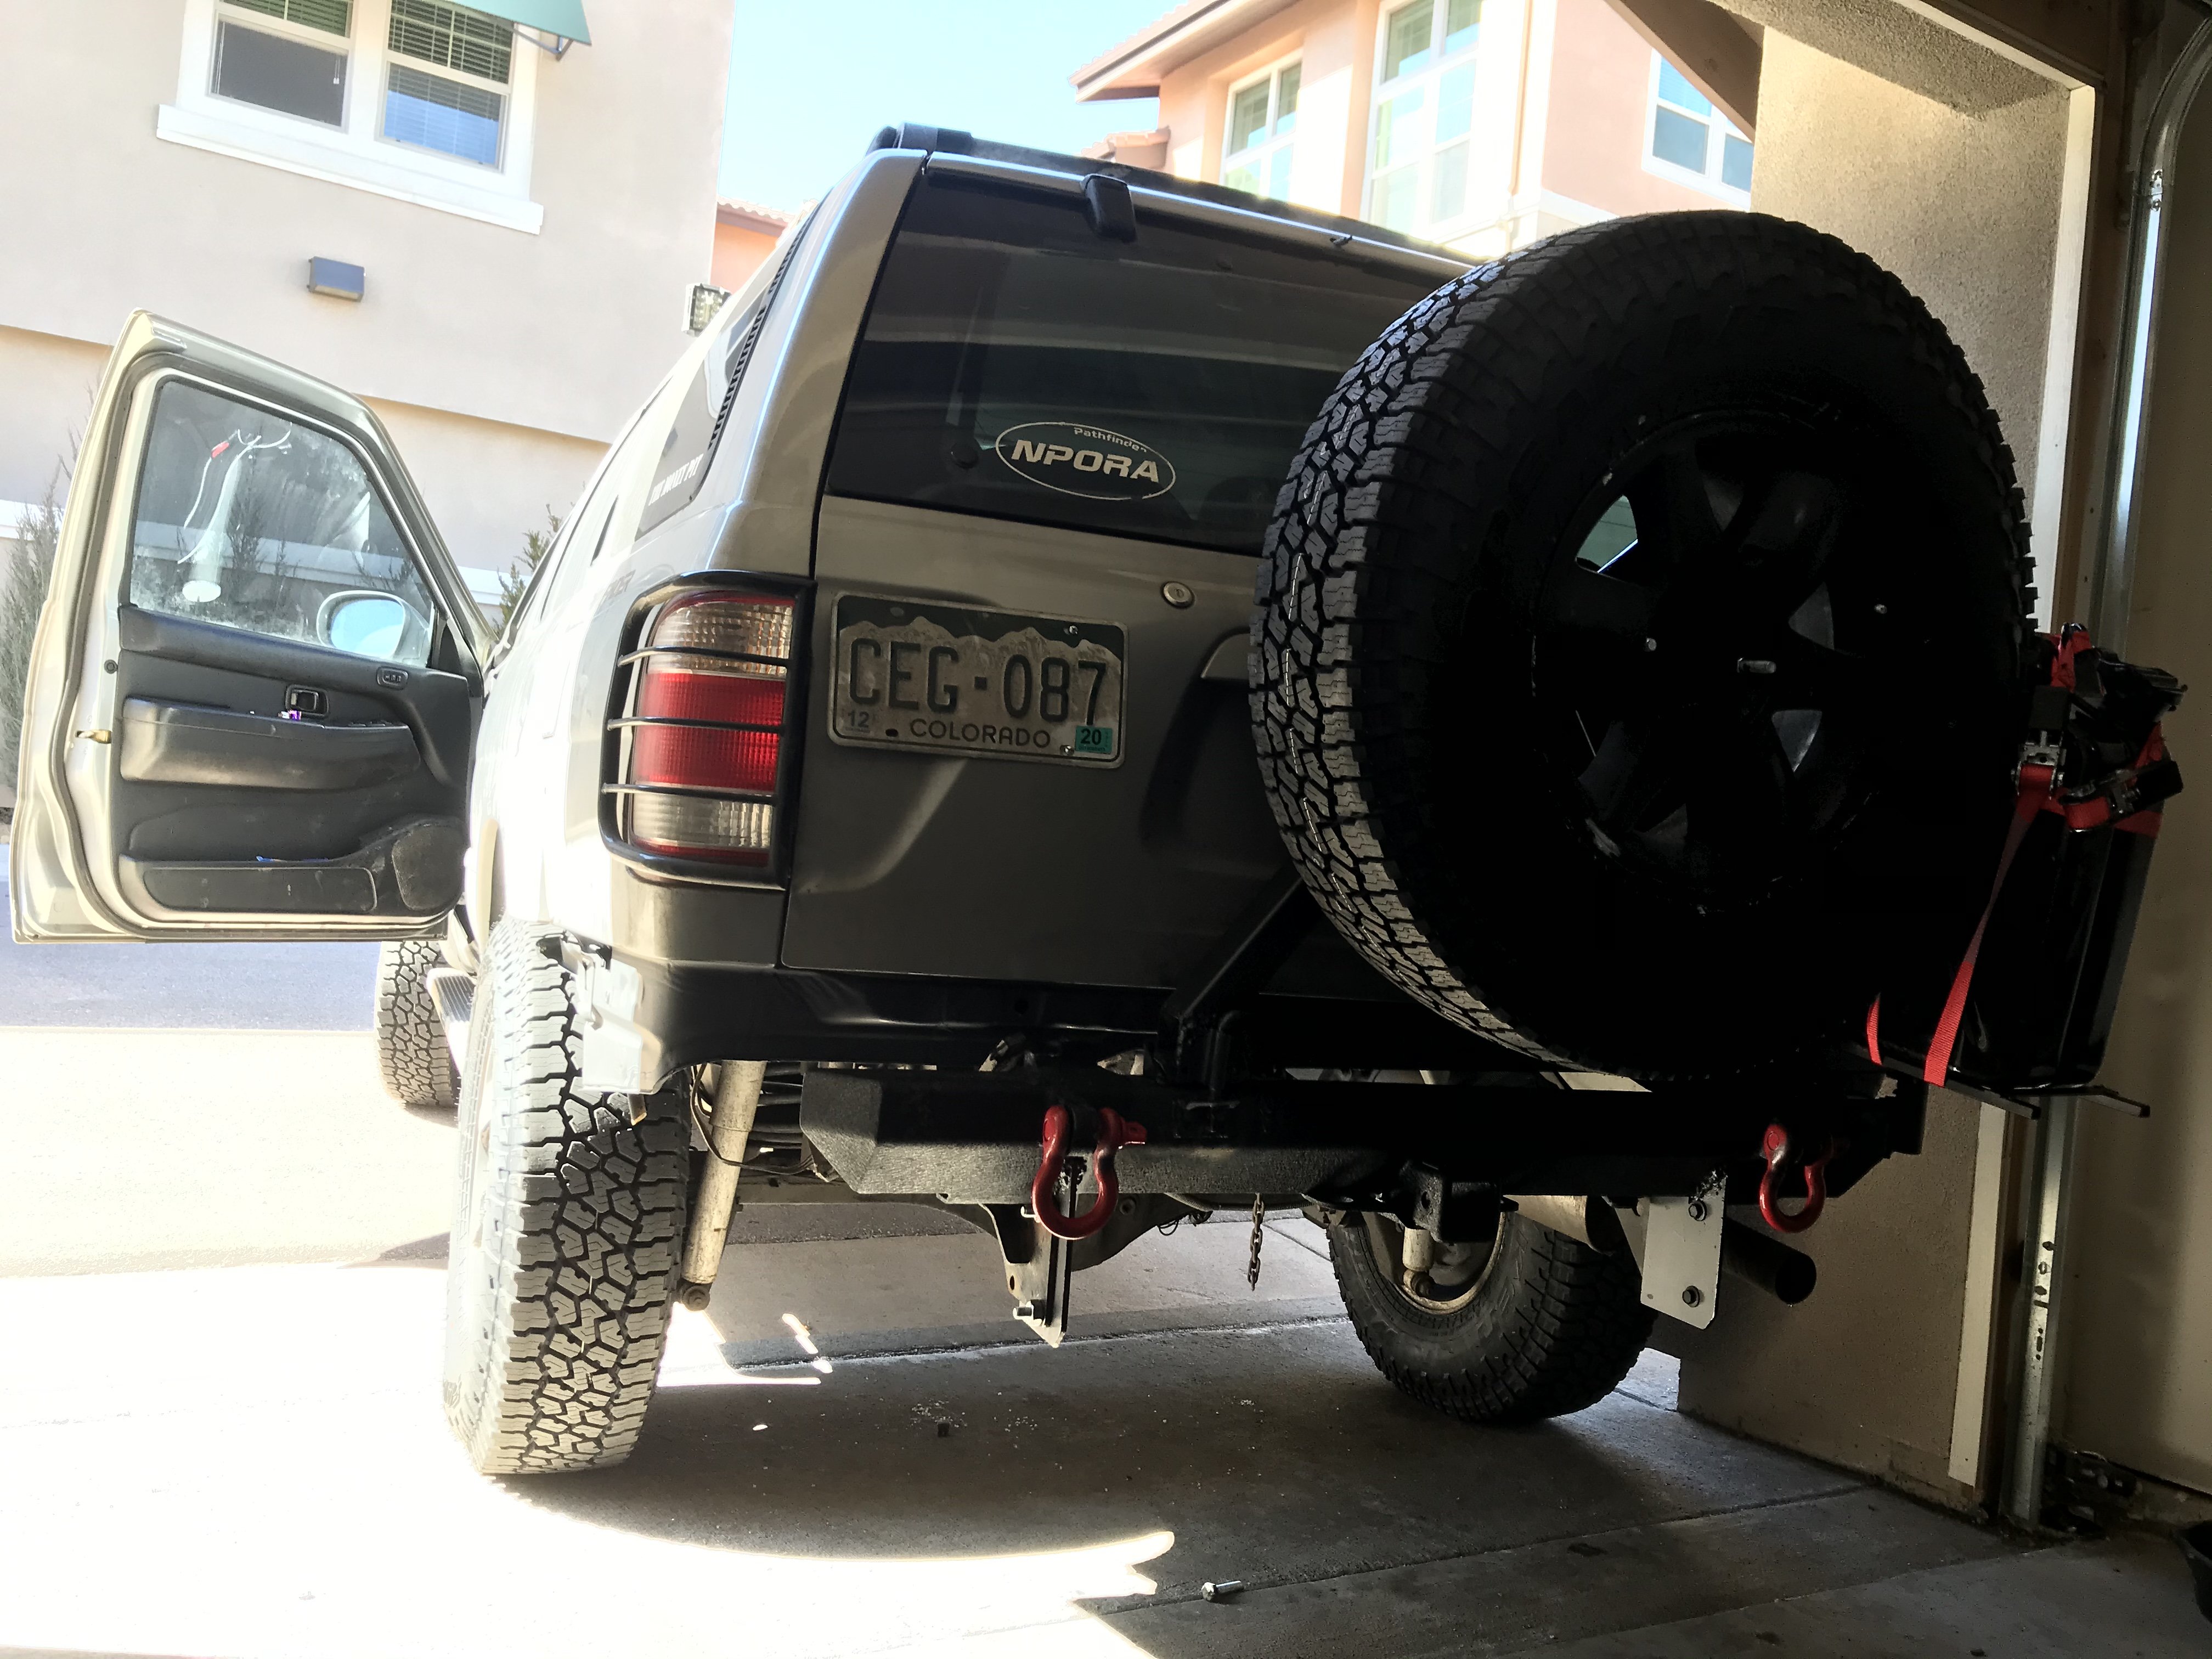
Rack is done and mounted, need to wire up the lights still. I really have to be in the right mindset to do anything electrical so I’ve been putting it off. I’m still trying to source a different light bar for the front so that’s my main excuse. I won’t post pics until it’s fully set up but the rack itself is very sturdy and the wind noise seems to be less than with the previous set up. The only issue I had was a bit of whistling because two of the mounting tabs in the front were catching the air JUST right, but Im using hooks to plug them so it’s all good now. Im also pretty much done building the drawer system. It’s mounted using the 4 cargo tie downs in the back and I used 1/2 inch plywood with drawers slides. I just put on the carpeting yesterday and now I need to finish the last few things like adding handles and organizing the tools and spare parts inside of them, but they are 100% functional as of right now. Instead of regular carpeting, I went with the stuff that they use for oil spill pads because it’s heavy duty and has a rubber backing that won’t let oil, grease, and solvents seep into the wood. I’ve learned from my previous spills back there that it’s bound to happen, either from tipping something over or from the dirty tools I think in total, the drawers only add around 30lbs and I don’t notice any effect on the ride height. The rear still feels roughly the same as well. The drawers are only 24 inches so I have some space behind the seats for longer tools, recovery stuff, and water storage. Again, no pics until they’re finalized and the interiors are organized. I’ve got big plans for the layout, gonna be awesome
-
It’s coming along nicely. Only have a little bit of free time here and there so I’ve been tackling it in stages. I’ve welded the verticals and crossbars on now, as well as the mounting tabs for the lights and tools, plus a few extra for tie down points. It got its first coat of paint day before yesterday and last night I bed lined it to give it some better resistance to chipping and scratching. It was -6 degrees when I sprayed it, so that was fun. I’m just determined to get this damn thing done. I left the truck idling next to the garage so I could hop in and warm up every few minutes Anyway, I also managed to mount the lights and tools once it was dry to the touch, now it’s just a matter of mounting the rack to the rails and soldering the wires up. You’ll notice I gave up on the idea of mounting the bar under the rack, and that’s mostly because the angle of the brackets that come with the bar don’t allow enough adjustability to aim the bar correctly when mounted upside down, so I could either bend my mounting tabs or put it right side up and I went with the latter for now. Looks pretty small with a full width rack though! I think I’ll have to upgrade to a 50” pretty soon lol Gotta love the makeshift painting set up/ repurposed heavy bag chain. The biggest challenge was keeping overspray off of the riding gear
-
Interesting. I’ll see what I can come up with
-
Thanks goat. I think you might be on to something with the 4 mounts thing, I just wasn’t sure it would be strong enough. Like I mentioned earlier, an amber bar is definitely on my short list. At the very least adding amber lens film to the front of mine I hear you on the wind noise but I don’t really mind it that much. My current set up has LOTS of wind noise but I’ve gotten used to it by now
-
Bingo, I think it’s the best way to be able to get that full width
-
I’m not sure I follow what you mean? The cross bars of the basket will be perpendicular to the frame rails of the truck and sit directly on top of them. With the wedge spacers for the ends the basket will sit flat along the roof and the bolting will be the same for all of the crossbars. The idea is to use a modified bracket that works like a U-bolt for each crossbar and bolts into two captured nuts in the rail The adjustability in the brackets shapes will allow for the slight angle change that the wedge spacers will make relative to the rails
-
One other aspect of this rack is going to be accounting for the curve of the roof rails. I’m thinking I’ll have to use some sort of wedge shims towards the front and rear to act as spacers between the basket and the rails. My current basket is much shorter and even it was starting to bend slightly as I tightened it down flush with the rails.
-
Sorry when I said “cross bars” I just meant the new crossbars that will be part of the basket. The factory rails will provide the mounting points with captured nuts/bolts and hold down the bars with some sort of pre drilled brackets that screw into them As for the hood glare. I’ve been considering this for some time now, and I think I want to make some sort of thin shelf below the light bar to keep the light from aiming directly at the hood. I’ll see what I can come up with, but a basic way to do it would be to mount the bar right side up with L brackets coming down from the basket to support it underneath instead of from above, and then put the thin sheet of material over the studs between the bar itself and the brackets, then tighten it all down. If positioned closely enough to the bar, it wouldn’t have to be too long to keep glare off the hood. Then again the easier (and cleaner) way would be to sink it back into the basket frame and let the basket corner take care of the glare. If I end up going this route I’ll chop the basket a few inches shorter so there’s no overhang since I wouldn’t be using it anyway. I’m also looking in to using amber film for the light bar like I’ve seen others doing on this site. That alone should cut down a lot of glare
-
The basket frame is taking shape. Needs vertical bars and cross bars now. Can’t decide on how many I want or how to best lay them out. Then I’ll go back and smooth out my welds and paint the sucker. I’m going to use the factory rail channels to mount it the crossbars will sit over them and I’ll be able to use modified U bolts to sinch it all down
-
Update time. In the past month I got the upstream O2s swapped out finally (what an absolute pain in the ass), and changed the EGR valve as part of preventative maintenance and partially in an attempt to address my excessive fuel usage. Didn’t help much, but it does idle a bit lower now for some reason. I also got a cat code recently that popped up for a few hours but it hasn’t come back since I cleared it. I’m wondering if they could benefit from some cleaning? That could help improve mileage a bit. Other than that, I’m going to just have to chalk it up to the crap load of gear and poor aerodynamics lol. I removed the original chamber thingy for the air intake so now it’s a straight path between the filter and the outside air through the hole in the body. Not ideal for water intrusion but I have plans for some mods to address that. Currently Im in the process of fabricating a new roof basket out of some steel tubing. I’m going radical this time and making it full length and width. It’ll stretch 48” between the tops of the doors and run from slightly over the windshield to the furthest back point that still allows hatch access. The reason I’m overhanging the windshield is so that I can then mount the main light bar under the rack so that it almost becomes a windshield mount but without needing to drill any holes in the body. The extra real estate of a full rack will be seriously helpful for long road trips with the pets so that I don’t have to crowd them with a bunch of suitcases/camping gear in the back seat. I’ll also have room for the second spare and some additional gas cans if necessary Oh yeah and I just discovered aluminum extrusions on Expedition Portal, which is bad for my wallet but good for my creative mind. I’m considering building a simple set of drawers for the cargo area. It’ll take a while to put together all of the materials and figure out my favorite layout but I’m hoping to have it done by summer. Mostly I just want a place to put tools and spare parts without using tool boxes like I’m doing right now. It’ll free up a lot of room and declutter the back so I can make it usable for the pets. Only question is wood vs hdpe for the main panels. I think I want plastic for weight savings but it’s more expensive so I’m not totally sold yet
-
Constant or Variable Rate Springs
PathyGig12 replied to AR97Pathfinder's topic in 96-2004 R50 Pathfinders
Mine top out constantly on the road because denver pot holes are terrible. It’s been a year since I put the AC coils on the front and no damage yet. I do food delivery most days as a side hustle so the truck sees a LOT of miles on these pot holes. -
Possible Rear Lokka Development
PathyGig12 replied to PathyDude17's topic in 96-2004 R50 Pathfinders
Is is too much to ask for an E-locker that priced around $700?? Lol Im not super into the idea of a rear Lokka but it’s nice that there might soon be an option for it. -
PathyDude's R50 Projects (03 SE 4x4)
PathyGig12 replied to PathyDude17's topic in 96-2004 R50 Pathfinders
Sounds dope. Every mention of lockers makes me want them more. COVID sucks -
PathyDude's R50 Projects (03 SE 4x4)
PathyGig12 replied to PathyDude17's topic in 96-2004 R50 Pathfinders
“All mode” locker switch? Do tell.... Also, Patrick’s rear bumper is still one of the sickest things I’ve seen on a pathfinder. -
Coil over shocks, good idea? Bad idea?
PathyGig12 replied to MTGunner's topic in 96-2004 R50 Pathfinders
Link to the shocks? -
It’s possible, but my hood is not super perfect anymore so there’s a sizable gap around that area and I think during the winter the outside air gets in there enough to make it nice and cold. But overall I haven’t noticed much different either way.
-
I’m thinking here somewhere. Plenty of space now that the airbox is gone. Just need to build a bit of a bracket/platform
-
Come on, SOMEBODY must have successfully changed U-joints on an R50 before?
-
Well I ended up going with the 2780 compressor which is the smaller version of it. Should be plenty good enough for my needs and will likely fit a whole lot better. If not, I’ll look into making a small frame and mounting it in the spare tire well with a thin gauge plate beneath it to give some protection from the elements. Or something. I’ll have to first see how big it is. There’s a chance I could also fit it in the cabin somewhere
-
Yeah man that’s what I was thinking. I might be able to handle it but my girlfriend sure as hell wouldn’t. I’ll keep saving for the rear locker for now. Just bought a smittybilt compresor and hopefully it’ll be able to mount in the engine bay and work with the locker.
-
Super interesting. Now I’m curious how the lokka works with manual hubs and the ATX14a. Does it actually get ignored by the system when the hubs are unlocked or does it still interfere? I’ve heard it’s supposed to be invisible but since finding out that the front is still spinning while unlocked, I’m not so sure of the effect.
-
These look promising for the rear as well, but it’s hard to know for sure GMB 2150029
-
I was reviewing this thread for info about U-joints but it left me more confused than when I started. Anybody know what the consensus is for R50 u joints that fit properly and aren’t a pain in the ass to install? For now I’m ruling out parts store garbage brands and want to stick with something solid, but if anyone has part numbers of “lesser” brands that have worked perfectly and been bomb proof on their trucks, feel free to mention them! As I understand it, the snap rings must be internal for the 2001 with an Auto transmission, so I did a search and found that the spicer 5-3218x seems to be correct for the front but I’m wondering why it was never mentioned in the above thread? I also can’t seem to find any for the rear besides the 5-1505x which was said to have external snap rings, but multiple websites list them as having internal, so I can’t tell. I took a look at neapco for the rear but they no longer list the 1-0029BF, only the regular 1-0029, which hawairish stated he had lots of trouble with.
-
Haha believe me, I can’t even get her to pay attention long enough to understand what the hubs do! She’s like nope I’m not touching those, so now if there’s a chance of snow I leave them locked and in auto mode so there’s no thinking involved.
-
Yeah I’ve always considered the Lokka as a good option but could never bring myself to add another complicating factor to the front end. I guess I may be overthinking it but if I can’t even trust the transfer case to be doing what I expect (because of the manual hubs), then adding a mechanical locker just puts another layer of complication on top. If that makes any sense? I understand that it’s been proven to work well but something about the traction dependent behavior still makes me worried on patchy snow, especially because my girlfriend drives the rig sometimes and wouldn’t know what was going on mechanically if it suddenly locked up The other side of the equation is that I prefer rear lockers in general, just because the weight is on the rear when you’re climbing hills with technical terrain, especially with how heavy my rear is with all the cargo and tire carrier. I get the logic behind locking the IFS front but I also think it’s a little more risky because the CVs are not as strong as the rear shafts. The other thing a rear locker gets you is a backup option if you snap a CV. You can just remove it, unlock the hubs and you’ll still have a locked rear that can do almost as much as you could using 4Hi Ideally I’d like both eventually, but my top priority is the rear
