- Sign In Changes: You now need to sign in using the email address associated with your account, combined with your current password. Using your display name and password is no longer supported.
- If you are currently trying to register, are not receiving the validation email, and are using an Outlook, Hotmail or Yahoo domain email address, please change your email address to something other than those (or temporary email providers). These domains are known to have problems delivering emails from the community.


snosnk
-
Posts
164 -
Joined
-
Last visited
Content Type
Profiles
Forums
Calendar
Everything posted by snosnk
-
These are the only pics i have as of current. And my cam sucks. I'll take some more today and postem later. To mount the jack i used two short (6") pieces of tubing with a carriage bolt welded to the top. Welded those to the top bar on the tire carrier spaced apart far enuf to fit throught the holes in the jack. And no, the back window wont open. I have to open the tire carrier first. I think i couldve moved the jack back a little so i could open the window but i had the factory spare on there when i put on the jack. It was a pretty close fit. Now with the new matching spare (different offset), theres more space to move it back. To mount the can i used a small piece of angle iron welded to the bottom bar so it looks like a small u. This hook grabs the bottom lip on the can. The top is a piece of tubing with a carriage bolt welded to it, with another small piece of angle iron to hook the handle on the top of the jack. Secured with a wing nut. better pics will help. I havent noticed any sagging in carrier yet and it been like this almost a year.
-
Need some new pics. Can is white now. New rear bumper goes to the powder coaters the end of the month. Also added a cb antenna mount on the right side of the tire carrier.
-
I had my OME's installed before I had the rear control arms replaced. It didnt help the infamous wiggle down the road. I went with having the control arms replaced instead of just the bushings because it was going to cost less (still 700$). The shop manual states 2 hrs / bushing to R&R them. 8 bushings is 16hrs. at 50$ / hr shop rates thats 800$ not including parts. The control arms were about 120-140$ each and it only took the mech a couple hrs to install em. I had the same prob with my emu's in the front, negligble lift. I added a 1 inch teflon spacer on top of the strut and so far so good. The front sits a little higher than the rear now. That will go away soon as the pathy is gettin a new bumper. I think it will settle the front to just the right height. I have noticed that the front cv joints are starting to groan because of the axel angles, and am currently looking for some manual hubs to fix this problem. Any body got a line on manual hubs for an R50? I agree with you that the emu's have a much better, firmer ride than factory. And coupled with OME shocks on the rear the pathy twists up pretty good.
-
I did a clutch install a few months ago and trashed the crank angle sensor. If its not bent inside the bell housing you can get it out with a 10mm ratchet wrench. Mine was bent so I had to remove the trans to get it out. First jack up the back of the engine do you can get your hand in between the firewall and the back of the engine to disconnect it. Squeeze the plug and pull to remove the wireing harness. Then You have to remove the front driveline and drop the crossmemeber so you can lower the rear of the trans to get to it from underneath. its at about the 11:00 position on the top of the bell housing. Reach up on the drivers side of the trans and remove the bolt that holds CAPS heat shield. Drop the shield and lift the sensor. it should come right out. If not its prbably bent and you'll have to drop the trans. Hope this helps. and good luck.
-
Just a few tips for your clutch install: Have lots of extensions on hand to reach the top bolts on the trans. You can do it throught the hole in the trans hump from inside your truck. It takes two, one under to line up the socket and one in the cab to turn the wrench. You'll have to take out the crossmember first and lower the back of the trans to get to them. There is a bolt above the starter that you cant see till the starter is out. There is a bolt on the drivers side that requires lots of extensions to get to from in front of the radiator. An if you have the resources to build a bracket with a loop that will bolt to the top of the trans where the shifter goes, you can use a cherry picker to hold the trans from on top. Makes for much easier line up of the tranny. Will post pics of the one we built later. The pilot bushing is a real pita to get out. I used a "tap" , Just twistedd it in then wiggled it back and forth for about 20 mins till it came out. watch out for the crank angle sensor on the top of your bell housing at about 11:00. Its real easy to mangle in the install and removal of your trans. You can jack up the back of the trans to get a little more room at the back of the engine. This will give you some more room to unplug it before you remove the trans. There is one 10mm bolt that holds it and its heat shield in. A wratchet wrench is the easiest way to get that bolt loose as a wratchet wont fit. Watch the wire loom on the passenger side to the side of the tranfer case. You dont have to uplug it if you move the trans back just far enuf to get the clutch out and dont lower it to far.. I replaced the clutch in my 96 about 3 months ago and couldnt get the pilot bushing out, so I elected to leave it in. Since, i have had the problem of a noise, the bbbbrrrrrrrrppppppp, sound that i have seen in so many posts. I also trashed the crank angle sensor. I tried to get the sensor out of the top of trans without removing it but it wouldnt budge. I broke the connector off trying to get it out. So yesterday, with the help of a couple of buddies, we pulled the trans to replace the crank sensor and figured while we were there we could take another crack at the pilot bushing. The tap idea worked great and we had the new bushing in in short order. I waited till we had the trans bolted back up to put the new crank angle sensor in. so as not to mung it up again. Woohoo, no more orange lite on the dash. The sensor was bent to about a 45 degree angle inside the bell housing from contacting the ring gear. This is why we couldnt get it out from on top. I still have it and will post a pic after i borrow a camera. The first time took all weekend from friday nite till sunday afternoon. Yesterday, if we wouldnt have taken so many smoke breaks, we could have done it in about 6 hours. Much easier the second time. Good Luck KC
-
Hey 90seven, Try checker auto parts. they'll do it for free. or at least they will here.
-
a buddy o mine had what sounds to be pretty close to the same problem. Only he didnt have to punch the throttle, it would just up and die. He'd let it set for a minute and it would fire up and go for a few more miles. It just kept getting worese till it just wouldnt start any more. He took it to the local stealer and they diagnosed it as some relay in the fuel system. Whether it be a fuel pump relay or what, i dont know. The relay was replaced and he hasnt had a problem since.
-
I have CBI Offroad Fab custom building a tube rear bumper for me. I hope to see it next week. When its installed I'll post some pics. CBI Offroad Fab
-
1996 se, 120,000 miles In progress of changing timing belt, water pump, and belts.(water pump should be here in an hour or two) an as yet unidentified part under the intake leaking antifreeze. all but 1 mud flap torn off. right front fender flare on front bumper hanging on by a prayer. hazzard light button light doesnt work front pinion seal leaks spare tire carrier latch sticky oxegen sensor is out trashed crank angle position sensor clutch hose from (frame) to trans needs replaced skid plates torn off from a jaunt through the sagebrush rear bumber taken off (waiting patiently for my new custom bumper, in progress) broken drivers side headlight windshield looks like a roadmap one fog light not working either the trans or transfer case has a howl after 4 wheeling, comes and goes (might even be the water pump (i hope)) CB is shot. needs a drivers side front axel ( I think the lift might have a little to do with that) Misc front suspension bushings and she really needs a bath Like others, I am sure theres more but this is a pretty complete list Just replaced the clutch, front brakes, bearings and seals. (did the bearings and seals because I broke two studs off the drivers side front while taking off the wheels to do the brakes) My Pathfinder
-
Steve made some pretty cool mounts that bolt to the factory running board locations. This is what they looked like before paint.
-
These are my cutom sliders from CBI Offroad Fab Pretty stout and have seen a few rocks with no more than paint damage.
-
http://npora.ipbhost.com/index.php?showtop...t=0entry20415 This post tells my experience.
-
Just started replacing the clutch in my 96 last nite. Got the parts in a kit from western transmissiion in Idaho Falls, idaho for Just under 160.00. It came with Pressureplate, disc, pilot bushing, TO bearing and centering tool. Some of the trans bolts are a real pita to get to but its loose and setting on the jack. hope to get it reasembled today. Then wheelin tomorrow.
-
The studs werent to bad to get out. I used a small sledge hammer. You have to support the edge of the piece that the studs are in with something while you beat them out. Its pretty flexible and will just bend if not supported. I used the edge of a table. One person can do it but two makes the job much easier. One to hold the strut an the other to beat out the studs. The teflon sheet was about 18" square by 1" thick. I halfed it to get two pieces about 9" X 18" X 1". Then I drilled a 4" hole in the center of each piece, marked the stud holes and driled them out. Then trimed the piece to fit the top of the strut. There was alot of waste and I probably could have made four blocks. I talked to Jay yesterday and have him watching for some more teflon so I can huild a set for a friends '98. I have been wondering about installing two blocks to gain one more inch but wonder if there will be any side to side shear forces i need to worry about.. Maybe countersink some bolts to hold the two pices together before bolting them in.
-
only 1 pic worth showing
-
I saw some where (maybe on this forum) where someone had modified the fog light relay to work even when the head lights were off. It was something like finding the leg of the relay that closes the relay when the headlights are on. they trimmed that off and pulled the cover off the relay and bent the contacts so they were closed all the time. This should allow the fogs to be turned on any time, but could be left on when the key was off. I think if I were going to try this i would find another relay to experiment with and keep the factory one unmodified. That way if it didnt work you could just put the factory one back in and be back to the way it was.
-
history: OME springs on front and rear with OME shocks on rear and factory replacement struts on the front. True lift was about 1/2" to 3/4" in the front and about 2" in the back. In this configuration the front end seemed quite abit lower than the rear. Also having problems with 31x10.5x15 tires rubbing on the front inside fender wells. I dont want to use spring spacers as this will (possibly) cause the struts to over extend. Solution: A trip to the local junkyard where i found a piece of teflon about 1' thick by roughly 18" square. I cut his in half using a sawsall and a wood blade (metal blades dont cut teflon very well, it just melts) Using a 4" hole saw i drilled a hole in the center of each half. I then pulled the struts off my pathy and fit the pieces over the top of the strut and marked where the strut studs touched the teflon. Then on to the drill press for some drilling. I drilled the holes 1/16" larger than the diameter of the studs in the strut. I then placed the teflon on the ground and set the strut upside down on top of the teflon so the studs were in the holes drilled on the drill press. Using a marker, i traced the top of the strut onto the teflon. Then using the sawsall i trimmed the exceess off and checked for fit. Looking good so far. Trip to the hardware store to pick up some 2" grade 8 bolts, washers and some nylocks. I then used a small sledge hammer to beat the studs out of the strut. To reasemble I had to put the bolts in from the top. In this order bolt, washer, body, teflon, strut, washer, then nylock. The inside nylock is the most difficult to install, I used the box end of an end wrench with a piece of electrical tape to hold the nylock in the the wrench while i had a friend tighten the bolt from up top. The whole project took about 6 hours. 5 hours on the first side as it was build as i went and about and hour on the other side as i had figured out what the heck I was doing. I did this last thursday and had it aligned today. All is well other than castor is out by just a "hair". Now the front end sits about 1/4" to 3/8" higher than the rear. This should level back out when i get my front bumper and winch. Cost: Sheet of Teflon: Free Thank you JayDee :bow: 6- 2" grade 8 Bolts, washers and nylocks and 6 2 1/2" grade 8 bolts (not used, i picked them up just in case the 2" didnt fit): $5.69 Thanks to Steve Egan at CBI Offroad Fabrication for the use of his shop and air tools. I'm looking forward to having new bumpers, and basket and ...... :cool2: I do have some concern of how the cold weather here will effect the teflon. Its used on snomobiles for the slide rails so I'm thinking that may not be an issue. If there is something else I might need to know about, please let me know. Sorry, no pics. I have to go to town today so I will borrow a cam and get some pics of the installed lift.
-
Popping noise after installing new springs/shocks
snosnk replied to Trialsin26's topic in 96-2004 R50 Pathfinders
maybe cv joint angle?? I have emu springs and rear shocks, but havent experienced any popping. Maybe on an extreme twist up. but ... dunno? -
check out page 2 of the images section at http://www.cbioffroadfab.com Steve has some pictures of my sliders there. I have a 96 and the sliders are bolted to the factory running board mounts.
-
It probably would open but the jack is in the way. The offset of the different rims pushed the spare back far enough that the glass would open if the jack were not in the way.
-
Substitute for flexible "skirting" in wheel well?
snosnk replied to jaafallon's topic in 86.5-89 WD21 Pathfinders
a buddy of mine used the parts of a belt off of a potato piler. He cut them to fit . Looks pretty good. I think the belt of of any type of piler would work. Watch your local junkyards. -
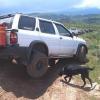
and another. I just noticed that 31X10.5 looks huge in this picture.

-
Here's a couple of pics of my carrier. Hope they help. From the looks of the carrier, it may take some body work to integrate the facetory carrier onto a pathy with out the factory brackets. And whp know about the structural support inside the fender. I'm sure CBI Offroad could build something on a custom bumper that would work. He has a couple of tire carriers that are hitch mount. One fixed, one swing down. The biggest problem I can see with this is that you have to remove the entire carrier to open your gate (fixed), or stumble around your tire (swing down) as it is right underfoot. If you want to check shipping charges Idaho Falls, Idaho is the city and postal code is 83401. If ya like, I'll borrow a digi-cam and get some more detailed pics of the hinges and such. Let me know

-
I had good luck. Ordered springs and shocks that arrived is less that a week.
-
I had a '85 Toyota with LSD. When I blew it up it cost almost 1800.00 to rebuild (which I had done twice (OUCH) ) Even after that I still had problems with gear lash, which I think lead to early failure. The third time I had it done I had them check on replacement cost for the whole third member, it was about $850 +/- $100. The replacement lasted much longer that the rebuilds.