
NissanNut
-
Posts
121 -
Joined
-
Last visited
Content Type
Profiles
Forums
Calendar
Everything posted by NissanNut
-
I read about some countrys dont allow welded steering components etc. I had to add a sway bar so the bumper got put on hold. I have a wheeling trip planned 8/2 so I plan to add the winch from the truck and I made some bumper ends I need to add.
-
There actually 1/2 bolt holes spaced apart for easy height adjustment. Better and stronger than any coilovers IMO.
-
My last 6 Nissans were all SEs. I have had 2 XEs and 1 GXE (Quest) and 2 bare bones. I love the SE for the intermittenant wipers and CC. I always love the optional power package. Everything works in all mine current 3 SE V6 Nissans. So easy to fix this stuff. I did not get the sports pack in my 92 pathy. It had the 31s, sunroof, rear carrier, lsd or rear discs but it did come with previous owner installed 31s on legos! The only feature I dont use is the auto climate stuff. I love the Truck version. 1-4 is all I need with super cool AC. I have since installed lsd and rear discs, upgraded to r134 also. easy swap. Its my only Nissan out of the last 7 that does not have a sunroof.
-
Did you send it to Rob? Or I can tell you if you have an xe or se. But by law you will have a sticker on the door. Mine is 5mph off now. Because my pathy did not come with 31s. I recently picked up a 31tire speedo for the tcase. one is 17teeth versus 19tooth. I used a GPS to calculate correct speed.
-
I was going to move mine. But after flexing out the suspension with no coils or shocks. I could not get the steering tres to bind in any scenario. Full droop hard left and hard right. My drag link is not perpendicular to the frame rails. But its seems to work just fine. One thing to remember with radius or link suspension the wheel travel arc is away body as wheel travels up. Unlike IFS or SOA leafs. My axle is maybe 1" forward of stock.
-
Very nice. Almost exactly how I did it. I just added some scrap steel under the right side tab to connect to frame.
-
OK cool. I like that axle plenty of room to mount brackets. I just added 1" spacers up front (1.5 in back) I have a tighter turning radius with no rubbiung now. You may want to cut and turn before you weld all the brackets on.
-
I have been updating the spreadsheet allot lately. Apparently some part numbers changed at ballistic. http://nissannut.com/projects/SAS_3link There is a price list on XLS. so glad some one is taking advantage of this setup. I am loving it. I just added a sway bar and it drives AWESOME!
-
There is plenty of room for another link on the right side. I have pix of an xterra setup that way. I only used the left side for upper link because my setup started as a radius arm and I switched designs half way through. There is definitely room but it will get busy on the right side axle mounts. I also wanted my upper link as high as possible. Very nice build so far. I hope the high pinion does not limit space for the panhard and upper axle mount. You may have to put a bend in the panhard. I started another 3 link on my buddys d22. Only did the cut and turn so far.
-
Yeah BLs make it hard to use those bolts. I dont use BLs anymore. I had them on other Nissans years ago.
-
Oh the factory bumper bolts are small. But there reinforced with the lower bolts. The 9k winch mounting bolts arent much bigger. 10mm I think. I have been running the same setup on the truck for years. I could add one extra bigger bolt/nut up high. I look into it before I use a winch on it. I am going to plate that stock piece that has a open hole.
-
Ebay, I bought all different sizes. I think its from a D40. I like to modernize my vehicles in every way. R134, new emblems etc. I just love the new style. I have one at both ends of my 92 and 93.
-
No drilling to frame or body. I use the stock 4 bumper bolts. And the 4 bolts on the bottom of frame were Tow hooks go. 8 total.
-
I also trimmed allot of sheetmetal and painted the core support while it was off.
-
Thanks, I think thats what I did basically. I built my first bumper starting at the brackets. This one was much easier starting with a nice level surface then adding brackets later. I did take the bumper off and weld it up last week and added some quick paint to prevent rust. Keeps raining here. Been working on some other projects. Added a sway bar, 4.9 gear installs (firends pathy), wheel spacers, PS power increase and fixing bad electrical connections on battery, , sticking calipers, warped rotor, fixed flashing dome light. The bumper will be on the list again soon.
-
Here is some more pix of the brackets. Top view of top brackets. side view of all brackets.
-
Sure.
-
The bumper uses the stock OEM mounts, the lower mounts are just to reinforce the uppers. 8 bolts total. NOT like the w/d22 style with 4 bolts down real low. Stock brackets only. lower brace. lower brace triangle You can see the upper mounts partially in this pic. More to come!
-
Texas now. Was CA for 2 long. I have no need for a vg30. I have one spare 94 complete motor.
-
Should be able to find a rebuilt long block for around 1k. Never know what you get with a used engine. http://www.jisengine.com/list-prices/html/23022.html dont know if this place ships, but I know oreilys and Autozone can get long blocks.
-
I will add measurements to website soon..... Got the bumper tacked on. And some more mounting details worked out. added some tube to stock brackets. Mocked the height. Made the lower mounts. Added some 4" flat stock to connect brackets and bumper. acts as a skid plate for front crossmember. Brackets to conect frame to bumper. Blah, blah.... its on! Long way to go still.
-
Been sanding and grinding, nothing exciting about those pix. cut a hole for the hawse fairlead. I dont like this HEAVY steel fairlead. So I ordered an aluminum one. Going synthetic line on the winch that goes in here. Been working on the brackets allot. basically 2 old bumpers and trailer hitchs I got for free. I chopped them up and will use for frame mount. Il take some more pictures of brackets when I finalize the setup.
-
I cut a hole for the winch wire and did some grinding /sanding. Ill post more pix when I start the brackets.
-
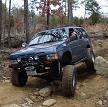
This was a good sideways test of the bumper. The d21 bumper has held up great with winching. The winch is basically right between the stock brackets. No movement noticed. wd21 rear bumper is 1.5 x 3 .180 (3/16) tube. Fit in the frame rails perfectly. My buddys had a 3" bl so I used flat stock. I can take off the winch bumper and reinstall my self quite easily. Its easier than the calmini style or shrockworks. Those things are HEAVY! They have zero upper mounting. I have relocated a few of those after BLs. http://nissannut.com/projects/Bumper_lift
-
Few more pix. Winch plate added. I just realized I should have put this in the How to, maybe...

