- Sign In Changes: You now need to sign in using the email address associated with your account, combined with your current password. Using your display name and password is no longer supported.
- If you are currently trying to register, are not receiving the validation email, and are using an Outlook, Hotmail or Yahoo domain email address, please change your email address to something other than those (or temporary email providers). These domains are known to have problems delivering emails from the community.

peejay
-
Posts
137 -
Joined
-
Last visited
-
Days Won
8
Content Type
Profiles
Forums
Calendar
Everything posted by peejay
-
ALWAYS.
-
I was able to find some D21 window channel parts on AliExpress that are no longer available in the states, you may wanna try there. Do you have a part number?
-
Fuel injectors (and other junkyard finds)
peejay replied to Aonghus's topic in 90-95 WD21 Pathfinders
[A proper] FSM-worthy explanation as always, slart, thank you! -
Nope, I probably should've done better at studying the online images... and to the best of my searching, can't find anyone who makes the female nissan terminal...so off to splicey-splicey land!
-
Fuel injectors (and other junkyard finds)
peejay replied to Aonghus's topic in 90-95 WD21 Pathfinders
Yep, that's it. They are known to cause problems, but someone somewhere in the interwebs (i'll share the link when i find it), dismantled one and improved upon the design with some readily-available parts. Discontinued from Nissan. I'm not sure when ABS was added, but if it has that doo-dad, grab it, again, discontinued! -
Fuel injectors (and other junkyard finds)
peejay replied to Aonghus's topic in 90-95 WD21 Pathfinders
- fan shroud - Anti Skid Actuator for the ABS - clutch damper -
The harness adapters finally arrived...I'll (hopefully) connect them tomorrow and post an update/pics.
-
There just has to be that one forum member...
-
"Known good" always cracks me up, especially when it comes to the ECU. Like everybody has a known good, vehicle-specific ECU just laying around!
-
For me, it's the fact that it's just that ONE plug! If they made that entire bank hard to get to, maybe I'd only be half annoyed!
-
Still waiting on the adapter harnesses to get here, supposed to be Monday!
-
Following this, because I remember one of my shifts being grindy, but can't remember which one...also used MT-90, and thought I over-filled it but it's been so long I can't remember!
-
You should be pun-ished for that one... I believe the injectors are identical, other than the connector, so once the VG30 supplies completely dry up, the VG33 should be a viable option, other than having to get/make adapters, splice. (I didn't remove any of the VG33 injectors to compare, but the rails, caps, hardware...everything looks nearly identical.)
-
Well, yay and GRRRRRRR at the same time... Tested the VG33 rail, and everything lines up: However, I lost the #3 cushion in the process: This makes the 3rd or 4th one I've lost! Guess that's one way Nissan makes sure you use new cushions! Gotta order the connector adapters anyway, so back to the waiting game. *** Edit: Finally some good luck! Found a lone cushion in a box of non-car part stuff! That'll teach my wife to encourage my inability to throw things away! (Ok, Slart, so I really wanna try those J.I.S. bits out, but looks like I may not have to (yet), plus they are probably coming from the mainland, so who knows how long that'll be, I was too cheap to order a set of Vessels right now...and I like some of the injector testing methods you described. With these cheapies, who knows if it's a flow thing, or pintle not seating properly, etc. And I did peer at least into the intake runners to see if the cushion found it's way in there, got a so-so look at the top of the valves, nothing to write home about).
-
Apologies for the novel, I tried to make it more of a novella! I did see that RockAuto carries the VG33 injectors (Beck-Arnley), well, they had 5 left as of yesterday, but yeah, VG30 is unobtainium. The VG33 ones I have ohmed out ok (12.0), but they've just been sitting in my parts pile, so can't hurt. Waiting on my J.I.S. bits to come in, or may order some Vessel screwdrivers,won't be reusing that hardware but wanna see if it makes a difference, using a phillips on the screws gave me fits last go-round. I had timing issues on a 16V VW many years ago, and how it ran reminded me of this Pathfinder, but off by one tooth was not to be. I'm gonna try and get a borescope down the cylinders before I button it back up to see if there's any fuel hanging out in there.
-
The rails... I'll get up the nerve tomorrow to see if the VG33 will drop right in (or does someone already know if it will/won't?). If not, I'll begin the annoying task of removing the VG33 injectors and putting them in the VG30 rails. (Edit: holes in rail mounting ears look larger on the VG30...)
-
Is that tool for testing the injectors probably out of the scope for the DIY shadetree mechanic? I've seen some in pro setups testing these cheap injectors (shoulda known better, I paid $70 for a set of 6, when I probably should've expected to pay that per injector). I might keep these cheapies around just for test purposes down the road. (I've become fascinated with googling "cheap injectors" and all the comments are the same: avoid, could cost thousands of dollars in the end, etc.) All plugs (I'm just gonna guess on #6!) were definitely fouled and sooty. When I removed one plug, you could still see fuel vapor billowing from the hole, for SEVERAL seconds. Guess it's good I came to my senses before hydrolocking the darn thing? I mentioned that Z31 conversion, because when I googled "nissan injector upgrade" or something like that, Z cars were the only thing that came up. Looks like the Z cars use injectors with a longer pintle. The VG30 and VG33 "truck" injectors look identical to me, except the change from the Bosch EV1 connector to the PROPRIETARY Nissan connector. I just got the upper plenum off, once I get the rail removed, I'm gonna see if they will simply swap over (the donor engine is a '00 Pathfinder). And CZP makes adapter harnesses with Bosch EV1 on one end and Nissan PROPRIETARY (can you tell that annoys me?) on the other. Was gonna try and make my own, but de-pinning that PROPRIETARY (last time, I promise) Nissan connector looks like a nightmare. Will follow-up as I progress!
-
Logic, eh, Slart? Ok, I will play your game! Thanks for mentioning @Cuong Nguyen, I did not heed the warnings and I did purchase those very injectors that were cautioned against. Now, at the time, they ohmed out correctly, were installed, and the injector (51) code went away, so I assumed all was well! And it looks like the only way to get injectors now is pay out the nose (AutoZone), or send them off to be rebuilt? *** Now, indulge me in this game! Let's pretend I just bought this vehicle/it was given to me as, "I dunno, it was running, now it won't idle and it's got black smoke, but it's yours" (hmmm, might be precursor to a listing of my own!). So it's showing no codes, but not running right, and somehow this forum (and the FSM) led me to "have you checked the injectors"? And then I check them, and the resistance is within spec (haven't checked that again yet, it's on the list), and they pass the rotate the distributor and hear them fire test (also gonna do this), and the fuel pump/pressure regulator show as ok (i did do this, and the numbers are correct and it holds pressure, which should rule out leaking injectors?)...anyhoo, if "the new owner" did all these injector checks and they passed, could they still be bad? maybe they only show as bad when running? and how would i check that? Thanks for playing! As much as I'd hate to pull these injectors again, I'd much rather that than an engine rebuild! *** Edit #2: @SlartibartfastYou may've just opened a whole new can of worms! Now I'm looking at doing the "Z31 Late Model Injector Swap". The kits look promising, but what could potentially be even better is, the rail I pulled from the VG33 may be a drop-in on the VG30 intake manifold. In which case then I may only need the Bosch EV1 to EV6 adapters, which I've ordered! Stay "tuned"! (And back to the "bad" injectors, I'm thinking they could pass all the electrical tests, but if they are cheap knock-offs, the flow characteristics may be WAY off, so the ECM is doing its job, but its relaying the info to injectors that possibly have the wrong "profile", like the nozzle pattern could be "Full" as opposed to "Cone", in water hose nozzle parlance!
-
That's what I'm afraid of, adamzan, that moving it "one tooth" is just gonna throw it off on the other side of the mark, leaving me "back" where I started. Maybe the old timing belt jumped, which I don't think it did. Will report back my findings, thanks all! Edit: Nope...one tooth ahead was pointing way off, I think it's correct where it is, sadly. On to the leak-down test!
-
Okay, I don't remember ever pulling the distributor since I had the thing running a dog's age ago, but I recentered it within the adjustment bolt, and looking at this pic, looks like it could be a tooth off? So I'll pull it and try to better align it with that imaginary green line, can't hurt, right?
-
Well...how much time ya got? Okay, the truck was my daily driver until it wasn't, it got relegated to weekend warrior around 2016. And one day I went to drive it and got the code 51 for injector circuit. I checked the resistance of the injectors, if I recall 4/6 were bad, so I replaced them all. And by replaced, I mean, bought them in 2021, and finally got them installed and test-fired the vehicle in 2024! So yeah, it sat all that time, and not sure what harm that did. When it did fire up, it would idle rough, was hard to keep running. Oh, and the water pump bearing had gone out/was squealing, so I figured I'd change that and replace the timing belt while in there. Did that, still the rough idle. I figured now was a good time to change the oil, and when I did, it reeked of fuel. Uh-oh...My fear was (and still is) that all that sitting somehow the rings got stuck. But the smoke that it produced was more black/grey than blue. And that's where I am today. I can barely keep it running without feathering the pedal to even check the ignition timing. When I got even close, it looked like it was retarded, but you know these distributors have a small range of adjustment, so I figured if the timing couldn't be corrected with the distributor, then the cam timing must be off, hence me pulling that and rechecking. It passes all of the diagnostic mode checks. The only "aha, there's your problem!" is when I was doing the timing belt, the passenger's side cam gear jumped ahead on me and few (maybe 6-8?) teeth, and I thought, "uh-oh, some valves maybe hit the pistons and got bent", but that could be my paranoia, or, yes, that can happen even in a non-running engine? I figured the leak down test (which I am NOT looking forward to, looking at you, No. 6 cylinder), would reveal if something is wrong internally with the engine.
-
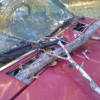
Thanks, Slart! Realized some of the sprocket was cut off after I uploaded, sorry about that, how's this: As for those missing bolts, I thought those mounting holes where "shared" by the cover bolts, but I could be wrong, about that, too! And for the gaskets, I thought I used the VG30 ones, but I'll double-check that, too, could be the source of a vacuum leak.
-
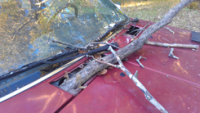
Can't seem to get this darn thing running right, so thought I'd recheck my timing belt install, does anything look off here? (I know that the "straight" line marks on the belt aren't lined up with the camshaft sprocket dimples). Next step is leak-down test if everything here checks out.
-
More physics, I see! (Got weird, slartifbartfast??? ) I tested the CTS/ECT (disconnected), all seems good there, slight corrosion on the positive side, gonna clean that just for peace of mind. I did download a few more FSM's, didn't know about the body sonic system, Nissan was ahead of it's time, I do remember the digital dashes and what nots in the early Maximas and Z's. Thanks as always for your help!
-
Okay, last one, I promise! (assuming this is correct): coolant exits the front of the intake manifold --> enters the Water outlet housing --> is SUCKED down the bypass hose, into the thermostat housing by the centrifugal force of the water pump... why isn't coolant also sucked in from the upper radiator hose (and therefore the radiator) when this happens? if this is what happens... physics? magic trick?


