-
Posts
71 -
Joined
-
Last visited
-
Days Won
4
Content Type
Profiles
Forums
Calendar
Everything posted by peejay
-
Good to know!
-
That stinks for sure, sorry. You've already got your eyes on another one, though, right???
-
I thought: right-angle blue bung (leftmost, companion switch mounts under dash) was for CC cancel green bung - (middle) ?? Big blue bung (rightmost, companion switch mounts on support bracket on floorboard) was for starting circuit I'll look at the FSM harness layout section again, see if it gives any clues
-
Thanks, Frenchy, that worked! I'll admit, I was nervous about using the switches to force the gum drops into the holes, but nothing else was working! I'm more nervous about working on most things on this truck now than I was 10 years ago when parts were more readily available! Oh, what does the "green gum drop" do, since I don't seem to have a switch that it matches up to...is it some cool feature that I don't have???
-
wait a minute... could it be that the diagram is wrong (or i interpreted the part numbers/dotted lines wrong???) according to the diagram, the GREEN bumper is for the clutch pedal start switch...and the BLUE bumper cancels the cruise control...but based on the size of the "nib" in each bumper, and the sizes of the holes in the pedal mounts, that should be reversed...GREEN is for cruise control and BLUE is for clutch/start circuit? (*** Edit ***) I'm gonna try a hex bit socket pressed firmly against the middle of the button(s)...
-
Me again... Any sure-fire (easy!) methods for installing the clutch/brake bumpers? Heat 'em in warm water? What I've tried so far: - greasing it, and pushing it on (nope!) - protecting jaws of slip-joint pliers (tape and cardboard, nope!) Next steps: - get a smaller (2") ratcheting C-clamp...i need to go to HF anyway, right???
-
SUCCESS, ladies and gents! Long story short, I think hammering on the m/c is what did it... The extended version, I used a conical grinding bit on the rotary tool, to dig enough of a groove to get some blows in with the chisel. (Never got close enough to the threads to make a "seam" there). Was getting frustrated at it still not coming loose, turned my attention back to hammering on the m/c from the inside, peeked my head back around and saw that there was more clearance now at the top stud! Then gave it a yank, and voila! Thanks again for all your help and suggested approaches!
-
Okay, Slart, you've given me more options to consider! (I probably should mention that I like buying (cheap) tools!) - I put penetrant (just liquid wrench) on the hoses, nada...may step up to pb blaster, then kroil, and/or use the picks to get some wiggle room, as you suggested. - got the bright idea to maybe try an oscillating tool, with the blade turned 90 degrees...while it does fit in the space, it is a TIGHT fit, not sure it would do much good, even if I had unfettered access - the dremel right angle attachment came, but doesn't fit the chicago electric rotary tool i've been itching to replace, so picked up one from hyper tough and the dremel attachment fits, so will test that tomorrow - since you mentioned BUTANE, i started looking at those micro torches, found one with an adjustable head, should be here tomorrow (also saw the dremel pencil one, too, but that looks more for soldering, think i may possibly need a flame instead of an "iron" type heat transfer) - may use a mirror to see if the studs are the same whether AT/MT, knocking it out from the front could be an option more to come!
-
Update...the M/C is STILL on there, but slowly "chipping away" at it: - heat gun with concentrator nozzle didn't work...addition of kroil didn't work, either - had to remove the washer reservoir* and charcoal canister to make more room for the 12" chisel, still a tight fit *was unable to fully remove the washer reservoir...any tips on disconnecting the hoses? seems nissan wants me to break the nibs on the reservoir - the rotary tool was able to make a SMALL "nick" in the ear...ordered the right angle attachment to see if i can get a better angle, may couple that with the flex shaft - this is annoying...
-
Well, the heat gun in "stock" form didn't work. Have since ordered the cone accessories to better concentrate/direct the heat, coupled with the Kroil that also arrived. (Currently using a wood block to keep the heat away from the wiper reservoir area). Have been trying with the ratchet strap, (not using the ratchet feature), just my "brute strength" to yank on it, the m/c will move SLIGHTLY, but really only from the top stud, towards the left front tire, can't get it to move towards the right front tire at all. If the heat won't get it, and dremel contraption is gonna be cumbersome, gonna protect/give some clearance to the stud threads (rubber hose, old credit card, etc) and try and chisel the ear and bend whatever gap I can make. Will try and post pics when I hit pay dirt! (Oh, thanks for chiming in, Slart, you helped me make sense of the EGR solenoid circuit many moons ago!)
-
Have you tried car-part dot com? Looks like they have one from a '92 XE MT 4x2, maybe you could swap the good bits if need be?
-
I may try the heat gun! I have a bernzomatic torch/MAPP, but i'm VERY nervous about using it in that confined area (paint on the firewall, discoloring/ harming the stud, anything that may burn/melt on the inside...I've been "burned" once before with that torch on an ATV carb, when patience and penetrant alone probably would've sufficed). The kroil and cold chisel should be here today... Got some cutoff discs, just using that as a last resort... (Toying around with a rotary tool/flex shaft, but even that may be tight). I may need to yank the washer reservoir first (and possibly the brake booster) to get max working room...
-
NOW I'm on the trolley! Getting the m/c to rotate around the lower stud sounds like the way, it's just going to take me ALOT of gulp, patience to get there. (Forgot to add the disclaimer that this is near the extreme end of shade tree...no air compressor, no AC outlet...so hand tools and at most a cordless rotary tool...wish me luck!) Thanks, will post my "progress"!
-
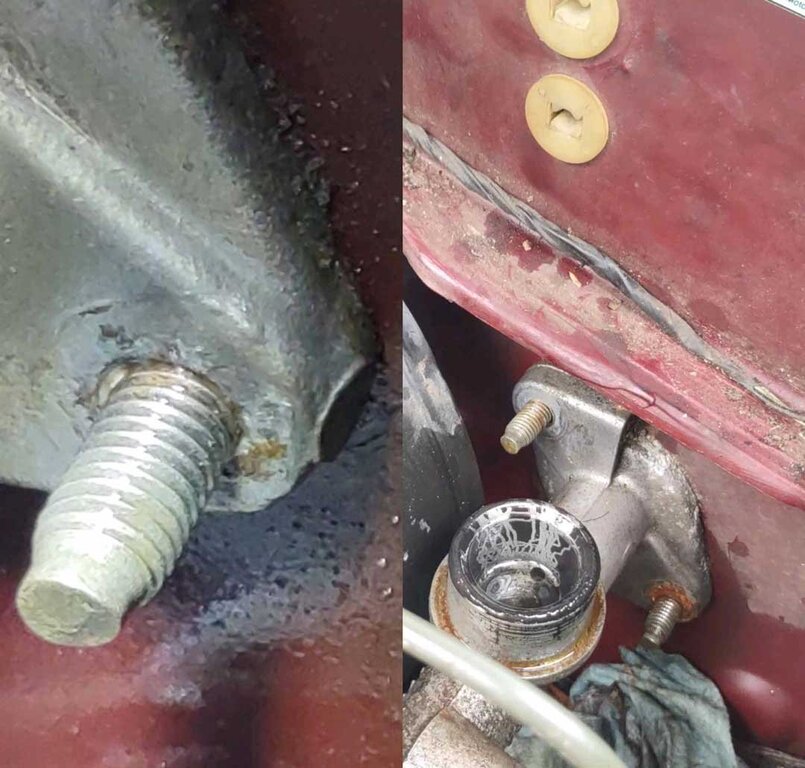
Thanks for the tips! I wanted to avoid (if possible) hammering from the top or bottom to reduce the likelihood of deforming the studs. You can't see any "daylight" around the threads of that lower stud, telling me that the threads are fused with the master cylinder. I'm leaning towards carefully use of a cold chisel in the area, maybe a slit in the 3 o'clock position, enough to wedge a screwdriver or something in to free the m/c from the stud.
-
Okay all, getting that "no, don't do THAT!!!” feeling, how in the heck do I remove this clutch m/c, it appears it has fused onto the lower stud? Tried beating on it from the inside (rubber mallet, long wooden dowel), no dice. Tried wire brushing and pb blaster, nope. Got some better brushes and kroil on order, trying to avoid heat (MAPP gas) and a cold chisel, if possible. Also, when/if I DO manage to get it free, is the m/c going to "easily" clear the brake booster? Thanks!
-
Thanks, RCWD21, I seem to recall reading that somewhere. Guess with a 5-gal reserve there's no excuse for running out-of-gas!
-
(1994 Pathfinder, V6) I apologize if this was posted before, I searched (briefly!) but couldn't find it... Trying to determine if I have a 15 or 21-gal tank, without having to run the thing empty! The fuel gauge is reading incorrectly... Let's 'assume' I'm getting 16mpg 'conservative' city driving... I reset the trip odometer the last time I filled up... Say I make it to the gas station with 240.0 miles showing...(and 16mpg x 15.0 gal = 240.0!) If it takes around 15-gallons to fill up the tank, do I have a 15-gallon tank? (That's what happened the last time, I don't think I've EVER come close to putting 21-gallons in this vehicle).
-
Slarti! How's it going? EGR valve/circuit is still working like a champ! You were able to section and weld your frame, no? Still lookin good as new?
-
Thanks, PathyAndTheJets! Sounds like a straighforward plan to follow! When/if I get a better frame, I'll post pics to document the procedure!
-
Thinking of getting a frame from the junkyard to replace mine that's got the rear frame rot. Are there things I can do to the "new" frame to keep it from suffering the same fate as the old one? Thanks!
-
Great suggeston, precise! I like the idea of the title containing the location/items! And of course, the threads could be deleted after a set time, and reposted if the vehicles are still on the lot!
-
Hi, all, what say you (and moderators) to a forum/sticky for vehicles we find in salvage yards, to help in our seach for hard-to-find parts? we can give the name of the yard(s) in a PM so as not to be freely advertising for these businesses? for example, i found these two in a yard near me (PM for info), the '90 maroon/gold one has the disc brake rear end with posi trac (i spun one side, the other side turned in the same directions), and the green '94 has all the lego wheels (as of today). IMAG0558 by Tamiya Striker, on Flickr IMAG0562 by Tamiya Striker, on Flickr IMAG0567 by Tamiya Striker, on Flickr IMAG0568 by Tamiya Striker, on Flickr
-
Thanks for the replies! I'd like to steer away from running it to empty, reading about fuel pump failure and what not...and the fuel pump gets VERY noisy right now when the gauge gets on E... Also, maybe the previous owner had the tank replaced before I got the truck? I will try and measure it as best I can in-vehicle...if it turns out to be a 15-gal, and i find a 20-gal, i will try to take and post side-by-side pictures of both tanks! Oh, right now I get aboug 240 miles on a full tank, and that's mostly city driving, no more than 60mph on the highways...
-
Ahem, that's "Precisely" the information I was looking for! Thanks!
-
Sorry to revive an old thread, but did anybody come up with a way to visibly tell the difference between a 15-gal and a 20/21-gal tank? The owner's manual shows my 94 as supposedly having a 21-gal tank, but i have NEVER been able to put more than 13 gallons in it after driving on E for a day or so! I'd like to know if any junkyard tanks I pull (or order) are indeed a 20+ gal model! Thanks!


