
1999R50
-
Posts
55 -
Joined
-
Last visited
Content Type
Profiles
Forums
Calendar
Everything posted by 1999R50
-
When I built my front and rear bumpers I priced out 2x6 .125 wall tubing. From a small place they wanted $185 for 24'(1 length). I priced out at The Metal Supermarket, a franchise, they wanted $175. I found a place that was a wholesaler that sold to the public, I went there, torched off 1 length into 4 pieces. I paid $106. Go through you local phone book and price out what you need from everyone who sells. You are bound to find someone who isn't trying to make a killing.
-
Custom Winch Mount and Fairlead
1999R50 replied to 1999R50's topic in Solid Axle Swaps, Hardcore Custom Fab
I was excited to try it and couldn't get stuck so I just said " I just pull my self up this hill". -
Well I purchased a M8000 winch from a guy on CNTC. It came with a trailer hitch mount. This wouldn't do because I don't have a 2" adapter on my front bumper. So I made my own winch mount that would use the handy dandy 5/8-11 tapped holes I put in my front and rear bumpers. Having access to an excellent tool shop in combination with being extremely cheap, I decided to save the $50 for a princess auto fairlead and made my own. It took a couple hours to find all the material, decide how I wanted to go about it and build it. But in the end, it worked well.
-
front bumper build pics please
1999R50 replied to flyinwall's topic in Solid Axle Swaps, Hardcore Custom Fab
All you need to make this one is a chop saw, a disc grinder a welder and a drill press. Everything else is bonus. -
Custom Rear Bumper and Tire Carrier
1999R50 replied to 1999R50's topic in Solid Axle Swaps, Hardcore Custom Fab
I have since cable tied the plate to the spare tire. I actually look forward to some cocky civic driver to ride my tail a little to close. Just a tap of the brakes... -
I am a Tool and Die maker. I mostly make tools that make outer belt moldings for cars.
-
Custom Rear Bumper and Tire Carrier
1999R50 replied to 1999R50's topic in Solid Axle Swaps, Hardcore Custom Fab
If anyone would like to buy either of these bumpers I would be willing to sell them. Shipping would be terrible so it would have to be someone within a few hours of Newmarket. But if you want to drive or get it shipped, by all means. -
Custom Rear Bumper and Tire Carrier
1999R50 replied to 1999R50's topic in Solid Axle Swaps, Hardcore Custom Fab
Just start. And if you can't figure it out, ask Google. -
Custom Rear Bumper and Tire Carrier
1999R50 replied to 1999R50's topic in Solid Axle Swaps, Hardcore Custom Fab
The wax is just regular turtle wax. Yes I did. Being my first bumper, it took about 18 hours with the skid plate. -
Here are a couple of pics of the intake taken apart. You can see here how the MAFS is mounted.
-
Custom Rear Bumper and Tire Carrier
1999R50 replied to 1999R50's topic in Solid Axle Swaps, Hardcore Custom Fab
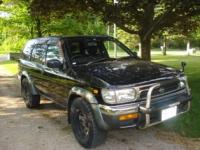
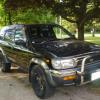
Here are the photos of the front Bumper with the bash guard. The white stuff on the bumper is wax. While waxing the truck for the pre-winter preparation, I decided to continue on to the bumper as well. -
Custom Rear Bumper and Tire Carrier
1999R50 replied to 1999R50's topic in Solid Axle Swaps, Hardcore Custom Fab
This is what the hinge looks like. i turned it up and pressed a bearing in either end. and then welded the piece to the end of the bottom of the tire carrier. Above in the post i spoke of the milling which I had to do. I milled out the sections for the bumper mounts and on the back of where I wanted to bend. I used a 3/8 roughing endmill to do all of it. The reason I put a pillar with the 5/8-11 tapped hole in it for my hinge was because I felt that the wall thickness was not enough to withstand the force of the tire carrier while it was swung out. I felt that it would bend the tubing over time. Did you weld the nut to the bolt? I would be afraid of it coming loose over time if you didn't. Bronze bushing is fine. It wont rust which is nice, and it can take alot of force. It definitely isn't your weakest link. I used the bearings because I wanted it to feel perfectly smooth when I swing it out. The other advantage of the bearings is that when they wear out, in many many years, I can just press them out and replace them. What more did you want pictures of? -
Custom Rear Bumper and Tire Carrier
1999R50 replied to 1999R50's topic in Solid Axle Swaps, Hardcore Custom Fab
My front bumper has been done for a while. i will post some pics when i get a chance to take some. I also prefer the centered tire at the back. However, with the off center tire you can still see out the back window. -
Custom Rear Bumper and Tire Carrier
1999R50 replied to 1999R50's topic in Solid Axle Swaps, Hardcore Custom Fab
I paid $106 cash for a 24' of 2x6 tubing. I paid $40 for the pieces of 2x4 because I didn't have time to pick up a length because I was in a hurry due to the snow piling up. So $26.5+$40 + the material for the tire carrier, so about $45 or less. $111.5 + a few new longer bolts here and there, $10. 1/2x3 hot rolled for the bumper mounts. $25 Trailer hitch receiver from princess auto $8 2 cans of truck bed liner $25 And the most expensive piece, the toggle clamp. $60 So about $239.5 and 11 hours work -
Custom Rear Bumper and Tire Carrier
1999R50 replied to 1999R50's topic in Solid Axle Swaps, Hardcore Custom Fab
The pin for the receiver goes behind the bumper. I think it looks nicer that way. The bolts are keeping the tapped holes clean. I put 1.5"x1.5"x 3.5" blocks through the bumper welded all around and welded to the bumper mounts. I then tapped a 5/8-11 tapped hole in each of the(I have them on the front as well). I didn't like how most peoples custom bumpers have the shackle's. So I use 5/8-11 hoist rings. http://www.mcmaster.com/#hoist-rings/=a6dbym The other advantage to the 5/8-11 tapped holes is that you can make adapters to mount anything you want and it is guaranteed to be strong because it is mounted directly to frame. I also use hoist rings for chain. http://www.mcmaster.com/#hoist-rings/=a6dcrd This way you are screwing in the chain directly to the frame through the tapped hole. I found it to be very convenient on the front bumper I made, so I decided to do the same on the back. -
Bender Built WD21 Rear Bumper
1999R50 replied to nige's topic in Solid Axle Swaps, Hardcore Custom Fab
What did you do down the sides toward the wheel wells? It looks pretty thin. I think you should have made it a little more strong. Besides that it looks pretty good. What wall thickness did you use for the 2x4 spine? -
Well. While looking on the net at different Pathys I got inspiration to build my self a rear bumper to match my front one. I also decided to add a tire carrier. Here is where it started I then wanted to remake the trailer hitch mounts so I could easily remove the bumper without too much hassle, but still maintain strength. So I than milled out the sections for the mounts and for the bends I welded in a pillar with a 5/8-11 tapped hole in it to use a shoulder bolt for the bearing surface. I made a piece of 2" round stock 2" long with recesses on either side and pressed in 1.625 OD .625 ID bearings. Now here it is assembled and painted with spray on truck bed liner For those of you who care to know. The material used for the main section is 2x6 .125 wall. It is flared up to 4". I then used 2x4 .1875 wall(because I couldn't get .125 in the time frame I needed) to go down the sides to the wheel wells. The angle I bend it in on either side to suit the profile of the rear of the vehicle was 7.5 degrees(Half of the angle that was needed on the front.) So therefore I slotted .263" down the back of the tubing for the bend. The toggle clamp I used for the tire carrier was provided by Fox.
-
I don't think its running rich. It seems to run fine. Can't really give a fuel efficiency comparison with all the snow we have been having. 4WD in combination with cold seems to suck a lot of gas.
-
Sure, I will take it apart and take some photos. I have been running it for 2 weeks now with no problem. I just drilled a 7/8 hole with a step drill for the MAF and then transferred the mounting holes and used some self small wood screws. The MAF uses a calculation based on the internal diameter of the pipe it is in which was something like 2 3/4. So the pipe I used was 3" ABS so therefore, it works fine, no problem. Yes I should paint it black. It would make it look less like the plumbing section of Home Hardware.
-
It stays in place quite nice. I have been checking it daily because I am paranoid that it will fall off, but it hasn't budged.
-
Exactly. Its accually the piece that really made the whole thing work. The intake goes from 3" at the mass air flow sensor down to 2 3/4" and that adapter worked perfect.
-
Cost me about $50 . $25 for filter from Canadian Tire. and $25 for the toilet connector, some sleeve with hose clamps and some abs pipe. Works great. feel the power increase right away.
-
-
i live in Ontario. If you want to pay shipping i will mail you the ones i took out when I put in my lift... They are still in good condition
-
Trail Gear Rock Sliders on R50
1999R50 replied to SilverPath's topic in Solid Axle Swaps, Hardcore Custom Fab
Does anyone think that these sliders would be a catch point for snow in the winter?
