
- Sign In Changes: You now need to sign in using the email address associated with your account, combined with your current password. Using your display name and password is no longer supported.
- If you are currently trying to register, are not receiving the validation email, and are using an Outlook, Hotmail or Yahoo domain email address, please change your email address to something other than those (or temporary email providers). These domains are known to have problems delivering emails from the community.
Leaderboard

Popular Content
Showing content with the highest reputation on 04/19/2023 in Posts
-
Hey ya'll! Starting this thread to document my latest project which is DIY rebuilding a junkyard RE4R01A transmission from an '01 VQ35DE pathfinder to revive my recent project R50 purchase with a known bad high clutch pack. I want my R50 to be a Colorado mountain adventure vehicle I can trust to drive far from home and have peace of mind towing a small camper redlining up high altitude inclines without worrying about having a high mileage black box for a transmission. I've never done this before but here are the main resources I'm using for information: 1) Nissan FSM off NicoClub, AT section for diagrams and basic procedures 2) Curmudgeon Transmission's excellent 1 hour and 37 minute video going over the entire rebuild process in detail, with gotchas. Parts list: - Junkyard transmission, high mileage - $150 - PA Cargo / Transtec overhaul kit - $130 - Borg Warner band, - $15 (even though original looked totally fine, it's old so replacing it) - Raybestos high energy frictions - $80 - PA Cargo bushing kit - $25 - Brand new Transtar front planet assembly (one planet has more play than the rest after dissassembly)... I bought the last one in stock anywhere...! - $70 - TransGo valve body shift kit upgrade - $50 Yesterday I pulled most of the transmission apart into component assemblies before deciding to stop and get a better pair of snap ring pliers. My plan is to attack each complex component assembly containing seals, frictions, springs, etc individually to avoid having a giant pile of similar looking parts that could potentially get mixed up. I'll bounce back and forth between Curmudgeon's disassembly and rebuild videos for each major component, doing one at a time until I've got a pile of assemblies ready to go back into the case. Images from 1 hour into the disassembly - Note wear found on the reverse drum bushing, steel is showing through the copper. Incidentally there was a normal amount of copper colored glitter in the pan (no chunks), hoping it's just that and the front planet washers which are known to wear: https://imgur.com/a/2YQFQA72 points
-
I would avoid moog branded upper ball joints if you can. They are absolute trash on this platform (and apparently moog parts now just suck in general). The AC Delco greasable ones have treated me well for years now.2 points
-
Update: just need to get the new torsion bars in and level her out!1 point
-
Found a great spot for a photo![emoji3531] Enviado desde mi iPhone utilizando Tapatalk1 point
-
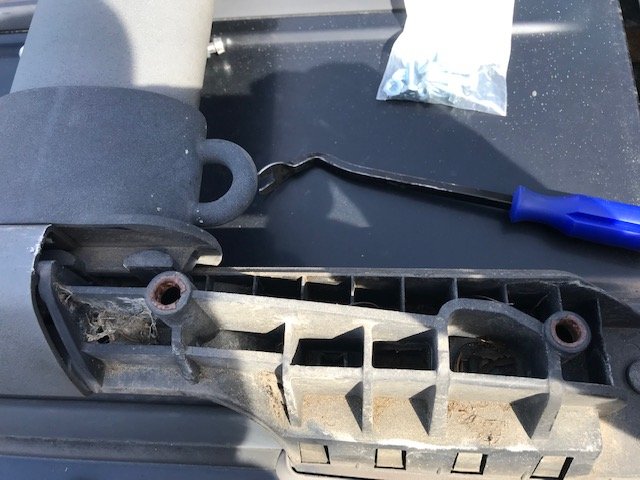
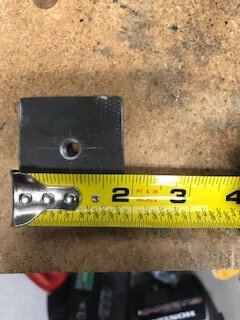
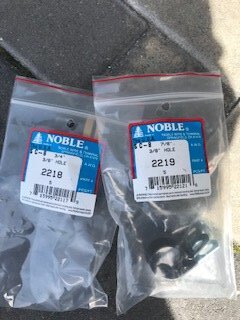
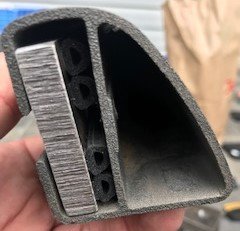
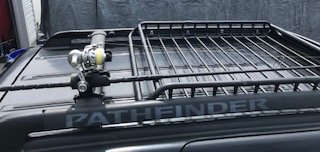
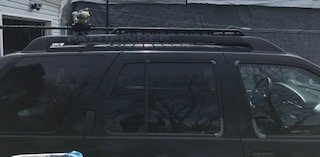
I recently went about putting a roof cargo basket on my kids 2003 SE R50 and I thought I would document it due to the fact I have seen a number of threads which were good but perhaps missing information or pictures which would help. Here goes. The project started with 3 goals: 1) put a cheap cargo basket in between the raised roof rails, 2) Have somewhere to put an LED light bar 3) Keep roof rail to attach fishing rod rack. The $99 Haul-Master basket at Harbor Freight is what we purchased because it looked like it might fit and it was cheaper than name brands. Here is the link to one we used. 150 Lb. Capacity Roof-Mounted Steel Cargo Carrier (harborfreight.com) We didn't want to simply put the roof basket on top of the existing rails because we didn't like the look having it stacked that high and we wanted to keep the roof rail(s) to attach things like fishing rod holder. I started with a trip to a scrap yard and stripped the roof rack assembly off 2 R50's. One was the flat roof rack and one was the raised rails like we already have. For $75 each it helped to learn how to remove the components and plus we had extra rails and other components to experiment with. The PATHFINDER logo was gone off our current raised rails and the ones we picked still have it on. So for people who are looking to do something like this with the raised rails here are some steps with pictures. 1. You have to remove the caps and support at the back or front of the raised rails. To do this you have to pry up the caps with a screwdriver or a pry bar. You have to be careful doing this as if your R50 is 20 years old and these haven't been taken off before they are in there pretty solid and might crack. The guy at the scrap yard who removed the one we purchased cracked one and we cracked one a little. My advice is to do it when its warm. Plastic cracks easier when its cold. Also you can try pushing up from the gap in the rail. Take your time and be careful. Basically there are 2 plastic feet that go into a circle and you are trying to pry them up. See picture below. Once you get that off you just remove 2 screws from the base and one screw that holds the rail to the base on the side. I think they are T25 heads. 2. After that is off now I had to figure out how to attach the basket to the raised rails. My solution was threaded steel. I'm not a welder so I went to a shop and they made me 8 2x2 plates threaded with a 3/8 hole. See picture below. For securing the plate I used 3/8-16 x 1inch hex head cap screws and then some clamps. Also I attached some weatherstripping to the back of the plate to keep it somewhat level when sliding it through the rails. Then its just a matter of sliding the plates in and securing the basket with the bolts and clamps. I used 4 on each side for a total of 8 plates/bolts/clamps 3. I might add that I removed one of the rails all together in the end. I kept 1 in the back to mount my fishing rod holder. I pushed the rack up front as far as possible. Then you put everything back together by connecting the side rail to the end base with 1 screw and then putting 2 screws back from the base to the roof. The next part of the project will probably be to find an LED bar to attach either to the rack OR the bolts under the wind fairing. There are a couple bolts there that can be used with brackets I think.
 1 point
 -
Has anyone installed a shift kit on their rig? I picked up a super clean 04 with 104k Miles. I’ve taken out the power valves and did some intake smoothing. About to order some intake spacers and 75mm throttle body. Home built intake removed silencers but kept stock box. Raised Mass air meter for now to help lean her out a little worked great. Will be working on some custom headers and installing true dual exhaust. This is my first pathfinder and absolutely love it. Lowering her a couple inches in a few months when I install new rear suspension kit. My wife has a Durango RT with CAI and Tune my path walks it from a dead stop. I’ts got lazy shifts at wot needs a shift kit.1 point
-
That's good stuff man! Sent from my SAMSUNG-SM-N920A using Tapatalk1 point
-
I haven't posted a pic here since I joined last year. Here she is after my 2" lift1 point

